So you’ve got got your source code into Git, you’ve learned how to work with your repository in a basic fashion and you’ve pushed it onto another server for safe storage. There are a few more tricks to using Git that will make the journey easier and are worth looking at before continuing. Although you’ll become more confortable with Git’s approach to source control over time knowing that the following features exist and how to use them will save you a lot later.
There are a number of really awesome things that Git does well and can be wielded to the great advantage of you and your team.
The main one however directly relates to the fact that Commits and Branches are incredibly cheap which we’ll cover further in this post.
Table of contents
- Pulling down someone else’s code.
- Making smaller commits with staged hunks.
- Amend your last commit if you’ve missed something.
- Save half-baked ideas for later with Stashing.
- Going back to the future and rewriting history.
Pulling down someone else’s code (cloning)
In the previous part of this blog series I showed you how to add a remote to your Git repository and push your code up to it. This works great when you have a project and are wanting to share it.
In a lot of cases you’ll simply want to grab someone else’s code in it’s entirety though and the fastest way to do this is with the git clone command.
On the command prompt you move to a folder where you’d like to clone your project into and simply enter the following (fill in your repository Url).
git clone http://username@localhost/my-first-repository.git
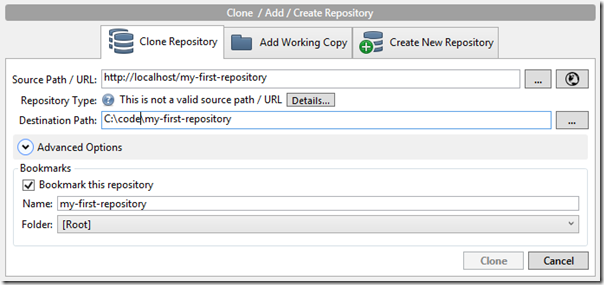
In Source Tree this is done by simply pressing the  button.
This will popup a dialog like below where you can enter the path you want the remote code into and the Url/path you’re going to clone it from.
Commit all things, and commit them often!
VCS tools like SVN and TFS don’t lend themselves well to making commits often. I’ve seen many developers limit their commits to one commit per task. While this does allow developers to see what code is related to a single task in a complete commit this actually often leaves a lot to be desired when it comes to retracing the developers steps as the task has grown. This also often over simplifies what was involved in the feature as code changes in a single file get lumped into a single commit. This means the changes can get lost as they’re “rounded up” into a single commit.
Take this example. In this file I’ve made two completely separate changes which are really clear when viewing viewed by Beyond Compare.
What is in this code change is actually two different changes. A change to add a Login controller method, and a change to add a Logout controller method.
These two changes could have many lines to each method (as they are controller actions you’d hope not, but you get my point).
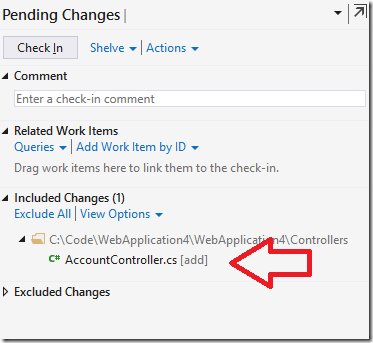
When using centralised Source Control like SVN or TFS it’s easy to fall into the trap of forgetting to commit after the first method, and then being stuck with committing the file’s change in it’s entirety. This isn’t so much as a fault of SVN or TFS, but more a human problem where you forget to commit as often as you should.
All of my changes, moved into a single commit.
This makes it hard for another developer to come along and understand what happened. And god forbid you’ve changed something 10 times in the search of a solution – the next guy has no way of seeing your thought process (or lack thereof).
Now the above problem can be solved in VCS like TFS or SVN by you committing after every little change you make. In reality we all know this never happens.
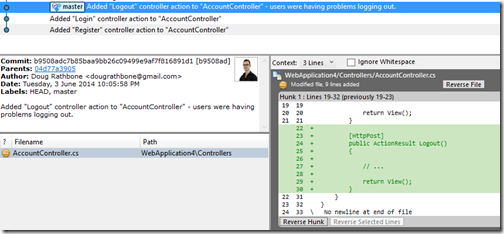
Compare this to a list of small commits for the same change in Git with the power of hunked commits.
Note the history at the top of the screen shot below. There is different commits for the different changes I’ve made.
It’s much more clear what was completed when the code changes are separated into different commits as above – Not just by me committing after every change, but actually by breaking my commits up.
Now we’ve all been there – the place where you start editing a file and before long you’ve made two changes and saved the file. Normally once this happens I’d say that you’ve lost the ability to have these high-resolution commits, but we’re using Git remember?
Git supports staging what it calls hunks of a file as a commit. This allows you to make two changes to a file, and commit them separately.
To demo this we’re going to first create a file named AccountController.cs with the following contents:
namespace WepApp.Controllers
{
    public class AccountController : Controller
    {
        [HttpPost]
        public ActionResult Register(string username, string password)
        {
            // register logic
            return Content("Registration successful");
        }
    }
}
Add and commit this file using the command-prompt (you can use SourceTree if you like, I'm just demoing the command prompt for brevity):
git add AccountController.cs
git commit –a –m "Added important file"
Now to make some changes. Update the file contents to the following:
namespace WepApp.Controllers
{
    public class AccountController : Controller
    {
        [HttpPost]
        public ActionResult Login(string username, string password)
        {
            // login logic
            return Content("Login successful");
        }

        [HttpPost]
        public ActionResult Register(string username, string password)
        {
            // register logic
            return Content("Registration successful");
        }

        [HttpPost]
        public ActionResult Logout()
        {
            // log out logic
            return Content("Logged out");
        }
    }
}
Save the file. Now we need to stage our changes but we’ve made two very separate changes to the logic in the file at once – we should really separate these changes as two separate commits for clarity for the rest of my team. This also allows my team to cherry-pick these logic changes separately if they want to pull my commit into their branch.
Now let’s see how we can do this with both the command-prompt and a GUI by using SourceTree’s powerful visual stage editor.
Git command line interactive staging
What we’re going to do is called an interactive patch staging and this allows you to elect exactly what lines of each file are staged for a commit.
Open your git bash and navigate to the folder that your git repo and the above file sits inside.
Then enter
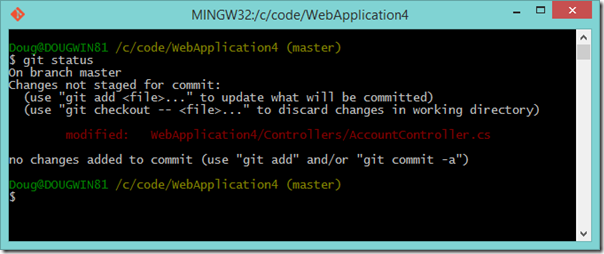
git status
This will show what files have changed. Like me you should see our AccountController from above.
You can see that my AccountController has changed, and we need to commit these changes interactively. Into your Git bash type;
git add –i
The –i is for interactive. Now press the number “5” or “p” for “patch” as we want to stage a patched commit.
This will then list the modified files. In this case it’s just our AccountController.cs select it by entering “1” and then hitting enter.
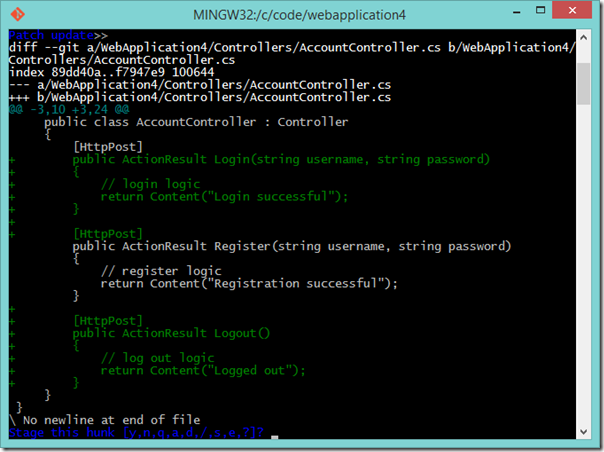
Follow this by hitting enter again. This will show you the interactive staging tool, and highlight the changes made to the file. It then provides you with a prompt asking if you’re ok with this hunk including all of the text in green.
The options for you to enter are:
y - stage this hunk
n - do not stage this hunk
q - quit; do not stage this hunk nor any of the remaining ones
a - stage this hunk and all later hunks in the file
d - do not stage this hunk nor any of the later hunks in the file
g - select a hunk to go to
/ - search for a hunk matching the given regex
j - leave this hunk undecided, see next undecided hunk
J - leave this hunk undecided, see next hunk
k - leave this hunk undecided, see previous undecided hunk
K - leave this hunk undecided, see previous hunk
s - split the current hunk into smaller hunks
e - manually edit the current hunk
What we’ll do is enter “s” to split the hunked text into multiple chunks so we can commit the two changes separately.
This will then ask if you want to stage the first hunk:
Enter “y” for yes, and you’ve now staged the Login action for commit.
Git will then show you the next changed hunk, but as we don’t want to commit this enter a “d” to leave the remaining hunked changes in our controller alone.
Follow this with a “q” to quit the interactive commit.
We can then enter “git status” to see that our AccountController is staged with some changes. It also has some unstaged changes as it appears in the unstaged list (notice that this is the same file? it’s because we’re only partially committing it).
Follow this with the normal command for a commit and you’re done!
git commit –m “Added a Login controller action to the AccountController”
And with that you’ve learned how to do hunked partial commits using the command line.
SourceTree hunked commit staging
When using Atlassian’s SourceTree, committing file hunks is even easier. SourceTree gives you a really nice and easy to use graphical interface to help you navigate the changes in your files with great clarity.
To do so open SourceTree, commit the same original file into a fresh repository, and then make the changes to your files that I showed above in the command line walkthrough.
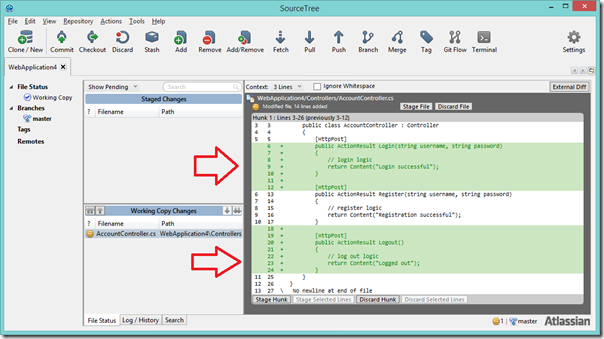
The changes will clearly show up in the staging area for you to see what has changed.
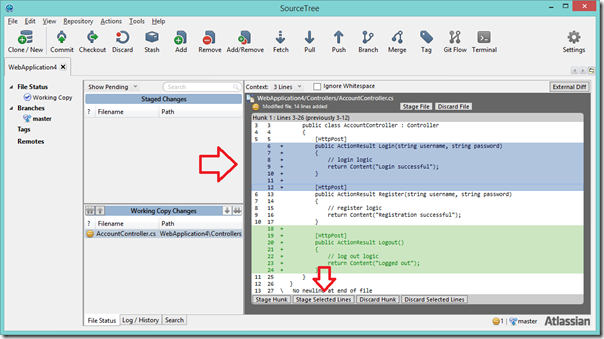
Now we can highlight just the lines we want to commit with a mouse by clicking and dragging, or by clicking and then holding shift and using the up and down arrow. This allows us to select just the lines we want to stage. We can then select “Stage Selected Lines” to stage them.
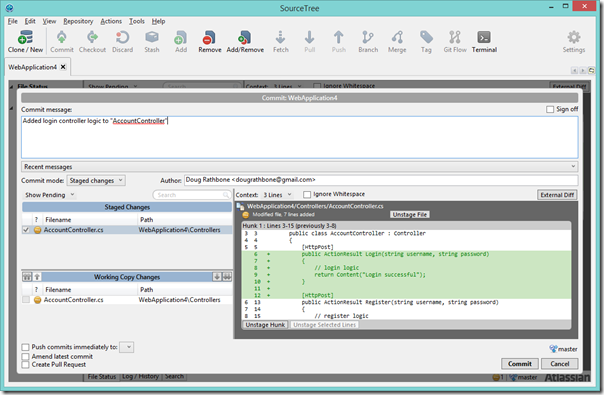
This allows you to then commit just the changes you want – in this case I’m committing just the Login controller action. Nothing else.
You can then do the same for the Logout controller in a different commit.
Amend last commit
Sometimes you’ll make a commit and realise you’ve left something out. The last thing you want to do is ruin your nice clean commit history. Git’s got you covered here, and supports amending your last commit as a first class action.
To do this in the command line, simply make your changes and type.
$ git commit --amend --no-edit
This allows you to amend the last commit also also without amending your commit message.
Doing with this in SourceTree is just as easy. Make your changes, stage them and then hit “commit” but check the “amend last commit” checkbox in the commit dialog.
Saving half-baked ideas for later
Git supports a feature called “stashing” that allows you to save an uncommited/unstaged set of files and put them to the side temporarily. You can then apply this to another branch, or just use it to try something with a clean slate for a while.
To do this in the command line, simply edit a file in your repository and do the following:
$ git status
This shows the change I made that I’d like to stash.
Then to stash my change I simply type.
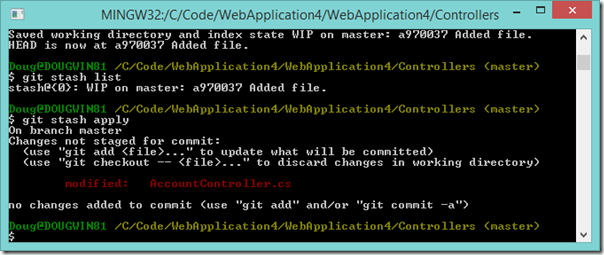
$ git stash
And it will take my change and store it.
I can list the past changes by typing:
$ git stash list
I can then reapply my last stash using
$ git stash apply
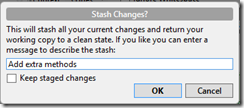
To do the same using SourceTree, simply make your change just the same and hit the “Stash” button.
Enter a name for your saved Stash, and hit OK.
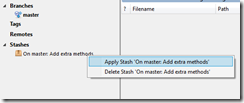
This the appears on the lower left of the SourceTree window where you can right click it while inside any branch and apply it over the top of your unstaged changes.
Apply this and you’ve got your changes back!
Rewriting History
One of the most powerful (scary?) things that git supports if the ability to rewrite history. You can actually go and remove past commits, past added files/folders and many other time-bending tasks.
These “fly backwards around the world to stop time” Superman’like abilities carry the same caveats as many other magical techniques.
With great power comes great responsibility
As a common example it allows you to go back and delete your NuGet packages files, so they don’t continue to bloat up your git repository forever more. We can do this with the git filter-branch command..
We can delete your nuget packages from the repository for ever, allowing you to just use package restore at build time.
git filter-branch basically allows you to replay and exclude (everything but) or include (only what I opt for) files, messages and committers commits from your git branch.
It’s worth taking a read of the filter-branch documentation closely, and cloning a copy of your repository to play with before continuing but once you’re up on the commands you’re able to conduct a historical removal of files and folders.
In my example below I delete the NuGet packages from a repository.
Open a command prompt or the Git Bash prompt and enter the following (ignoring the comments).
# Change the reference to "packages/" to your NuGet packages folder path
git filter-branch --index-filter "git rm -rf --cached --ignore-unmatch packages/" HEAD


# Clean up your local git cache
rm -rf .git/refs/original/
git reflog expire --all
git gc --aggressive --prune
What this does is replay the whole of the current HEAD branch and ignore any files added or changed with the path “packages/” in their repository relative file path. Powerful stuff.
You then have to do a forced to any remote repositories to make sure they take your push. By default any remote you’ve pushed to before will deny your push for safety reasons as their version of commits won’t match you local ones. This is to make sure you don’t make a mistake and rewrite something important.
To force a push this you simply enter the command.
git push -f
Kicking ass with a team
Next up we’ll walk through a common workflow to get up and moving with a team in a production environment.
Checkout the rest of the posts in this series:
- Part 1: Getting started
- Part 2: Pushing it up Somewhere
- Part 3: More than just Committing
- Part 4: Team Workflows







Comments