Web.config transformations have been around for a while now, and a lot of developers use them in their staple day-to-day environment deployment strategies – hell, Scott Hanselman was spouting about them way back in the beginning on 2010 with his “Web Deployment Made Awesome: If you’re using XCOPY, you’re doing it wrong” post. As usual though, one size does not fit all – and in the case of Continuous Integration fans out there that may have specific build-configuration-based build and deployment scenarios (such as myself), there is the need to have finer grained control over the Web.config transformation process. If this sounds like you, then this post is aimed to deliver.
What a second… what the hell are “Web.config Transforms”?
 ASP.net has had a few features that that been around for what seems like forever when it comes to abstracting away or alternating between different configuration data for your website (i’m talking about configSource functionality mostly). The features were very minimal and usually created a less-than-ideal solution for developers working on big websites in multiple environments. With the advent of Visual Studio 2010 Microsoft kindly helped us all out by taking note that “hey maybe not all websites are being built for a single server with a single configuration”… Smart guys. They created web.config transformations to help deal with this problem and Jokes aside, the feature is actually pretty cool and allows you to write a base web.config file as you normally would and then transform it for each of your environments.
Your base web.config:
<?xml version="1.0"?>
<configuration>
    <appSettings>
        <add key="ExampleApplicationSetting" value="Value being replaced by Transform"/>
    </appSettings>
    <connectionStrings>
        <add name="MyConnectionString" connectionString="..." providerName="System.Data.SqlClient" />
    </connectionStrings>
    <system.web>
        <customErrors mode="Off"/>
        <compilation debug="true">
        </compilation>
    </system.web>
</configuration>
Your web.config transform (note the change to my connection string, my custom errors and my compilation mode):
<?xml version="1.0"?>
<configuration xmlns:xdt="http://schemas.microsoft.com/XML-Document-Transform">
    <appSettings>
        <add key="ExampleApplicationSetting"
                 xdt:Transform="SetAttributes(value)"
                 xdt:Locator="Condition(@key='ExampleApplicationSetting')"
                 value="The new value to replace after transform"/>
    </appSettings>
    <connectionStrings>
        <add name="MySolutionDatabase" xdt:Transform="Replace" xdt:Locator="Condition(@name='MySolutionDatabase')"
                 connectionString="... My New Connection String ..." providerName="System.Data.SqlClient" />
    </connectionStrings>
    <system.web>
        <customErrors xdt:Transform="Replace" mode="RemoteOnly" />
        <compilation xdt:Transform="SetAttributes(debug)" debug="false" />
    </system.web>
</configuration>
If this is the first you’ve heard of web.config transforms and the syntax in my example above isn’t the clearest it could be, you’ll find the MSDN page on the transformation syntax a valuable read.
So what is wrong with the default usage?
“So what?” you say, “I use them every day, and they work fine”. The main problem i have with the “out of the box solution” is as follows;
The default usage creates a new config transform for each build configuration of the website they sit inside.
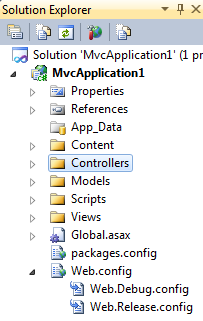
When using Visual Studio and you right click your web.config and Add Config Transformations you will end up with the following

This is a major problem for me, as nearly all the places i have worked that use Continuous Delivery or Continuous Integration with ASP.Net websites have used Solution Configurations for switching between different build environments, not Project Configurations.
Your website should really only have two build configurations that you use for compilation:
- Debug
- Release
Your different environments may be:
- Local
- Internal Staging
- Quality Assurance
- External Staging
- Production
- ??
But all of the above environments will either be compiled in Debug mode or Release mode, so confusing build configurations with environmental configurations feels to me like you are introducing some serious “Code Smell” into your build setup.
For some environments you may want to use the same web.config transform
Another issue i have with this setup is that it assumes that you have a different transformation for each of your build configurations. What if you use the same environment configurations for a number of your build configurations? Your production-staging environment should probably be the same as your production environment for example – i don't begin to know your requirements, but i do know that mine are not as rigid as this.
For some environments you may want to use multiple tiers of web.config transformations applied over the top of each other
Another case where the default usage may not tick all your boxes is when it comes to tiering multiple configurations transformations together. Having the ability to apply transformations in functionality groups instead of environment groups is a very powerful potential usage of transformations.

So where does this leave us?
For me, this put me in the position of wanting badly to find a solution that could give me this level of granularity while still using the transformation tools built into Visual Studio and all the nice convention based functionality that comes with their usage. Up until this point i have been a big fan of abstracting my configs based on environment using something similar to below and swapping the “\Live\” string at build time:
<configuration>
    <appSettings configSource ="Configs\Live\AppSettings.config" />
</configuration>
The major problem with using this technique is that you end up risking having some configurations that are missing certain appSettings keys and a couple of other annoying niggling issues that you usually only become aware of at the time of deployment (this is a big no-no when using Continuous Integration as the main point of using it is that it removes a lot of the risks of deploying – and this very issue creates risk). So i was very eager to find a solution that uses config transforms.

“… MSBUILD is a hell of a drug…”
I am a big fan of MSBUILD when writing build scripts, if for no other reason than the fact that Microsoft’s Web Deployment Projects are basically MSBUILD scripts that integrate well within the Visual Studio IDE.
Why does this matter? Because I am about to show you a way to use MSBUILD to apply web.config transformations step-by-step, allowing you to apply them with as much fine granularity as you like…
OMFG WTG BBQ R U SERIUZZ!
Short answer: yes
The Short Version
Applying configuration transformations using MSBUILD is quite easy, all you need is the to have Visual Studio 2010 installed on the machine running your build (in my case this is usually my TeamCity server).
The bare minimum example for applying a transform is shown below (do not use this until you have read the rest of this post and become aware of “the bug”):
<UsingTask TaskName="TransformXml"
                        AssemblyFile="$(MSBuildExtensionsPath)\Microsoft\VisualStudio\v10.0\Web\Microsoft.Web.Publishing.Tasks.dll"/>
<Target Name="TransformWebConfig">
    <TransformXml Source="C:\Code\MyProject\Web.config"
                  Transform="C:\Code\MyProject\TransformFile.config"
                  Destination="C:\Code\MyProject\Web.config"
                  StackTrace="true" />
</Target>
My above example kind of explains itself, however just to clarify what this does:
- Imports the assembly found at $(MSBuildExtensionsPath)\Microsoft\VisualStudio\v10.0\Web\Microsoft.Web.Publishing.Tasks.dll and gives it the task name TransformXml.
- Defines a new target named TransformWebConfig (so that you can call this from somewhere else in your MSBUILD/Web deployment project file, such as in your AfterBuild section).
- Inside our newly created target, we call TransformXml and pass it the following parameters
- Our source web.config is located at C:\Code\MyProject\Web.config
- Our transformation file is located at C:\Code\MyProject\TransformFile.config
- The end resulting web.config file should be saved to C:\Code\MyProject\Web.config
- Turn on StackTrace so that in my build log i can review any issues with the transformation such as rules that couldn’t be applied etc (good to have on for review).
Pretty cool eh?
With the above snippet you can apply as many different transforms as you like in your build scripts by using the command in different ways – even to put into action more advanced configurations such as applying tiered transformations.
Thar be Dragons! – Use this instead
There is a known issue with the above MSBUILD task though in that it does not close the source web.config file successfully during the application of the transformation causing it to error when reading and writing to the same web.config. This is very annoying as it causes your build to fail if you use my example above directly, because MSBUILD will try and write over the original web.config while it still has it open. To overcome this, i add a simple second step to my build task that copies the web.config to a temporary location and then deletes the file after the transform has taken place.
<UsingTask TaskName="TransformXml"
                        AssemblyFile="$(MSBuildExtensionsPath)\Microsoft\VisualStudio\v10.0\Web\Microsoft.Web.Publishing.Tasks.dll"/>
<Target Name="TransformWebConfig">
    <ItemGroup>
        <OriginalWebConfig Include="C:\Code\MyProject\Web.config"/>
        <TempWebConfig Include="C:\Code\MyProject\TempWeb.config"/>
    </ItemGroup>
    <Copy SourceFiles="@(OriginalWebConfig)" DestinationFiles="@(TempWebConfig)" />
    <TransformXml Source="C:\Code\MyProject\TempWeb.config"
                            Transform="C:\Code\MyProject\TransformFile.config"
                            Destination="C:\Code\MyProject\Web.config"
                            StackTrace="true" />
    <Delete Files="@(TempWebConfig)" />
</Target>
More advanced techniques
As i mentioned earlier in this post, i usually prefer to use a more dynamic Solution Configuration based switching in my Continuous Delivery setups for deployment, and therefore want to be able to have my transforms applied depending on the solution configuration being fired, to allow for more flexibility.
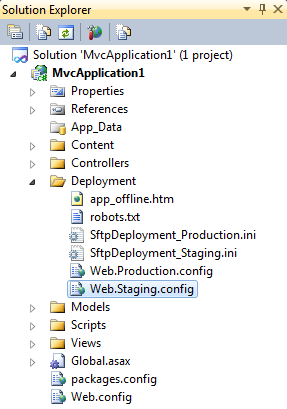
My usual website project setup includes a folder called Deployment that sits in the root of the site. In this folder i include any assets that are used as part of my deployment. This includes things like a command-line SFTP client, a web.config checker and any configuration files that are used in my build. I usually have a post build step that deletes this folder so that you don’t find things such as sftp hashes or alternate environment database connection strings finding their way onto your web host’s servers – i highly recommend you follow a similar procedure.

For my example below I base all the properties i send the TransformXml build task shown above on the build configuration parameters and the file paths being used at build time. I also refer to the transform files i have in my \Deployment\ folder shown above.
My example below, does the following:
- Defines a property named WebConfigReplacement and defines it depending on the solution build configuration being used. If building a staging deployment use the staging transform file, if a production deployment use the production config transform file.
- Copy the web.config file to a temporary location inside my \Deployment\ folder
- Runs the config transform defined in step 1 to the temporary web.config created in step 2 and save it over the top of my web applications web.config
- Delete the temporary web.config inside my \Deployment\ folder.
<!-- Setup the transformation file to use -->
<PropertyGroup Condition="'$(Configuration)|$(Platform)' == 'Deploy - Staging|AnyCPU'">
    <WebConfigReplacement>Staging</WebConfigReplacement>
</PropertyGroup>
<PropertyGroup Condition="'$(Configuration)|$(Platform)' == 'Deploy - Production|AnyCPU'">
    <WebConfigReplacement>Production</WebConfigReplacement>
</PropertyGroup>

<UsingTask TaskName="TransformXml"
                        AssemblyFile="$(MSBuildExtensionsPath)\Microsoft\VisualStudio\v10.0\Web\Microsoft.Web.Publishing.Tasks.dll"/>
<PropertyGroup>
    <TransformInputFile>$(OutputPath)\Deployment\Web.Temp.config</TransformInputFile>
    <TransformFile>$(OutputPath)\Deployment\Web.$(WebConfigReplacement).config</TransformFile>
    <TransformOutputFile>$(OutputPath)\Web.config</TransformOutputFile>
    <StackTraceEnabled>False</StackTraceEnabled>
</PropertyGroup>
<ItemGroup>
    <OriginalWebConfig Include="$(OutputPath)\Web.config"/>
    <TempWebConfig Include="$(OutputPath)\Deployment\Web.Temp.config"/>
</ItemGroup>
<Target Name="TransformWebConfig"
                Condition="'$(Configuration)|$(Platform)' == 'Deploy - Production|AnyCPU' Or '$(Configuration)|$(Platform)' == 'Deploy - Staging|AnyCPU'">
    <!-- Copy our web.config into a temp folder as the 'TransformXml' task has a file lock bug -->
    <Copy SourceFiles="@(OriginalWebConfig)" DestinationFiles="@(TempWebConfig)" />

    <TransformXml Source="$(TransformInputFile)"
                                Transform="$(TransformFile)"
                                Destination="$(TransformOutputFile)"
                                StackTrace="$(StackTraceEnabled)" />
    <Delete Files="@(TempWebConfig)"/>
</Target>
In closing
Hopefully this has given you food-for-thought and got your Continuous Integration juices flowing. Web.config transformations are a very cool feature, so you shouldn’t have to go without just because you are a fan of Continuous Integration – time to come play with all the other kids…
Comments