When configuring an Azure Virtual Network one of the most common things you'll want to do is setup a Point-to-Site VPN so that you can actually get to your servers to manage and maintain them. Azure Point-to-Site VPNs use client certificates to secure connections which can be quite complicated to configure so Microsoft has gone the extra mile to make it easy for you to configure and get setup – sadly at the cost of losing the ability to connect through the command line or through PowerShell – Let's change that.
Current state of play == No Command line VPN connections
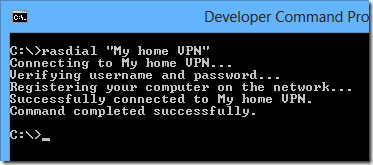
Normally when you want to launch a VPN from the CLI or PowerShell in Windows you can simply use the following command:
rasdial "My home VPN"
The Azure pre-packaged VPN doesn't allow this because it's really just not a normal VPN. It's something else, something mysterious - not a normal native Windows VPN connection.
When you run the Azure VPN through the command line you get this (you'll see a hint as to why I'd be using Azure Point-to-site in this screenshot):
Azure VPNs don't appear to support this.
If you want to keep your servers behind a private network in Azure and use continuous deployment to get your code into production this makes it hard to deploy without a human being around. Not really the best case scenario – especially when you remind yourself that automated builds aim to do away with human error altogether.
What the Azure Point-to-Site looks like out of the box
When you first go to setup a Point-to-site VPN into your Azure virtual network Microsoft points you at a page that walks you through creating a client certificate on your local machine to use as authentication.
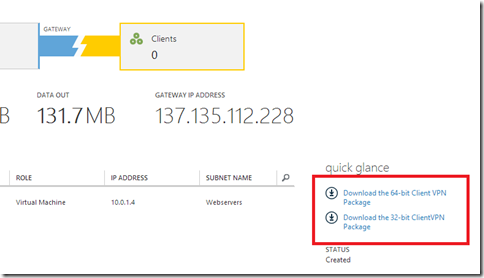
They then get you to download a package for setting up the Azure VPN RAS dialler on your local machine.
This is accessed from within the Azure "Networks" page for your virtual network.
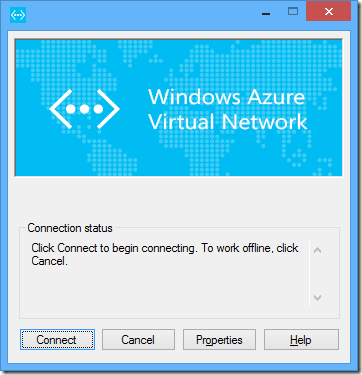
You install this package and then whenever connecting you're greeted with a connection screen that you might of seen in a previous life. And by seen I don't mean that Windows Azure Virtual Networks have been around for ages. But more that the login screen may look familiar.
This is because this login screen is a Microsoft "Connection Manager" login screen and has been around for a while.
Example from TechNet (note extremely dated Bitmap awesomeness):
Connection Manager is used to pre-package VPN and dial up connections for easy-install distribution in a large organisation. This also means we can reconstruct the underlying VPN connection and use it as a normal VPN – claiming back our CLI super powers.
Digging through the details
So what we really want to know is:
What is this mystical VPN technology the people at Microsoft have bestowed upon us?
Here's how I started getting more information about the implementation:
- Connecting once successfully then disconnect.
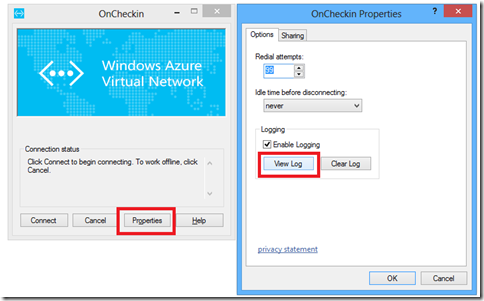
- Open it up again to connect and click on Properties
- Then clicking on View Log
You'll then be greeted by something that looks like this:
******************************************************************
    Operating System      : Windows NT 6.2
    Dialler Version        : 7.2.9200.16384
    Connection Name       : My Azure Virtual Network
    All Users/Single User : Single User
    Start Date/Time       : 24/11/2013, 7:50:31
******************************************************************
    Module Name, Time, Log ID, Log Item Name, Other Info
    For Connection Type, 0=dial-up, 1=VPN, 2=VPN over dial-up
******************************************************************
[cmdial32]    7:50:31    03    Pre-Init Event    CallingProcess = C:\Windows\system32\CMMON32.EXE
[cmdial32]    7:50:39    04    Pre-Connect Event    ConnectionType = 1
[cmdial32]    7:50:39    06    Pre-Tunnel Event    UserName = MyClientSSLCertificate Domain =  DUNSetting = [OBFUSCATED AZURE GATEWAY ID] Tunnel DeviceName =  TunnelAddress = [OBFUSCATED AZURE GATEWAY ID].cloudapp.net
[cmdial32]    7:50:44    07    Connect Event
[cmdial32]    7:50:44    08    Custom Action Dll    ActionType = Connect Actions Description = to update your routing table ActionPath = C:\Users\Doug\AppData\Roaming\Microsoft\Network\Connections\Cm\[OBFUSCATED AZURE GATEWAY ID]\CMROUTE.DLL ReturnValue = 0x0
[CMMON32]    7:56:21    23    External Disconnect
[cmdial32]    7:56:21    13    Disconnect Event    CallingProcess = C:\Windows\Explorer.EXE
More importantly you'll see this path included in the connection:
Within this folder is all the magic connection manager odds and ends. Apologies for the [Obfuscated], simply the path contains information to my azure endpoint.
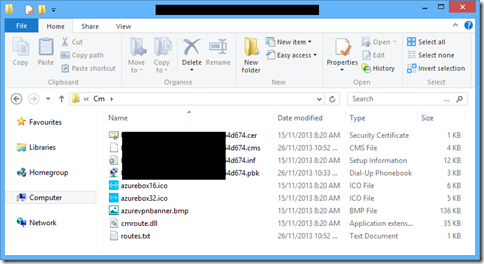
Within this folder you'll see a bunch of files:
Most importantly there is a PBK file – a Personal Phonebook. This is what stores the connect settings for the VPN as is a commonly distributed way of sending out connection settings in the Enterprise. If you run this on its own you'll actually be able to connect to the VPN directly (without your network routes being updated).
This phonebook is where we can steal our settings from to recreate a command line driven connection.
Setting it up
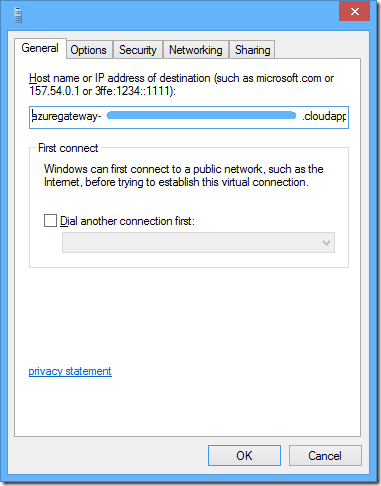
Open up the properties of your Azure Point-To-Site VPN phonebook above, and copy the connection address.
It will look like this:
azuregateway-[Guid].cloudapp.net
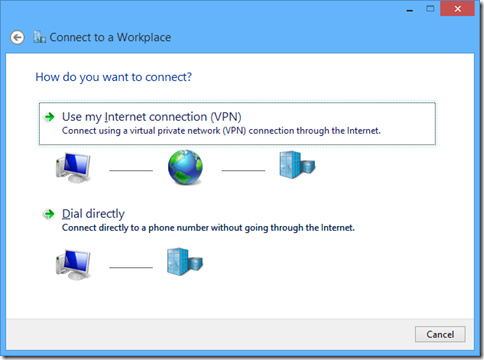
Open Network Sharing Centre, and create a new connection. Then select Connect to a workplace.
Select that you'll "Use my internet connection".
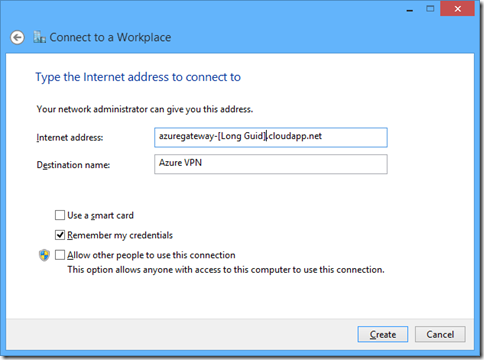
Then enter your Azure Point-To-Site VPN address and then give your new connection a name. Remember this name for later
Then click Create to save your VPN.
Now open the connection properties for your newly created VPN. This is where we'll use the settings in your Azure Diallers config to setup your connection.
I'll save you the hassle of showing you me copying the settings from one connection to another and instead i'll just focus on what you need to set them to.
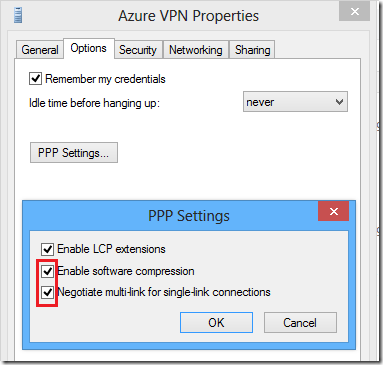
Flick over to the Options tab and then click PPP Settings. Click the 2 missing options Enable software compression and Negotiate multi-link for single-link connections.
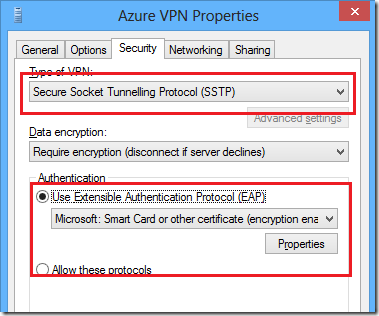
Set the type of VPN to Secure Socket Tunnelling Protocol (SSTP), Turn on EAP and select Microsoft: Smart Card of other certificate as the authentication type.
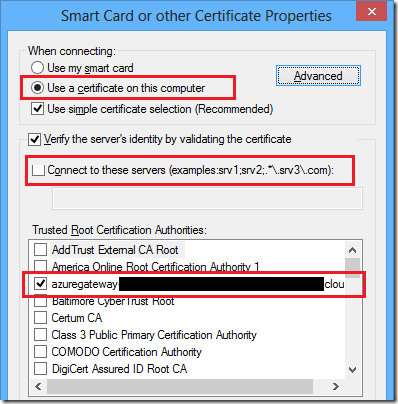
Then click on Properties.
Select "Use a certificate on this computer", un-tick "Connect to these servers", and then select the certificate that uses your Azure endpoint Uri as its certificate name and then save out.
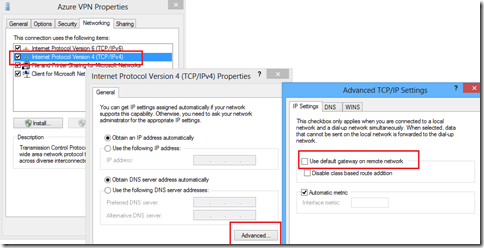
Then flick over to the Network tab. Open TCP/IPV4 then Advanced then untick Use default gateway on remote network. This setting stops internet traffic going over the VPN while you're connected so you can still surf reddit while managing your Azure environment.
Close the VPN configuration panel.
You now have a working VPN connection to Azure.
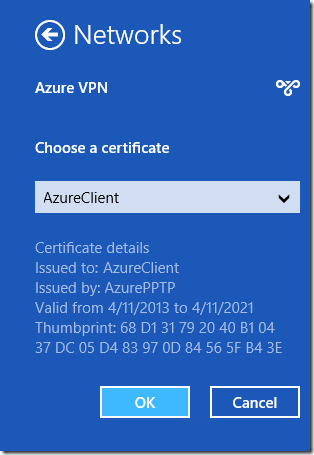
When you connect using windows you'll be asked to select the name of the client certificate you'll be authenticating with. You select the certificate you created and uploaded into Azure before you setup your connection.
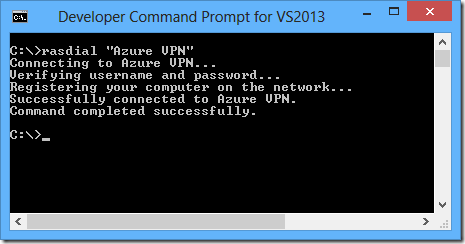
When you connect using the command line you don't need to specify your certificate:
rasdial "Azure VPN"
But there's one catch: Your local machine's route table doesn't know when to send any traffic to your Azure Virtual Network. The network link is there, but Windows doesn't know what to send over your internet link and what to send over the VPN link.
You see Microsoft did a few things when they packaged your connection manager, and one of these things was to also copy a file called "cmroute.dll" and call this after connection to route your traffic onto your Virtual Network. This file altered your routing table to route traffic to your Virtual Network subnets through the VPN connection.
We can do the same thing – so lets go about it.
What's this about Routing... Rooting (for the English speakers in the room)
My Azure Virtual Network consists of the following network range:
10.0.0.0/8
I also have the following subnets for different machines groups.
10.0.1.0/24 (Web Servers)
10.0.2.0/24 (Application Servers)
10.0.3.0/24 (Management services)
My PPTP Connections, or Point-To-Site connections sit on the range: 172.16.0/24
This means that when I connect to the Azure VPN I will get an IP address in this range. Example: 172.16.0.17
When this happens we need to tell Windows to route all traffic going to my 10.0.X.X range IP addresses through the IP address that has been given to us by Azure's VPN RRAS service.
You can see your current routing table by entering route PRINT into a command prompt or PowerShell console.
Automating the Routing Additions
Luckily the Windows Task Scheduler supports event listeners that allow us to watch for VPN connections and run commands off the back of them.
Take the below PowerShell Script below and save it for arguments sake in C:\Scripts\UpdateRouteTableForAzureVPN.ps1
 #############################################################
# Adds IP routes to Azure VPN through the Point-To-Site VPN
#############################################################

# Define your Azure Subnets
$ips = @("10.0.1.0", "10.0.2.0","10.0.3.0")

# Point-To-Site IP address range
# should be the first 4 octets of the ip address '172.16.0.14' == '172.16.0.

$azurePptpRange = "172.16.0."

# Find the current new DHCP assigned IP address from Azure
$azureIpAddress = ipconfig | findstr $azurePptpRange

# If Azure hasn't given us one yet, exit and let u know
if (!$azureIpAddress){
    "You do not currently have an IP address in your Azure subnet."
    exit 1
}

$azureIpAddress = $azureIpAddress.Split(": ")
$azureIpAddress = $azureIpAddress[$azureIpAddress.Length-1]
$azureIpAddress = $azureIpAddress.Trim()

# Delete any previous configured routes for these ip ranges
foreach($ip in $ips) {
    $routeExists = route print | findstr $ip
    if($routeExists) {
        "Deleting route to Azure: " + $ip
        route delete $ip
    }
}

# Add our new routes to Azure Virtual Network
foreach($subnet in $ips) {
    "Adding route to Azure: " + $subnet
    echo "route add $ip MASK 255.255.255.0 $azureIpAddress"
    route add $subnet MASK 255.255.255.0 $azureIpAddress
}
Now execute the following from an elevated command prompt window. This tells Windows to add an event listener based task that looks for events to our "Azure VPN" connection and if it sees them, it runs our PowerShell script.
schtasks /create /F /TN "VPN Connection Update" /TR "Powershell.exe -NonInteractive -command C:\Scripts\UpdateRouteTableForAzureVPN.ps1" /SC ONEVENT /EC Application /MO "*[System[(Level=4 or Level=0) and (EventID=20225)]] and *[EventData[Data='Azure VPN']] "
If I then connect to my VPN the above script should execute.
After connecting if I check my routing table by entering route PRINT into a console application we have our routes to Azure added correctly.
We're Done!
With that we're now able to fully use an Azure Point-to-Site VPN simply from the command line. This means we can use it as part of a build server deployment, or if you're working on it all the time you can simply set it up to connect every time you login to windows.
Command line usage
rasdial "[Connection name]"
rasdial "[Connection name]" /disconnect
For my connection named "Azure VPN" this command line usage becomes:
rasdial "Azure VPN"
rasdial "Azure VPN" /disconnect






Comments