A few years ago the Gmail team began experimenting with the concept of interactive extensions to email messages, with the release of Gmail Actions (now called Gmail Email Markup). These simple additions to your HTML email allow developers to add call-to-action type links to your emails, without customers even needing to open your email.
The Gmail Email Markup support provided today offers a number of different options for adding call to actions to your customers inbox.
To show you how you can use Gmail Email Markup I’ll walk you through setting it up for my Continuous Deployment service OnCheckin, so customers can click through to view their build logs and deployment history for a recent build without even reading the emails we send them on every build.
Example of Gmail Email Markup in use for OnCheckin.com build notification emails.
What functionality is available?
Before we get into our demo it’s worth taking a look at some of the functionality available.
The list of supported functionality appears to be continuing to grow, but at the time of writing the functionality spans the following approaches:
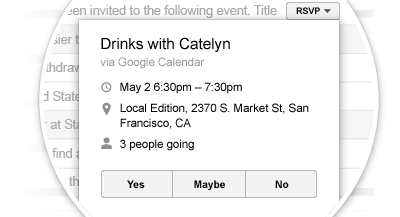
Add the ability to add interactive buttons to an email allowing you to notify the sender you’re going to attend an event called out in the email.
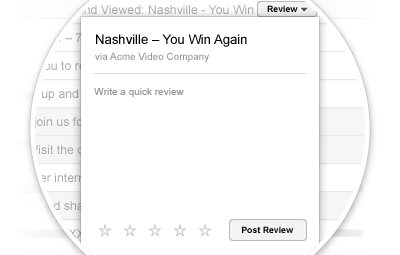
Add an embedded form in your email inbox that allows you to capture reviews from your users based on the content of your email (a great way to capture “did this help” type information).
This allows you to add support for dynamic event based interaction, where users can click a button from within Gmail that calls an asynchronous webservice hosted on your site.
This allows you to add direct hyperlinks to your emails so email recipients can click on a button from within their Gmail inbox and go directly to a page on your website.
For the example we’re going to build for OnCheckin below, we’re going to use the Go-to action, as it’s the most flexible and easy to implement to get customers to have a return visit to your website that saves your customers digging through your email for a call to action.
What you’ll need
- Access to HTML based emails sent by your site and their respective email templates.
We use ASP.Net MvcMailer Razor templates for OnCheckin’s email templates. - A website to host your call to action destination.
We’re going to use OnCheckin.com’s build result pages. - DKIM/SPF configured for your outgoing email.
The last requirement above is actually pretty important. The Gmail team manually approves all applications to the program, and they ask for both example emails as well as a proven track record of sending legitimate customer email to Gmail addresses.
Email template configuration
The modification to our outgoing email template is really easy.
For our HTML template, we simply add some code to the email’s HTML body, right after the opening body tag.
<body>
<script type="application/ld+json">
    {
        "@@context": "http://schema.org",
        "@@type": "EmailMessage",
        "description": "View your Build",
        "action": {
            "@@type": "ViewAction",
            "url": "https://oncheckin.com/manage/build/1234-1234-1234-1234",
            "name": "View Build"
        },
        "publisher": {
            "@@type": "Organization",
            "name": "OnCheckin",
            "url": "https://oncheckin.com"
        }
    }
</script>
    ...
</body>
That’s all you need to do!
Testing
The first thing you can do, is paste the full and complete HTML for your email into the Gmail markup tester.
The next step is testing your email against a live Gmail inbox.
To do this is a little tricky, as to do with without Google approval for testing you need to send to send from a gmail mailbox to a gmail mailbox. One approach you can take here, is to run your application in Development or Staging Environments using Gmails SMTP gateway and set your apps outgoing email address to a gmail account (what I did to test my modifications).
While this may seem a little dramatic, I preferred this approach as it means I am testing the actual HTML my application is going to be sending, sent from my application. Not me cutting and pasting HTML into an email body somewhere, which may/may not have encoding issues etc in production.
An example of what your web.config file would look like sending through Gmail’s SMTP servers to test this.
  <system.net>
    <mailSettings>
      <smtp from="your.email@gmail.com">
        <network host="smtp.gmail.com"
                 enableSsl="true"
                 port="465"
                 userName="your.email@gmail.com"
                 password="YOUR_GMAIL_PASSWORD" />
      </smtp>
    </mailSettings>
  </system.net>
Registering with Google
Now that you’ve tested your Gmail Html Markup in a test environment for your application, you’re ready for the prime time: registering for real with Google.
The Google help page is pretty specific here:
- Send a real-life email coming from your production servers (or a server with similar DKIM/SPF/From:/Return-Path: headers) including the markup / schema to schema.whitelisting+sample@gmail.com. We need this in order to check that you comply with all the guidelines and requirements listed in Registration Guidelines.
- If you send a test/blank email, an email that does not contain schema or if you don't send an email for review your application will be silently discarded.
- Make sure that the markup is correct prior to sending the email. For more details see Testing your Schema. Especially make sure the email passes the Email markup Tester and that there are no errors, also make sure to include as much data as possible.
- Gmail removes all markup when forwarding an email. Do not forward the email but send it directly.
- Fill out the registration form and we will get back to you.
This means you need to deploy your application with it’s new email templates (including Gmail HTML Markup) and send a production email from your application to the email address above (with DKIM, your real email body HTML etc).
Once you’ve done that, fill out the registration form and wait, someone from the Gmail team will get back to you once they’ve review your submission (as a guide, my registration for OnCheckin took 3 business days for them to come back to me).
That’s all folks
Gmail Email Markup allows you to add a nice piece of added interactivity to your customers/visitors Gmail inbox, and should hopefully increase your websites “stickiness” through a rise in return visitors. The cost to you is less than 30 minutes of dev time including testing and deployment; an implementation so easy you’re being silly not to use it.
If you’d like to see it in action, feel free to sign up for a free trial to OnCheckin for your Continuous Deployment needs, and your notifications will all contain interactive Gmail Email Markup :-)


Comments