Centralised Version Control (VCS) providers like TFS and SVN always rely on a central server to store and maintain your project’s source control assets. While Git is an example “distributed” version control (DVCS) it is still most commonly used with developers relying on a central store for everyone to push and pull commits to and from. There are a number of options are your disposal so let’s take a look.
Table of contents
- Choosing where to store your code – Git remotes
- Setting up a Bitbucket repository.
- Setting up GitStack and creating a repository.
- Pushing your code base to your new “remote”.
Choosing where to store your code - Git remotes
When Git talks about servers to push your commits to they call them remotes. A remote can be any remote repository; the guy sitting next to you or a cloud based service.
There are a number of options for setting up a Git remote for your team. In this post we’ll cover the following two:
There are other both externally hosted services and locally hosted applications that are just as reputable that I won’t be covering. The hosted services I’d recommend are:
Basically a very similar service to Bitbucket as far as feature parity and experience, however unlike Bitbucket they do not offer free private repositories. If you want to release an open source project though, you’re good to go. Other than this limitation the online solutions are almost identical and Github offers a very similar experience. If you’re looking into the enterprise accounts of both, the only main difference between Github and Bitbucket is the fact that Bitbucket charges you for team members and Github charges you for number of repositories.
This is Microsoft’s take on using Git combined with Team Foundation Server. In my opinion they still haven’t cottoned onto the power of Git in the way their online tooling allows you to work with your repository (forking and pull requests aren’t supported). We’ll get to why this is important later, but in my opinion Microsoft’s approach to Git has been about using the same centralised source control approach for Git as it has for TFS. This throws away a large part of the dynamic you get with Git in the first place.
The locally hosted Git remotes I’d recommend (for Windows hosted environments):
Bonobo Server – Free and open source
I’ve never used Bonobo server, but I hear good things from many people using it around the place. Built in .Net using the GitSharp library it’s meant to be quite good, although earlier editions apparently were quite buggy when it came to cross platform encoding issues etc.
A fully featured Windows Git server that is free for the first two users. GitStack offers a great way to get started with a local Windows hosted Git server. GitStack runs on Apache and Python, both well known server technologies, making configuration of the web serving and file permissions and security a bit easier using well known approaches to locking down Apache and Python.
Starting at $10 for 10 users this is basically like hosting your own Bitbucket behind the firewall. Complete with pull-requests, forking, and all the rest of the Bitbucket awesomeness.
Option A. Setting up a remotely hosted Bitbucket repository and creating a repository.
To choose the service Bitbucket to host your private code for free, sign up for a Bitbucket account here.
Then login and click on the “Create” button at the top of the page.
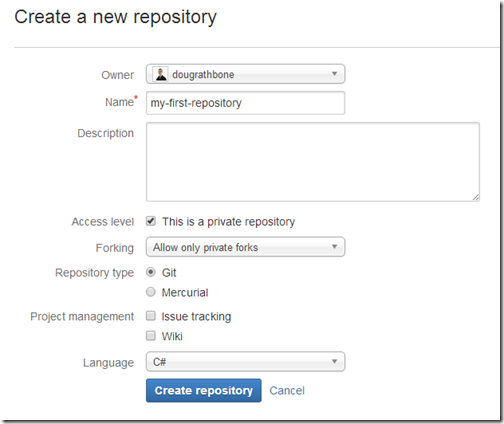
On the next page, give you repository an owner. In my example below I’ve selected me, but if you add team members (up to 5 are free with Bitbucket) you can make them or if you setup a team after signup your team can be the owner itself.
Then give your repository a name – This can be a different name from that of your local repository. I recommend that you use a lower case name, as Git is a Unix based technology and therefore names are case sensitive so it can be frustrating for you and your team members if you forget the casing. This also makes it easier to type if you’re using the command-prompt later. After this select the programming language for your project. This is just for the code highlighting tools Bitbucket uses for displaying your commits and pull requests. It can be changed later.
Click “Create repository” to create the repository.
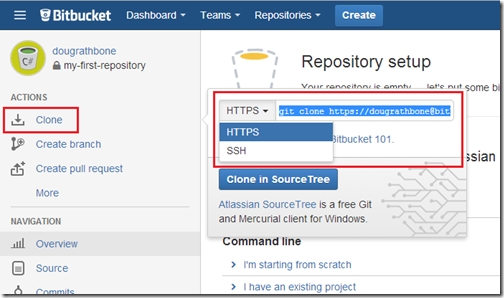
On your newly created repositories page (the next page that loads), click on the “Clone” link on the left and select either Https or SSH depending on how you’re like to talk to Bitbucket, then copy the Url part of text shown.
ie. if it reads:
git clone https://myuser@bitbucket.org/myuser/my-first-repository.git
then
https://myuser@bitbucket.org/myuser/my-first-repository.git
is your source control repository’s Url. Copy this and skip over Option B to see how to push below.
Option B. Setting up a local network GitStack environment and creating your repository.
If you’d like to setup a local source control repository on a Windows server, I recommend GitStack as your
Download GitStack from here.
Install using all of the default settings. You’ll need port 80 to be open during the install or the installation will fail. You can change this port afterwards, but it’s important to stop any services you have running on port 80 like IIS before you install GitStack. After installing I recommend that you purchase and install an SSL certificate for GitStack – a free SSL cert from https://www.startssl.com is perfect for getting started.
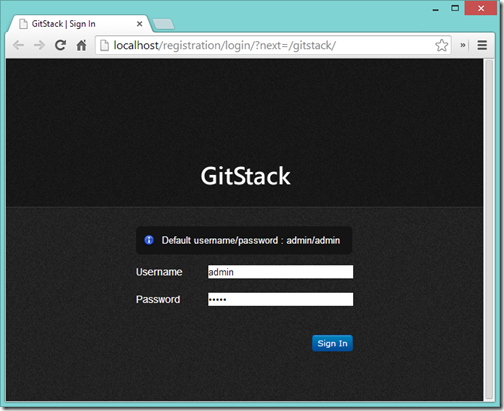
Once installed open up http://localhost/gitstack in a browser and enter admin as both the username and password. This is the default for a fresh GitStack installation.
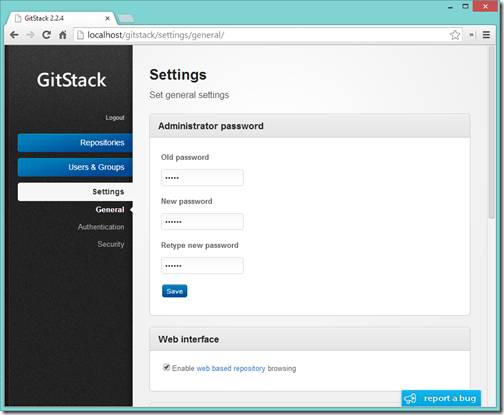
The first thing you want to do once logged in, is change the admin password for your server. Do this by heading over to the Settings link on the left.
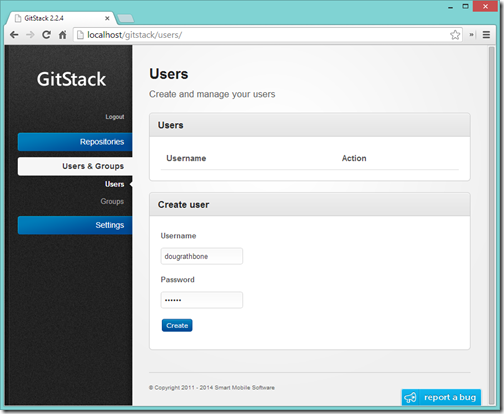
Now create a new user for yourself to commit using. Open the Users and Groups link on the left and create yourself a user.
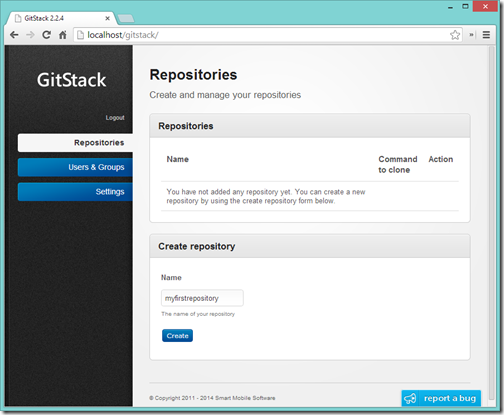
Now it’s time to create our first repository so we can push your source code up to your server. Click on “Repositories” on the left navigation.
Then enter a repository name. For my example I'm entering “myfirstrepository” – I suggest that you keep this name to all lowercase as unlike in Windows most Linux based utilities (Git bash etc.) are case sensitive, so by using lowercase you’ll save you and your team the trouble of remembering the casing you’ve used in your naming.
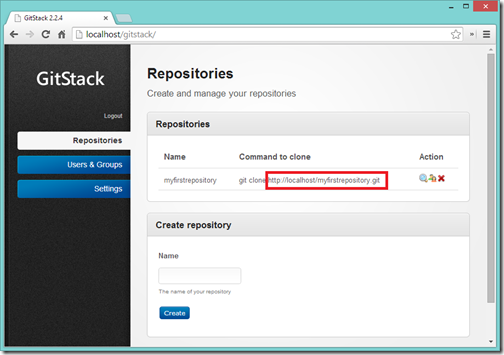
You’ve now created your first repository, and are ready to push up your source code. You’ll notice that the repository listings page now shows your repository with a “git clone http://localhost/myfirstrepository.git”. You can replace “localhost” with your server’s local network hostname or DNS entry you’ve pointed at your new Git server. By default GitStack is listening on port 80 and will answer to any hostname.
Pushing your code base to your new “remote”.
Now that you’ve created a remotely hosted Git master on either Bitbucket or GitStack, you now want to tell your local repository about this remote, so you can push to it for your team to get at. This is done locally on every developers PC.
Doing this on the command line
If your preference is to use either the Windows Command Prompt or the Git Bash, adding a new remote is easy.
Navigate to your repository’s root path.
c:\>cd C:\code\myproject
Then add a new “remote” to your local repository. By default when you add your first remote it gets the name "origin". You want to add your username to the Url as per my example
C:\code\myproject>git remotes add origin http://username@localhost/myfirstrepository.git
Note that with my example below I've added my username as "username" to the Url before the @ symbol.
Then push all of your commits in your master branch up to the remote. Mentioning the name of the remote you're pushing to, followed by the local branch you'd like to push (In Git the default branch name is called “master” unlike “trunk” in SVN or “Main” in TFS).
C:\code\myproject>git push origin master
This is saying
push my ‘master’ branch to the remote server named ‘origin’
This will ask you for your password, and after successfully authenticating it will then push all of your commits to your remote server.
Doing the same thing with Atlassian SourceTree
If you’re wanting to achieve the same goal of pushing to your remote server with Atlassian’s GUI based Git client instead, the amount of effort isn’t really any different.
Start by opening your repository in a tab in Source Tree.
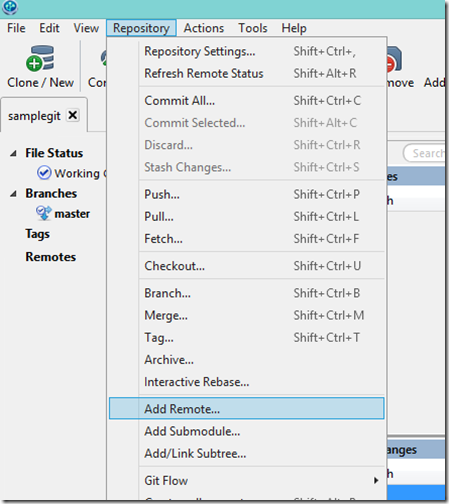
Then from the menu options select Repository > Add Remote
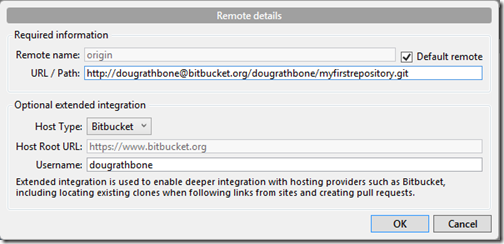
On the next screen, select that you are adding the “default remote” (this names it “origin” to save you the trouble) and then enter the path to your remote server.
A few things of note in my screenshot below:
- I’ve entered my git repo path as “http://dougrathbone@localhost/myfirstrepository.git”.
- The Url I've enter contains my username.
- The Url also includes the hostname to your git remote. I’ve entered my local GitStack server address – I’ve entered this only for this example, and in real situation this should either be the real hostname of your Git server, or in Bitbucket’s case it should be Bitbucket.org.
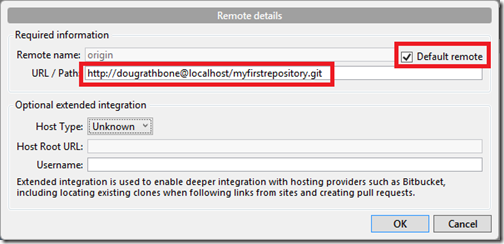
Note that if this was to point at my Bitbucket repository it would look like the example below.
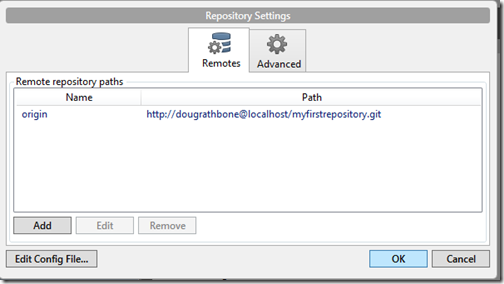
Now click “Ok” and review your entry in the next screen before clicking “Ok”.
Now to action our first push to this remote, simply press the big  button.
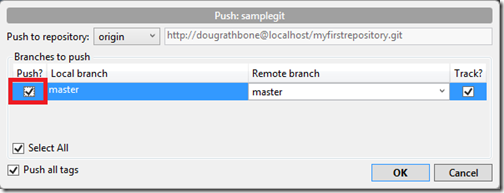
This will open up a push command window where you can select the branches you’d like to push and what these branches are named on the “remote” server (in future you can point these are differing remote branches, a very powerful feature). You want to tick the box next to your “master” branch to make sure you push it to the remote.
Click “Ok” and your done.
Wrapping up
So we’ve setup a local repository, migrated your current source code to Git, setup a “remote” repository to store commits centrally for all of your team, and we’ve joined all of it up together by pushing your code for your team to get access to. One thing we haven’t really done is show how to use Git for what it is really useful for – team based development, where unlike centralised source control you and your team are trying to move away from (SVN, TFS, VSS), you don’t simply “add commits to a central server”.
Now it’s time to learn how to use git in a bit of a deeper way.
Checkout the rest of the posts in this series:
- Part 1: Getting started
- Part 2: Pushing it up Somewhere
- Part 3: More than just Committing
- Part 4: Team Workflows
Comments