Few generations get to see as many epic battles for mindshare as our recent generations – in the 80’s it was VHS and Betamax and this decade we’ve seen Git and Mercurial duking it out. Developers have voted with their commits, and I’m pretty sure Git won the war. When setting our to use Git there are lots of basic tutorials, but none that approach it from a zero-to-hero in a team environment. In this blog series I am going to trying to set out to change all that by walking you through the steps from working in a non-Git source control environment to using DVCS with other people.
After using Git personally for around four years now, like a lot of us I definitely categorise myself as someone who’s drank too much of the DVCS kool-aid even though I wasn’t always this way. A little over a year ago I took a job managing a number of different teams who were developing .Net applications using Team Foundation Server, while at the time being firmly in the camp of “what is this evil command-line thing”. As a new DVCS advocate with a fresh slate I thought “Lucky me” and set to work with my teams – not many people write about how you should use Git daily with teams of any decent sizes, so the Git users within my ranks and I had some process and standardisation to develop, all while working to make it as friction free as possible.
What follows is a list of things I wish I’d known previously on how to use Git in a commercial setting, as well as what it’s like for teams using “evil” Microsoft technologies...
Table of contents
- Getting your environment setup
- Starting out
- Adding a .gitignore file
- Making your first commit
- Converting your SVN Repository
- Converting your Team Foundation Server Repository
Getting your environment setup
What to install:
- Git for Windows
- SourceTree (the best GUI Git client out – it natively supports workflows unlike GitHub for Windows or the Git GUI)
First things first – we need to get you setup with Git.
Go download the latest preview release of Git for Windows (the windows port of Git). Yes I did say “preview” build – this is the latest version and “preview” just really means the Git team don’t want to hear you whinge to them about issues. Don’t worry, I’m yet to have an issue with a build yet.
When running the installer make sure you opt into the following.
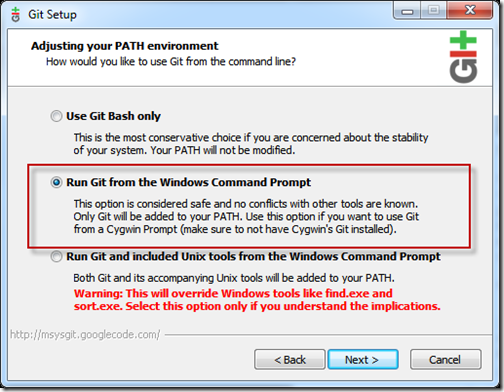
Opt to “Run Git from the Windows Command Prompt”. This means you can use Git from the command-line.
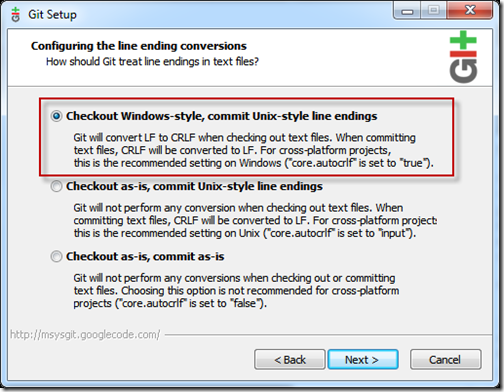
Then opt to “Checkout Windows-style, commit Unix-style”. This means you always guarantee your repo has unix-style line endings and when you interact with it it will use Windows style line endings – making it easy to work with non-windows users while still being able to develop in .Net.
Then install the SourceTree with a default installation (“Next, next, next” etc).
Getting started with basic source control actions
Now that you’ve got your git and SourceTree installed it’s time to start learning how to work with your new repository.
For basic actions for using the command line client can be found in the official Git “Getting started guide”.
This guide cover the basics:
I am of the opinion that forcing a development team to jump into using command line source control tools when they’ve been using any manner of GUI based source control tooling like Tortoise SVN or TFS can make for a pretty high friction experience that you probably want to avoid while actively developing a project.
Also the command-line tooling can be a step too far for less senior member of your team and their ability to be productive if you’re trying to make the change while still running – in my experience this especially applied to developers working in the Microsoft space (both in and outside my teams) where developers are less loving of the command line over GUIs.
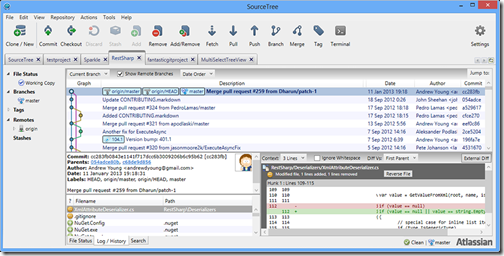
This is why when setting my team up I opt to use a combination of both the Git command line client and Atlassian’s Source Tree – it’s available on both Mac and Windows and supports some pretty advanced usage scenarios we’ll get into later.
To walk through how easy it is to use SourceTree I’m going to create a repository, add some files, and commit.
Open SourceTree and click on the “Clone / New” icon again just like I showed you above.
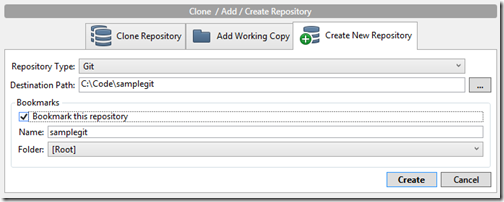
Then switch to the “Create Repository” tab and enter a filepath for your new Git repository. I’m going to place this in C:\Code\SampleGit.
Click “Create”.
You can do this on the command line by moving into the folder and using the command:
git init
Adding a .gitignore file
Now that you’ve created a repository, the first thing you need to do is configure it for optimal usage with .Net projects.
Add a .gitignore file to stop you adding files to your repository that you probably shouldn’t.
You can follow this guide to get allow you to create this type of file in Windows Explorer by entering “.gitignore.” (two dots) as the new filename.
Inside this file use this sample contents.
#OS junk files
[Tt]humbs.db
*.DS_Store

#Visual Studio files
*.[Oo]bj
*.user
*.aps
*.pch
*.vspscc
*.vssscc
*_i.c
*_p.c
*.ncb
*.suo
*.tlb
*.tlh
*.bak
*.[Cc]ache
*.ilk
*.log
*.lib
*.sbr
*.sdf
*.opensdf
*.mdf
*.ldf
obj/
[Bb]in
[Dd]ebug*/
[Rr]elease*/

#Tooling
_ReSharper*/
*.resharper
[Tt]est[Rr]esult*
Packages*/
#Project files
#[Bb]uild/

#Subversion files
.svn

# Office Temp Files
~$*
Save this file and close it.
Making your first commit
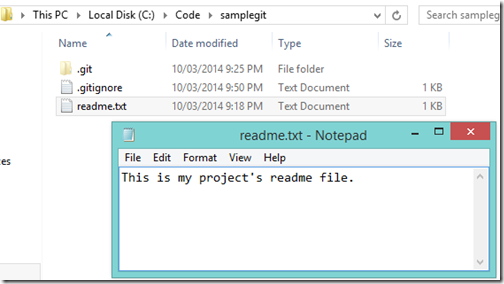
Now open the folder C:\Code\SampleGit in Windows Explorer.
Add a new text file, name is readme.txt and place some text in it.
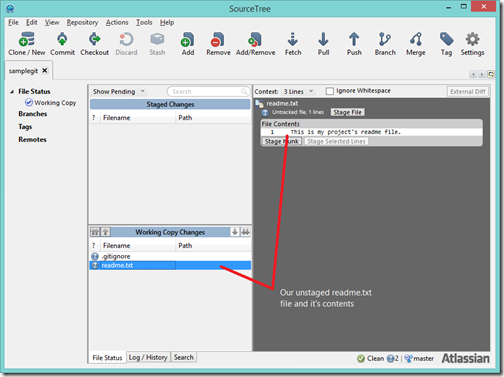
Save your file and switch back to SourceTree, you should see the following. Take not of our readme file sitting in the “Working Copy Changes” panel.
In Git files that it’s unaware of are called “Untracked” and sit in your “working copy changes” in waiting for you to add them to your repository.
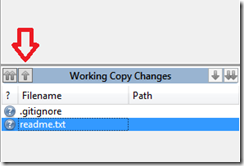
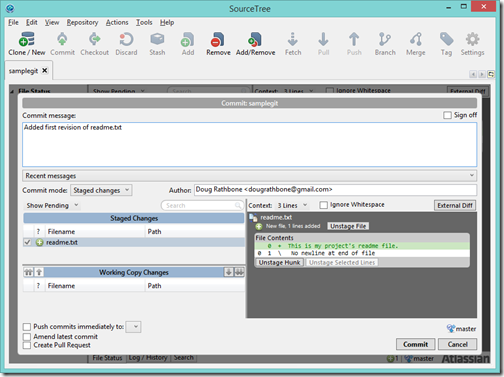
We’re going to do this in Source Tree by selecting our file and clicking the single up arrow, pointing up towards the “Staged Changes” panel.
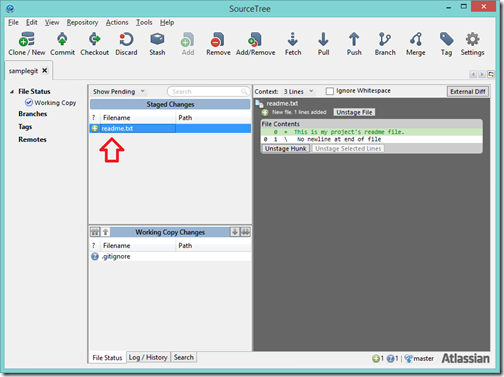
This will move our file into the “Staged Changes” panel, showing you that you’d like to include your readme file in your next Git commit.
You can complete this on the command line by typing:
git add readme.txt
This has not committed your file yet. It has only moved this file into a “staging area” where you can continue to build your next commit. Committing it a separate task. This allows you to pick and choose files, groups of files, or even lines of files to a single commit (we’ll get to this later).
You’re now ready for your first local commit (remember all Git commits are local). Click on the “Commit” icon in the top left of Source Tree.
This will bring up a modal window asking you to review your commit, and leave a message. I’ve written a commit message as “Added first revision of readme.txt”.
Click on “Commit” in the bottom right when you’re done typing your commit message.
You can also complete this on the command line using:
git commit -a -m "Added first revision of readme.txt"
You’ve just finished your first Git add, and first Git commit.
Complete the same as above again but this time with the “.gitignore” file to add this file to your repository.
Next up – we’re going to take a look at converting either an SVN or TFS repository to Git. So you know how to bring in your current projects.
Converting your SVN repository
If you’re working in the .Net space there’s a good chance that if you’re not using Git you’re using either SVN or Team Foundation Server for your source control. Luckily you can bring both along for the ride with simple tooling.
I’ll start with Subversion because it is by far the simplest – Git was built as a replacement for SVN and therefore treats SVN like a first class conversion source.
First take note of your Subversion repository’s conventions. You need:
- Where the trunk is /trunk?
- Where your branches are /branches/XX?
- Where your tags are stored /tags/XX?
Then you need to map your SVN users to new Git users. You do this by creating a text file in the following format (new user for each line):
svn_user_name = Firstname Lastname <gitusers@email.com>
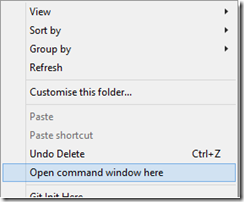
I’m saving this as C:\PathToYourAuthors.txt After you’ve got this locked down converting an SVN repo is as simple as opening a command prompt the same as I showed you above. Right click in a folder you want to create your repository folder within (this folder doesn’t exist yet) and click on “Open command window here”.
I’m created my repository under C:\Code, and it’s going to be called C:\Code\SampleGit.
Now using the command prompt simply enter the following (note that i’m telling Git where my SVN branches, tags and trunk are.
git svn clone
--trunk=/trunk
--branches=/branches
--branches=/bugfixes
--tags=/tags
--authors-file=C:\PathToYourAuthors.txt
https://yourdomain.com/svn/yourrepository SampleGit
This will clone your SVN repository from https://yourdomain.com/svn/yourrepository into a folder SampleGit.
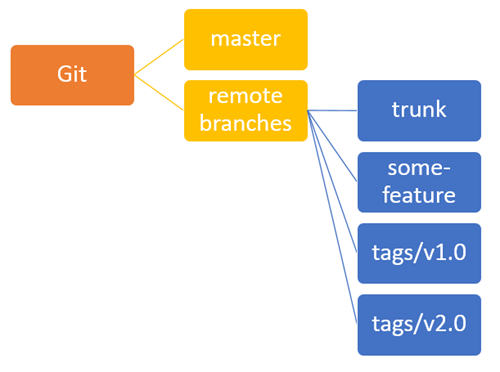
The branching format will look like:
Now your repository has been migrated and your current codebase is available in Git. It’s also now in a state to push to a remote server (we’ll get to this later).
Converting your Team Foundation Server Repository
If you’re using Team Foundation Server and are looking to move your team to Git there is a similar approach to SVN, it’s just not built into Git natively.
There is an open source project called Git-TFS. To get setup you simply download the latest binary from here.
Then add the unzipped path to your path.
set PATH=%PATH%;C:\Program Files (x86)\GitTfs\bin\Debug
In order to map TFS commit authors to Git authors, like the SVN clone create a text file with the following format (one per line):
ADDomain\john.doe = John Doe <j.doe@company.com>
You then need to convert all of your branched folders to actually be setup as “branches” as per TFS 2010 onward features in TFS allow. To change folders to branches, open 'Source Control Explorer' and then, for each folder corresponding to a branch, right click on your source folder and select 'Branching and Merging' then 'Convert to branch'.
Now open a command prompt in the folder you’d like to clone into and type the following:
git tfs clone https://tfsserver.com:8080/tfs/DefaultCollection $/yourproject/Main
--with-branches–-authors="C:\PathToAuthors.txt"
Now all of your repository’s commits should be cloned into a fresh repository, ready for you to push to a new remote (we’ll get to this soon).
Next up - Pushing it up somewhere
So we’ve got your SVN or TFS repository migrated into Git, and it’s sitting locally for you to work with. Next up we’re going to show you how to push your code onto a server for other developers to work with.
Checkout the rest of the posts in this series:
- Part 1: Getting started
- Part 2: Pushing it up Somewhere
- Part 3: More than just Committing
- Part 4: Team Workflows


Comments