In years past building Visual Studio Extensions have often been considered the realm of the big boys. Staff working at Jetbrains or the Microsoft employees of the world. Last year I saw a talk given by Mads Kristensen aimed at taking away some of this stigma and showing how easy the guys at Microsoft have tried to make it for developers like you and me to just up and write extensions. I’ve been wanting to build one ever since, but haven’t had a good enough excuse to jump right in – until now. Here follows the creation of “OnCheckin Web.config Transformer”.
 My little project’s requirements
Last year I launched my own SAAS startup OnCheckin to bring the time and money saving gift of deployment automation to the masses.
A recent release has added support for multiple environments for each deployment project. With this comes the addition of environmental based config transforms on top of the already supported “web.oncheckin.config” transform applied to all build and deploys done through OnCheckin.
The way this works is a tiered transformation of your web.config.
If you have an environment in your deployment workflow called Production and you want to store database connection strings etc. that are environment specific then you’ll need to add a config transform named “web.production.config” to your project.
Web.config transforms are then applied in the following order.
- web.release.config
- web.oncheckin.config
- web.production.config
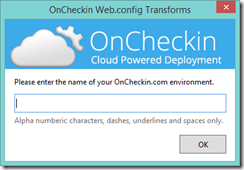 This is great, but unless you have a publishing profile in your website called “production” creating the above transform is actually a little more difficult, and involves a bit of fiddling with the actual XML in your web application’s project file.
Like a lot of learning project’s, when you have your own itch to scratch it’s often the best way to start.
What you’ll need to get started
Firs you’ll need the following
- Visual Studio 2013
- Visual Studio 2013 SDK
Once you’ve got these installed you can jump right in.
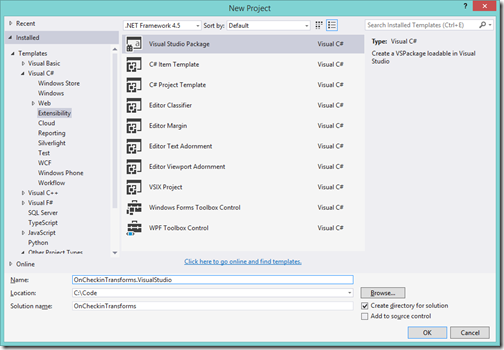
Create a new project under Visual C# > Extensibility > Visual Studio Package.
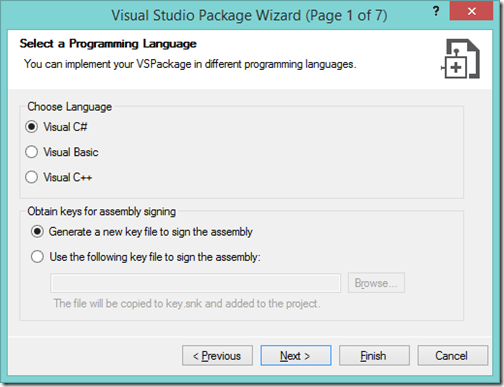
Click through the opening wizard.
Select a language for your extension and either provide or select to enter a signing key.
Enter some basic information about your plugin and provide an icon.
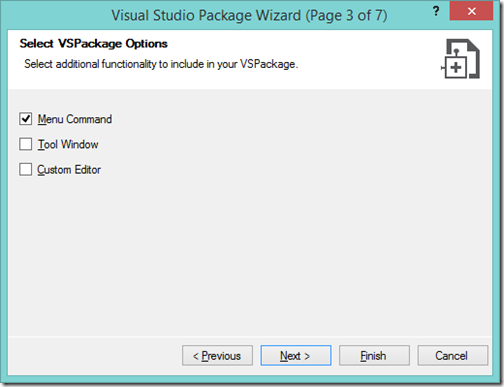
Then select “Menu Command” from the next window – this will create the boiler plate code to get us started.
Then enter the text for your first command option and give it a command id (you’ll understand this later).
Select whether you want a Microsoft Unit test and Integration project to get you started (yes, please!).
Then click “Finish”.
This has actually created for you a working Menu item VSIX project.
If you “Run” the project a new instance of a sandboxed “Visual Studio Experimental Instance” will start with your menu plugin installed. Open a project and then select the “Tools” menu drop down to see your plugin.
If I click this I get the default method created by the template firing.
You can find this code inside the class “OnCheckinTransforms.VisualStudioPackage.cs” automatically created by the project setup.
private void MenuItemCallback(object sender, EventArgs e)
{
    // Show a Message Box to prove we were here
    IVsUIShell uiShell = (IVsUIShell)GetService(typeof(SVsUIShell));
    Guid clsid = Guid.Empty;
    int result;
    Microsoft.VisualStudio.ErrorHandler.ThrowOnFailure(uiShell.ShowMessageBox(
                0,
                ref clsid,
                "OnCheckin Transforms",
                string.Format(CultureInfo.CurrentCulture, "Inside {0}.MenuItemCallback()", this.ToString()),
                string.Empty,
                0,
                OLEMSGBUTTON.OLEMSGBUTTON_OK,
                OLEMSGDEFBUTTON.OLEMSGDEFBUTTON_FIRST,
                OLEMSGICON.OLEMSGICON_INFO,
                0,        // false
                out result));
}
Moving along - what we want to do it change this from a menu item to a context menu item for files in your solution, so when you right click a file (our final goal is just a web.config) you see our menu. Let’s change this.
Open “OnCheckinTransforms.VisualStudio.vsct” and modify the menu group created for your action to make it an “Item node menu” command instead of a “Visual Studio Menu” command.
<Group guid="guidOnCheckinTransforms_VisualStudioCmdSet" id="MyMenuGroup" priority="0x0600">
  <Parent guid="guidSHLMainMenu" id="IDM_VS_CTXT_ITEMNODE"/>
  <!--<Parent guid="guidSHLMainMenu" id="IDM_VS_MENU_TOOLS"/>-->
</Group>
Then immediately upon clicking “Start” on my project another instance of Visual Studio will launch with your plugin installed.
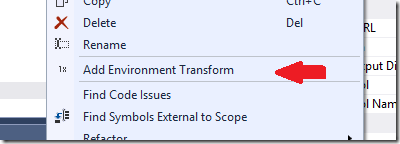
You’ll notice now that if I right click on a project item (any item), I’ll see my command option.
We’re moving along pretty quickly, but what we really want now is:
- Only show our menu if a project item is selected (not a folder, or project etc).
- Disable our menu if you have selected a file that isn’t a web.config, or is a child of a web.config.
To do the above we can hook up an event that fires before the context menu shows on the screen. This means we can hide or disable our menu through code based on the file selected.
The first thing we’ll need to do is turn on the features to disable and hide our menu item by default. To do this open up the “OnCheckinTransforms.VisualStudio.vsct” file again and add a few lines to our menu button.
<Button guid="guidOnCheckinTransforms_VisualStudioCmdSet" id="oncheckinEnvTransform" priority="0x0100" type="Button">
  <Parent guid="guidOnCheckinTransforms_VisualStudioCmdSet" id="MyMenuGroup" />
  <Icon guid="guidImages" id="bmpPic1" />
  <!-- the 2 lines below set the default visibility-->
  <CommandFlag>DefaultInvisible</CommandFlag>
  <CommandFlag>DynamicVisibility</CommandFlag>

  <Strings>
    <ButtonText>Add EnvironmentTransforms</ButtonText>
  </Strings>
</Button>
Then we open our ‘OnCheckinTransforms.VisualStudioPackage.cs’ file again and replace a few lines in our Initialize method. We change our menu command’s type, and then hook into a BeforeQueryStatus event handler.
OleMenuCommandService mcs = GetService(typeof(IMenuCommandService)) as OleMenuCommandService;
if ( null != mcs )
{
    // Create the command for the menu item.
    CommandID menuCommandID = new CommandID(GuidList.guidOnCheckinTransforms_VisualStudioCmdSet, (int)PkgCmdIDList.oncheckinEnvTransform);

    // WE COMMENT OUT THE LINE BELOW
    // MenuCommand menuItem = new MenuCommand(MenuItemCallback, menuCommandID );

    // AND REPLACE IT WITH A DIFFERENT TYPE
    var menuItem = new OleMenuCommand(MenuItemCallback, menuCommandID);
    menuItem.BeforeQueryStatus += menuCommand_BeforeQueryStatus;

    mcs.AddCommand( menuItem );
}
Then we add a new method to handle changing the status of our menu item and check if the filename is ‘web.config’ before showing.
void menuCommand_BeforeQueryStatus(object sender, EventArgs e)
{
    // get the menu that fired the event
    var menuCommand = sender as OleMenuCommand;
    if (menuCommand != null)
    {
        // start by assuming that the menu will not be shown
        menuCommand.Visible = false;
        menuCommand.Enabled = false;

        IVsHierarchy hierarchy = null;
        uint itemid = VSConstants.VSITEMID_NIL;

        if (!IsSingleProjectItemSelection(out hierarchy, out itemid)) return;
        // Get the file path
        string itemFullPath = null;
        ((IVsProject) hierarchy).GetMkDocument(itemid, out itemFullPath);
        var transformFileInfo = new FileInfo(itemFullPath);

        // then check if the file is named 'web.config'
        bool isWebConfig = string.Compare("web.config", transformFileInfo.Name, StringComparison.OrdinalIgnoreCase) == 0;

        // if not leave the menu hidden
        if (!isWebConfig) return;

        menuCommand.Visible = true;
        menuCommand.Enabled = true;
    }
}
public static bool IsSingleProjectItemSelection(out IVsHierarchy hierarchy, out uint itemid)
{
    hierarchy = null;
    itemid = VSConstants.VSITEMID_NIL;
    int hr = VSConstants.S_OK;

    var monitorSelection = Package.GetGlobalService(typeof(SVsShellMonitorSelection)) as IVsMonitorSelection;
    var solution = Package.GetGlobalService(typeof(SVsSolution)) as IVsSolution;
    if (monitorSelection == null || solution == null)
    {
        return false;
    }

    IVsMultiItemSelect multiItemSelect = null;
    IntPtr hierarchyPtr = IntPtr.Zero;
    IntPtr selectionContainerPtr = IntPtr.Zero;

    try
    {
        hr = monitorSelection.GetCurrentSelection(out hierarchyPtr, out itemid, out multiItemSelect, out selectionContainerPtr);

        if (ErrorHandler.Failed(hr) || hierarchyPtr == IntPtr.Zero || itemid == VSConstants.VSITEMID_NIL)
        {
            // there is no selection
            return false;
        }

        // multiple items are selected
        if (multiItemSelect != null) return false;

        // there is a hierarchy root node selected, thus it is not a single item inside a project

        if (itemid == VSConstants.VSITEMID_ROOT) return false;

        hierarchy = Marshal.GetObjectForIUnknown(hierarchyPtr) as IVsHierarchy;
        if (hierarchy == null) return false;

        Guid guidProjectID = Guid.Empty;

        if (ErrorHandler.Failed(solution.GetGuidOfProject(hierarchy, out guidProjectID)))
        {
            return false; // hierarchy is not a project inside the Solution if it does not have a ProjectID Guid
        }

        // if we got this far then there is a single project item selected
        return true;
    }
    finally
    {
        if (selectionContainerPtr != IntPtr.Zero)
        {
            Marshal.Release(selectionContainerPtr);
        }

        if (hierarchyPtr != IntPtr.Zero)
        {
            Marshal.Release(hierarchyPtr);
        }
    }
}
Now we have our extension only showing up we right click a web.config file, and all other files will hide/disable the extension menu option.
The rest of the code required to replace the click handler with code to add a web.config transform is included in the Github repository at the end, it gets a bit tedious to past inside a post.
To continue your journey you can take a look at the VSIX documentation over on MSDN.
Publishing your VSIX
Once you’ve got your extension to a place where you’re happy, it’s time to get it out there for other developers to use. You want to publish your extension in the Visual Studio Extension Gallery.
First, build your extension in release mode, then head on over to http://visualstudiogallery.msdn.microsoft.com/
Login with the Microsoft account you want to publish using.
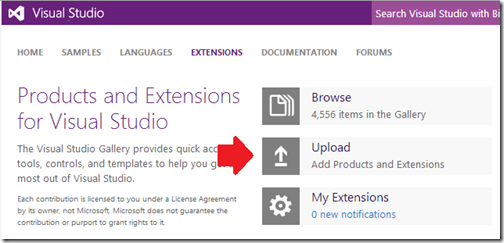
Then click on the big “Upload” button on the home page.
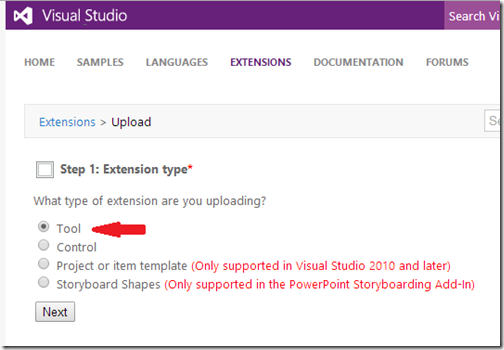
On the second page, select “Tool” as the extension type you’re uploading.
Then surf to your ‘/bin/release’ directory and select your VSIX for upload.
Then on the next page enter a description, select some categories and select “Publish” and you’re done!
But wait, there’s more…
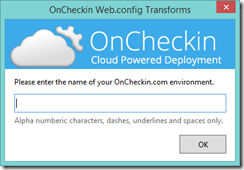
My final VSIX was a little more involved than the above show as I extend mine to actually contain a WPF window and some more logic to add a web.config transform. As I also reused some of the great codebase over on Sayed Hashimi’s project Slow Cheetah as part of my project and Sayed’s project is open sourced using the Apache 2.0 license, I’ve decided to open source my project as well.
You can all the source code for it over here on Github – also licensed as Apache 2.0 so you can reuse and learn forevermore.
My final Visual Studio plugin is also now online for you to download and use, and it can be found here.
If you’d like to give the new release of OnCheckin.com a try feel free to head on over and signup today!






Comments