When updating a project’s Database Schema as part of your deployment strategy, you want to automate as much of the process as possible to avoid human errors. If you have a Visual Studio Premium installed on your build server, generating schema update scripts is easy to achieve with the built-in database tools that the IDE contains. I will show you how to do this easily and also automatically deploy the changes to your destination server with the awesomeness of TeamCity.
Last week i posted about “Visual Studio’s Best Kept Secret – Compare & Update Database Schemas Right From Within the IDE” and this post is part two of this series on Visual Studio Premium’s Database Schema Comparison features.
The examples shown in this post can really be used with any build server – i will show you the command-line tools to run, and how to enter them into TeamCity, but at the end of the day the principles shown in this post can be used on any build server, in a build script like MSBUILD or NANT or simply from the command-line ‘old-school style’.
A Little Word About Dbschema Files
Visual Studio’s database tools store a database’s schema in a file that has a file extension *.dbschema. This file stores everything that defines a database’s structure so that it can be deployed, used in a database schema comparison or imported into a Visual Studio database project.
So what does a *.dbschema file’s contents look like?
<?xml version="1.0" encoding="utf-8"?>
<DataSchemaModel FileFormatVersion="1.2" SchemaVersion="1.1" DspName="Microsoft.Data.Schema.Sql.Sql100DatabaseSchemaProvider" CollationLcid="1033" CollationCaseSensitive="False">
    <Header>
        ...
        <CustomData Category="CompatibilityMode">
            <Metadata Name="CompatibilityMode" Value="100" />
        </CustomData>
        ...
    </Header>
    <Model>
        ...
        <Element Type="ISql90DefaultConstraint" Name="[dbo].[DF_tblBlogsComments_bcomPublished]">
            <Property Name="DefaultExpressionScript">
                <Value><![CDATA[((0))]]></Value>
            </Property>
            <Relationship Name="DefiningTable">
                <Entry>
                    <References Name="[dbo].[tblBlogsComments]" />
                </Entry>
            </Relationship>
            <Relationship Name="ForColumn">
                <Entry>
                    <References Name="[dbo].[tblBlogsComments].[bcomPublished]" />
                </Entry>
            </Relationship>
        </Element>
        ...
    <Element Type="ISql100Table" Name="[dbo].[tblBlogsComments]">
            <Property Name="IsAnsiNullsOn" Value="True" />
            <Relationship Name="Columns">
                <Entry>
                    <Element Type="ISql100SimpleColumn" Name="[dbo].[tblBlogsComments].[bcomID]">
                        <Property Name="IsNullable" Value="False" />
                        <Property Name="IsIdentity" Value="True" />
                        <Relationship Name="TypeSpecifier">
                            <Entry>
                                <Element Type="ISql90TypeSpecifier">
                                    <Relationship Name="Type">
                                        <Entry>
                                            <References ExternalSource="BuiltIns" Name="[int]" />
                                        </Entry>
                                    </Relationship>
                                </Element>
                            </Entry>
                        </Relationship>
                    </Element>
                </Entry>
...
A *.dbschema file is quite powerful in the world of Visual Studio’s Database tools. It stores the entire state of the database at the time of generation, and is a good way to version a database for tagging your database’s schema as part of your automated build, potentially for comparison, deployment or simply piece of mind – using these files to deploy directly to a database server is something i will show you in a later post.
Command-line versions of the Visual Studio tools
The developers working on the Visual Studio team were very kind to the fans of Continuous Integration when they built the Database tools that come with Visual Studio. I say this, because they included a command-line versions of the tool that does database schema comparisons, *.dbschema file generation and *.dbschema file deployment.
The command-line tool is called vsdbcmd.exe and sits inside the Visual Studio VSTSDB folder under the Visual Studio 2010 root:
%ProgramFiles(x86)%\Microsoft Visual Studio 10.0\VSTSDB\Deploy
The documentation for this command-line tool can be found here.
Ask anyone who is into Continuous Integration, and they’ll tell you that command-line tools are like pirate’s treasure when it comes to build-automation – this case is no different.
A quick take a look at the overloads that this little nugget of Continuous Delivery gold delivers:
VsDbCmd: Command-line tool for deploying Visual Studio database projects.
Copyright (c) Microsoft Corporation.  All rights reserved.

Help for dynamic property usage
/help[+|-]                        (short form /?)

/Action:{Import|Deploy}           (short form /a)

/ConnectionString:        (short form /cs)

/DatabaseSchemaProvider:  (short form /dsp)

@                           Read response file for more options


Help for command actions
/Action:{Import|Deploy}           (short form /a)

/Quiet[+|-]                       (short form /q)

/ConnectionString:        (short form /cs)

/DeployToDatabase[+|-]            (short form /dd)

/ModelFile:               (short form /model)

/TargetModelFile:         (short form /targetmodel)

/ManifestFile:            (short form /manifest)

/DeploymentScriptFile:    (short form /script)

/DatabaseSchemaProvider:  (short form /dsp)

/Properties:              (short form /p)

/ExtensionArguments:      (short form /ext)

@                           Read response file for more options
Our Automated Approach
Using the Visual Studio Database command-line tool VSTSDB.exe we’ll take the following approach to the automated generation of our database schema update SQL scripts.
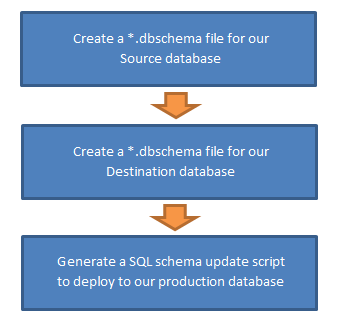
In order to generate a database change script for deployment to our staging or production database we will first create a dbschema file that represents our local development database. This can reside anywhere within connection reach from you build server, it can even reside ON your build server, if you wanted to setup a local SQL express database on your build server to simply for database comparison.
Once we have a dbschema file for our local (source) database, we will then create one for our staging or production (destination) database, and after that we will compare the two schema files and get the Visual Studio Database command-line tool to generate a change script that can be run on our destination database server to bring it up to speed with our development database.
The Secret Spell Is…
To complete our ultimate goal of database versioning awesomeness, we are going to use the following commands to “Make it happen” (You need to replace the items in CAPS with your server’s details):
Step 1 – Version of development “Source” Database
"C:\Program Files (x86)\Microsoft Visual Studio 10.0\VSTSDB\Deploy\vsdbcmd.exe" /a:Import /dsp:sql /model:SourceDatabase.dbschema /cs:"Server=MYSERVER; Database=VersionTest1; User Id=MYUSERNAME;Password=MYPASSWORD"
Step 2 – Version our “Staging” or “Production” database
"C:\Program Files (x86)\Microsoft Visual Studio 10.0\VSTSDB\Deploy\vsdbcmd.exe" /a:Import /dsp:sql /model:DestinationDatabase.dbschema /cs:"Server=MYSERVER; Database=VersionTest1; User Id=MYUSERNAME;Password=MYPASSWORD"
Step 3 – Compare the schemas of the two projects and create a Change Script
"C:\Program Files (x86)\Microsoft Visual Studio 10.0\VSTSDB\Deploy\vsdbcmd.exe" /a:Deploy /dsp:sql /dd:- /model:SourceDatabase.dbschema /targetmodelfile:DestinationDatabase.dbschema /deploymentscriptfile:update.sql /p:TargetDatabase="VersionTest2"
To be a little bit tricky, I will replace the C:\Program Files (x86) section with a TeamCity macro %env.ProgramFiles(x86)%
Also, remember that for my demonstration i am using two databases that we setup in my first post, named VersionTest1 and VersionTest2.
Let’s get too it
In this post I will take you first through a simple “run these commands in TeamCity” approach that is not connected to a Visual Studio Project or Solution in anyway, and then follow it up with a more Web Project integrated approach in the next post.
The first thing you are going to want to do if you don’t have TeamCity is to head over here and download the latest version. TeamCity is a fantastic continuous integration and build server and the price point is insane: FREE for the first 20 build configurations! So if you haven't installed it, grab it, go away and install it and then we can continue.
Now open up your TeamCity console and click on the ![]() link up the top of the page.
link up the top of the page.
Now click on the ![]() link and we’re on our way.
link and we’re on our way.
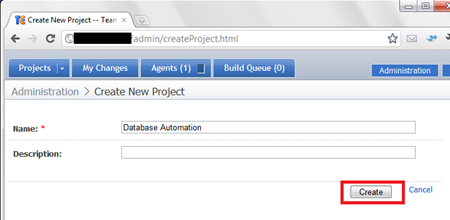
Give you Project a name – i am going to call mine Database Automation and click Create.
On the new project’s administration page that loads, click the link add a build configuration
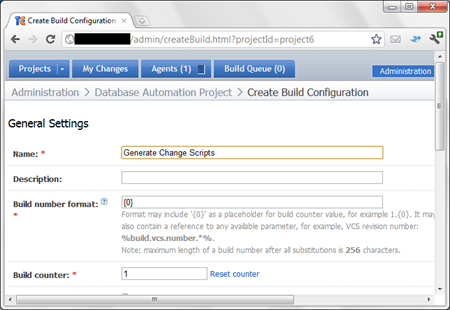
Name your Build Configuration – I've named mine “Generate Change Scripts” and at the bottom of the page click the button marked VCS Settings
Ignore everything on this page and click the button marked Add Build Step
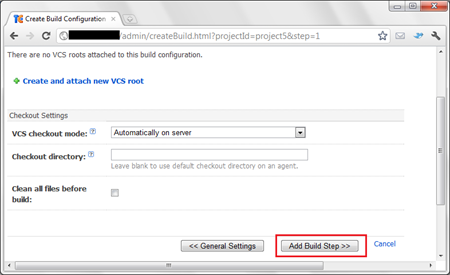
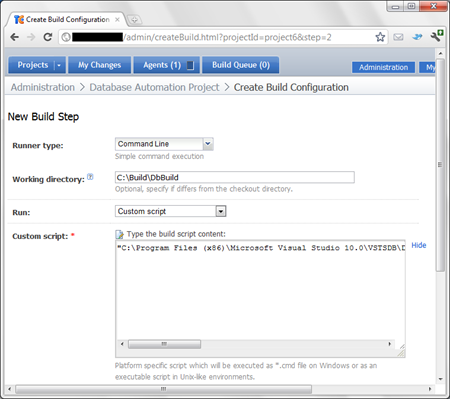
On the next page, Select “Command Line” as the Runner type, enter a working directory that all your build artefacts will live in as the Working Directory (I’ve use the path C:\Build\DbBuild – you can change this to any path that has read/write access by the user that TeamCity runs as), Select Custom script as the Run option, and then the following as the Custom Script parameter:
"%env.ProgramFiles(x86)%\Microsoft Visual Studio 10.0\VSTSDB\Deploy\vsdbcmd.exe" /a:Import /dsp:sql /model:SourceDatabase.dbschema /cs:"Server=MYSERVER; Database=VersionTest1; User Id=USERNAME;Password=PASSWORD"
You may ask at this point: Why do we use the Custom script option for the command line runner? Well the answer that there is a bug in TeamCity even to this day that affects parameters for an executable when the parameters contain quotes or double quotes.
Info can be found at: http://devnet.jetbrains.com/message/5298726#5298726
On the next page, click the link marked Add Build Step so that we can add the Destination Databases versioning task. For this task, enter exactly the same build runner details as the previous task, except this time enter the following script as the tasks runner:
"%env.ProgramFiles(x86)%\Microsoft Visual Studio 10.0\VSTSDB\Deploy\vsdbcmd.exe" /a:Import /dsp:sql /model:DestinationDatabase.dbschema /cs:"Server=MYSERVER; Database=VersionTest2; User Id=USERNAME;Password=PASSWORD"
Click Save and then click the link again Add Build Step. Again add a the same Build Runner, Working Directory and Run property as “Custom Script”.
Enter the following command:
"%env.ProgramFiles(x86)%\Microsoft Visual Studio 10.0\VSTSDB\Deploy\vsdbcmd.exe" /a:Deploy /dsp:sql /dd:- /model:SourceDatabase.dbschema /targetmodelfile:DestinationDatabase.dbschema /deploymentscriptfile:Update-Build%system.build.number%.sql /p:TargetDatabase="VersionTest2"
Now click Save to lock in the final step of our build.
Click on the “Projects” tab at the top of the page

Now all we need to do is click Run on our newly configured build and we’re on the way!

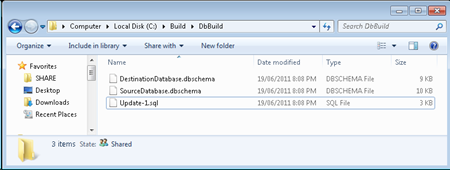
If i now visit the folder that i configured as the Working Directory for my build, i see 3 files:
- SourceDatabase.schema – The database schema for my source database VersionTest1
- DestinationDatabase.schema – The database schema for my destination database VersionTest2
- Update-1.sql – An update SQL schema script that allows us to bring our destination database VersionTest2 into line with our development database.
If i look inside the contents of the sql script i see the following:
/*
Deployment script for VersionTest2
*/
GO
SET ANSI_NULLS, ANSI_PADDING, ANSI_WARNINGS, ARITHABORT, CONCAT_NULL_YIELDS_NULL, NUMERIC_ROUNDABORT, QUOTED_IDENTIFIER OFF;
GO
:setvar DatabaseName "VersionTest2"
:setvar DefaultDataPath ""
:setvar DefaultLogPath ""
GO
USE [master]
GO
:on error exit
GO
IF (DB_ID(N'$(DatabaseName)') IS NOT NULL
    AND DATABASEPROPERTYEX(N'$(DatabaseName)','Status') <> N'ONLINE')
BEGIN
    RAISERROR(N'The state of the target database, %s, is not set to ONLINE. To deploy to this database, its state must be set to ONLINE.', 16, 127,N'$(DatabaseName)') WITH NOWAIT
    RETURN
END
GO
IF NOT EXISTS (SELECT 1 FROM [master].[dbo].[sysdatabases] WHERE [name] = N'$(DatabaseName)')
BEGIN
    RAISERROR(N'You cannot deploy this update script to target . The database for which this script was built, VersionTest2, does not exist on this server.', 16, 127) WITH NOWAIT
    RETURN
END
GO
IF (@@servername != '')
BEGIN
    RAISERROR(N'The server name in the build script %s does not match the name of the target server %s. Verify whether your database project settings are correct and whether your build script is up to date.', 16, 127,N'',@@servername) WITH NOWAIT
    RETURN
END
GO
IF CAST(DATABASEPROPERTY(N'$(DatabaseName)','IsReadOnly') as bit) = 1
BEGIN
    RAISERROR(N'You cannot deploy this update script because the database for which it was built, %s , is set to READ_ONLY.', 16, 127, N'$(DatabaseName)') WITH NOWAIT
    RETURN
END
GO
PRINT N'Creating [VersionTest1]...';
GO
ALTER DATABASE [$(DatabaseName)]
    ADD FILE (NAME = [VersionTest1], FILENAME = '$(DefaultDataPath)$(DatabaseName).mdf', SIZE = 3072 KB, FILEGROWTH = 1024 KB) TO FILEGROUP [PRIMARY];
GO
PRINT N'Creating [VersionTest1_log]...';
GO
ALTER DATABASE [$(DatabaseName)]
    ADD LOG FILE (NAME = [VersionTest1_log], FILENAME = '$(DefaultLogPath)$(DatabaseName)_log.ldf', SIZE = 1024 KB, MAXSIZE = 2097152 MB, FILEGROWTH = 10 %);
GO
USE [$(DatabaseName)]
GO
/*
The column [dbo].[Products].[Price] on table [dbo].[Products] must be added, but the column has no default value and does not allow NULL values. If the table contains data, the ALTER script will not work. To avoid this issue, you must add a default value to the column or mark it as allowing NULL values.
*/
IF EXISTS (select top 1 1 from [dbo].[Products])
    RAISERROR ('Rows were detected. The schema update is terminating because data loss might occur.', 16, 127) WITH NOWAIT
GO
PRINT N'Altering [dbo].[Categories]...';
GO
SET ANSI_NULLS, QUOTED_IDENTIFIER ON;
GO
ALTER TABLE [dbo].[Categories]
    ADD [CategoryDescription] VARCHAR (MAX) NULL;
GO
SET ANSI_NULLS, QUOTED_IDENTIFIER OFF;
GO
PRINT N'Altering [dbo].[Products]...';
GO
SET ANSI_NULLS, QUOTED_IDENTIFIER ON;
GO
ALTER TABLE [dbo].[Products]
    ADD [Price] MONEY NOT NULL;
GO
SET ANSI_NULLS, QUOTED_IDENTIFIER OFF;
GO
At this point i think it’s important to stop and grab yourself a <insert beverage of choice> and give yourself a pat on the back, as you’ve brought versioning your database into the realm of the automated.
Time for some Source Control Love
While it’s great having a folder on your build server that contains all the versioned rollup scripts for you database, you probably want to take it one step further and submit the change script to your source control for added security.
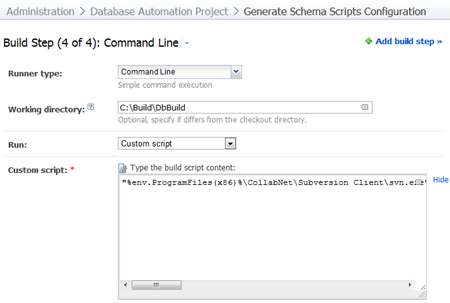
To accomplish this we will add a 4th build step to our build configuration, and use SVN to push our changes to our SVN repository (the same principals apply to any source control client that offers a console application).
This will add a extra step to the end of our build process like this:

Start by downloading the command-line Subversion from here (if you don’t already have it) and installing it on your build server:
http://www.collab.net/downloads/subversion/
Back in TeamCity click on our database schema build configuration.
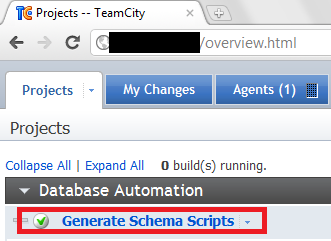
Now in the top right of the page, click the link Edit Configuration Settings
On the loaded page, click on the Build Steps(3) link to bring up our build steps list

Click the ![]() link
link
Select Command Line as the Runner type option
Enter the same Working directory as our other steps ( C:\Build\DbBuild ) and Custom Script as the Run: option
Now enter the following script in the textarea and replace your settings in the places i talk about below
"%env.ProgramFiles(x86)%\CollabNet\Subversion Client\svn.exe" import -m "Importing SQL Change script %system.build.number%" Update-Build%system.build.number%.sql https://MYSVNSERVER/svn/MYSVNPROJECT/trunk/Update-Build%system.build.number%.sql --non-interactive --trust-server-cert --username MYSVNUSERNAME --password MYSVNPASSWORD
Lets stop for a second and take a look at this SVN.exe’s command parameters:
import -m "Importing SQL Change script %system.build.number%"
this tells svn to import and add a message on the checkin
Update-Build%system.build.number%.sql
This tells SVN what file to import (our freshly generated SQL update script)
https://MYSVNSERVER/svn/MYSVNPROJECT/trunk/Update-Build%system.build.number%.sql
This sets the remote path that we want our file to be uploaded too
--non-interactive
SVN runs in non-interactive mode so that that the executable doesn’t ask us for confirmation for anything
--trust-server-cert
Allow SVN to automatically accept SSL certs (such as those used by Visual SVN)
--username MYSVNUSERNAME
My SVN username
--password MYSVNPASSWORD
My SVN password
Save this build item, and Run your build – your awesome continuous integration setup now versions, AND checks your change script into SVN.
(Feel free to modify this to work with your respective source control git or Mercurial/Hg executable)
Other Options
Because we have a SQL script from our automated database schema comparison, we are able to again take this one step further and actually deploy the change script to our destination database.

If your continuous delivery setup works with an internal database server and a staging/QA database server then this sounds like something you’d do on every release of your project, so automating it is probably just what you need. In cases like this, you’d probably not even split the steps in this post into its own build configuration, but add it as build steps at the end of your continuous delivery setup.
For this you simply add a build step that calls the sqlcmd.exe built into SQL Management Studio and included in Visual Studio’s installation.
To do this, repeat the above steps for the source control option, but use the following command in place of the SVN.exe command used above (with you command options replaced with mine below):
"%env.ProgramFiles%\Microsoft SQL Server\100\Tools\Binn\SQLCMD.EXE" –S MYSQLSERVER\MYSQLINSTANCE -i Update-Build%system.build.number%.sql -U MYSQLUSERNAME -P MYSQLPASSWORD
If you want to know more options surrounding this executable check the following MSDN article:
http://msdn.microsoft.com/en-us/library/ms162773.aspx
But why stop there?
My demonstration is quite simple, as it is manually fired and isn’t triggered by anything in an automated fashion (such as source control check-in). In my next post in this series I'll show you have to automate this further by adding the above into a Visual Studio Deployment Project so that you can version your database as part of your deployment.
