Over the last few years we've seen a lot of blog posts floating around showing how to setup and deploy a website to Windows Azure. In my opinion they all cover the the "Azure 101" point of view and don't speak too much about migrating a website that already exists to Azure and some of the pains and gains experienced along the way. This post covers the migration of this very website to Azure websites and migration of my blogs database to SQL Azure.
For reasons that will become clear in later blog posts, I've recently undertaken a large migration of most of my infrastructure to Microsoft's Azure platform. I've gone all-in with Azure.
And when considering moving some of my other websites to Azure, what better place to start than this very blog with database, website and mail forms, so the post below records my journey.
A bit of background
Before web get into the migration, it's probably getting some more information on this blog.
- The previous server it was hosted on was on a Windows VPS hosted with Softsys Hosting (read: I have full control).
- I get about 30,000-100,000 page views a month depending on how many posts I push out. Not too much traffic, but enough that I had to shift away from shared hosting a few years ago it became clear that my previous webhost was unable to serve the off 100,000+ page views per day that is sometimes triggered by a popular post every now and then.
- The site is handwritten and runs on ASP.Net MVC 3.
- Data access for the using Entity Framework 5 Code First Migrations. Migrations are run on application start up as I have a small enough model for it not to matter.
- I run a handwritten MetaWeblog API RPC endpoint for content entry through Windows Live Writer – there is no CMS, just a web service endpoint.
- I only have a single folder that needs app pool read/write – "/asset/blogimages/" for blog images.
- The site sends DKIM signed email by SMTP with SPF records setup in DNS for my local SMTP server (I currently use hMailServer – incredibly powerful and free SMTP server for windows with DKIM support).
The above makes the site pretty much a perfect candidate for Azure websites migration: not too many complex requirements, but enough to cover the standard gamut of simple website hosting.
Azure site setup
The first thing you'll need to do is login to the Azure portal here.
If you don't yet have an account, feel free to set one up now – you don't need anything prepared before following along with this post.
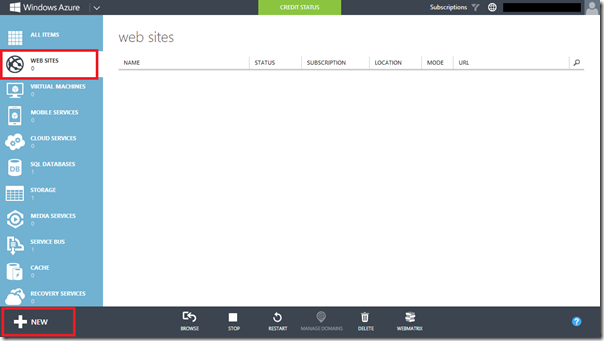
Now select the "Websites" option from the left hand side of the portal, and then click "New".
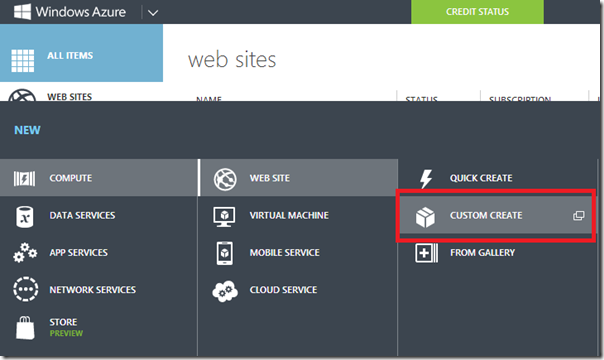
Select a new "Web site" and then select "Custom Create".
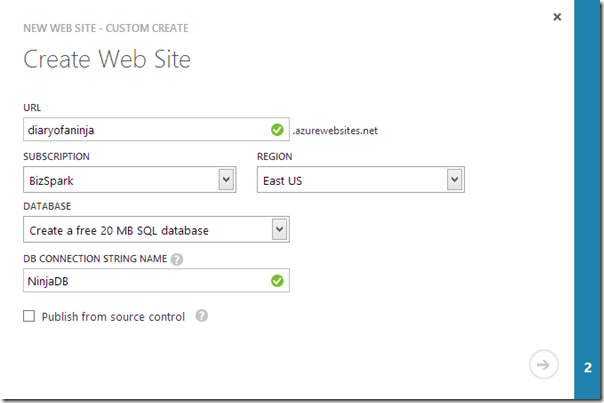
Enter a name for your website, what account you want to have it sit within and where you want it located.
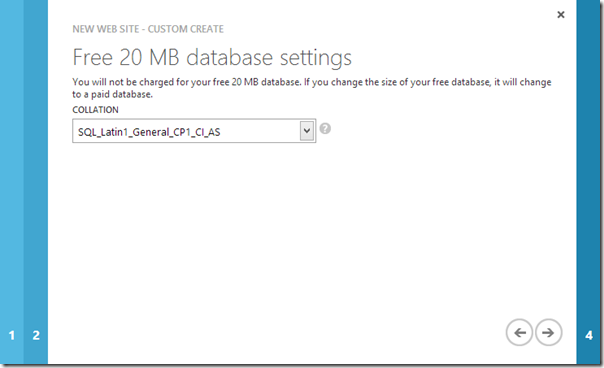
If you've never setup a SQL Azure database previous, you'll also want to select the "Free 20mb SQL database" (limit of one per account) option.
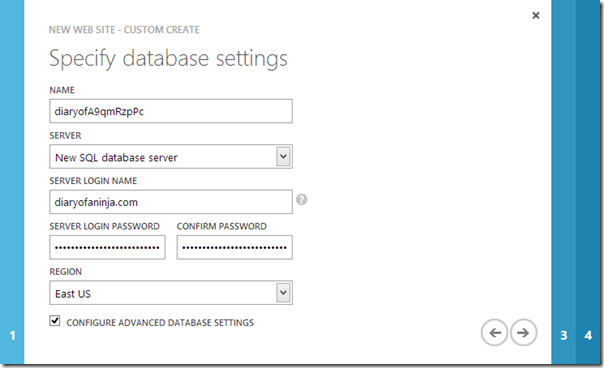
Then on the next page, enter the details for your new database. I recommend picking a password or a decent length/obscurity using a service similar to this awesome tool from John Van Der Loo.
It's worth noting that by default only machines within Azure's network can access your database, until you add exceptions to the rule within the portal.
If you want to change the collation settings, tick the box marked "Configure Advanced Database Settings".
Hit the next arrow and you're done setting up your site!
Database
Now you've got to configure your Azure database and upload your data to it. You can create and migrate a SQL database direct to SQL Azure using the Azure SDK additions to SQL Management Studio (details here).
For today though I am going to be doing a script migration, because the azure migration tools don't work for an Azure database that already exists (only works for DB's you're going to create during the migration process – odd). As I'm using the free 20mb Database I cannot create a new database as part of the setup/migration process.
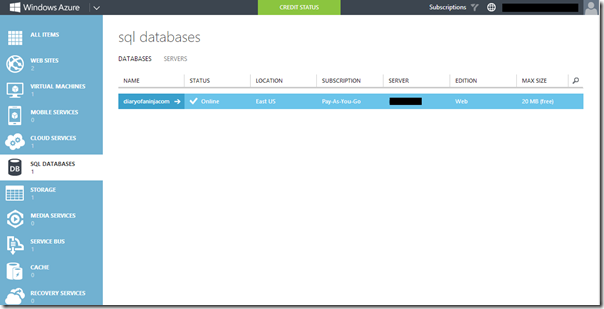
While logged into the azure portal, go into the database configuration section of Azure from the left navigation panel.
You should see your database – click on it.
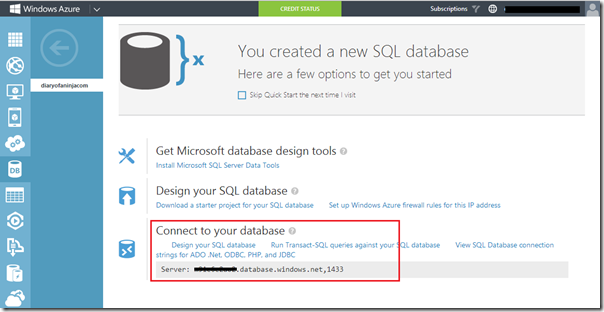
On the quick start page you'll notice connection string settings for your new database.
Copy these for use later in your web.config transforms and database migration connection.
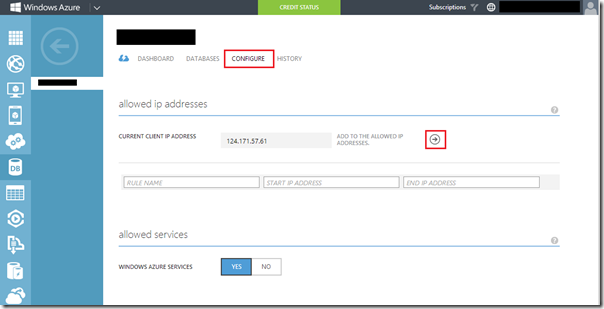
So that we can upload your data, go to the configure tab. Add your current client IP address so that you can connect/deploy to your azure account from your local machine.
Now open SQL management studio and right click the local database you want to migrate. Select Actions > Generate Scripts
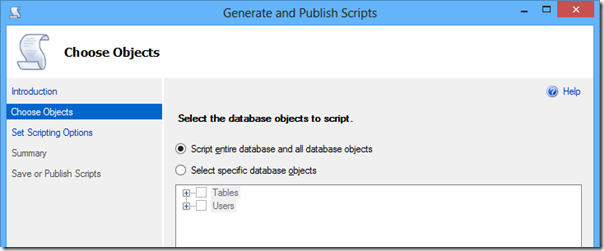
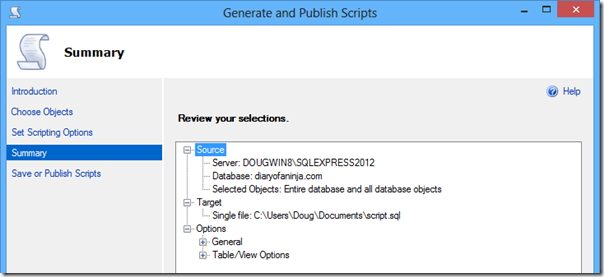
Select "Script the entire database and all database objects" and click Next
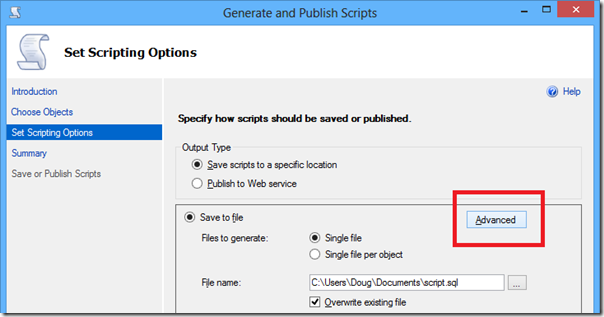
On the next screen click the "Advanced" button.
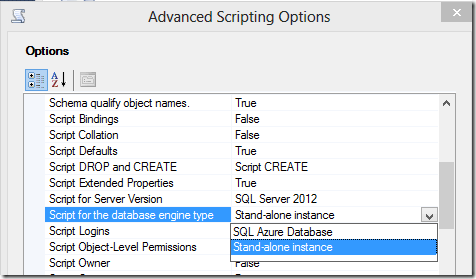
Scroll to the option "Script for the database engine type" and select "SQL Azure"
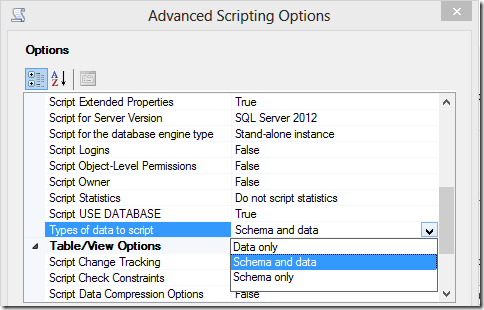
Then select the option "Types of data to script" and select "Schema and data" this ensures that your data is scripted out as well.
Hit OK, then Next and generate your SQL script file.
Now open the SQL script inside SQL Management studio – if it is too large, you're going to need to use the command line client, as I've previous described here.
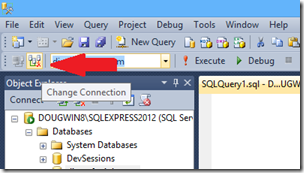
Once the script is open in SQL Management Studio, select the "Change connection" from the dropdown within SQL Management studio.
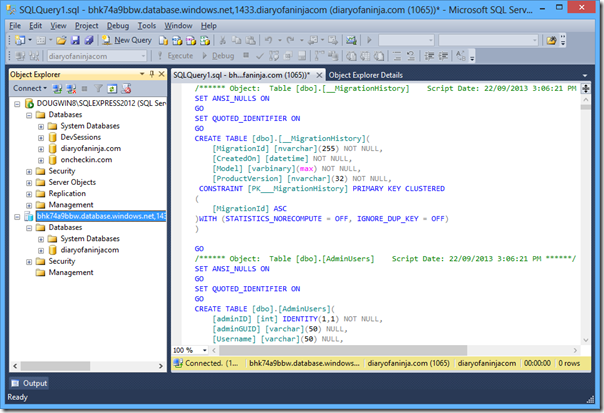
Enter the credentials and connection details you wrote down earlier from the Azure web portal.
Once you're connected, simply select your database from the list of databases in the list, and Run your script by either hitting F5 or by using the taskbar button.
This might take a while. My puny 6mb blogging database took 10 minutes (I am limited to 1mbit upload though so your mileage may vary).
Setting up SMTP/Mail
One of the of things I found odd about Azure is that they don't offer SMTP as part of their hosting. This forced me to look elsewhere to outsource the mail for my contact email form.
I ended up using SendGrid as they offer Azure customers a great deal with 25,000 emails per month for free. I am pretty religious about signed mail and correct SPF records etc when sending applications, as it's something that developers often overlook. SendGrid takes care of ticking all of these boxes for you without any of the setup headache.
This literally meant I just needed to update my web.config email sections to point at SendGrid. The only thing I don't like about this is the fact that you need to us your account credentials as you SMTP credentials. As you can understand this makes it a complete pain if you need to change your password.
<mailSettings>
  <smtp deliveryMethod="Network">
    <network host="smtp.sendgrid.net" userName="MySendGridPassword" password="MySendGridPassword" port="25"/>
  </smtp>
</mailSettings>
Deploying your website
The next step is obviously to deploy your website to Azure – this is something they've made dead simple.
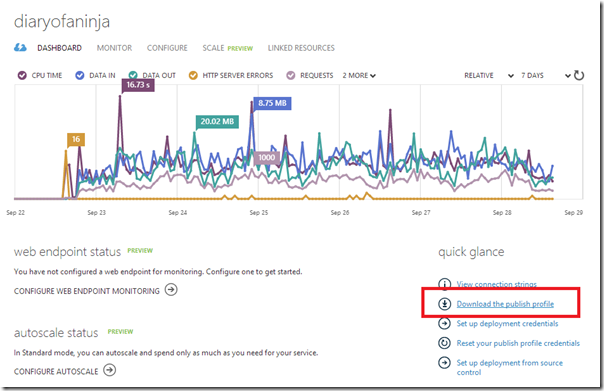
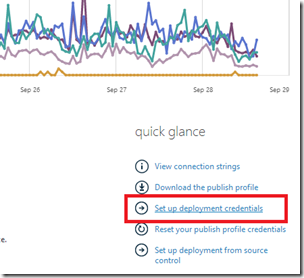
Open your website in the Azure portal and click the "Download the publish profile" link.
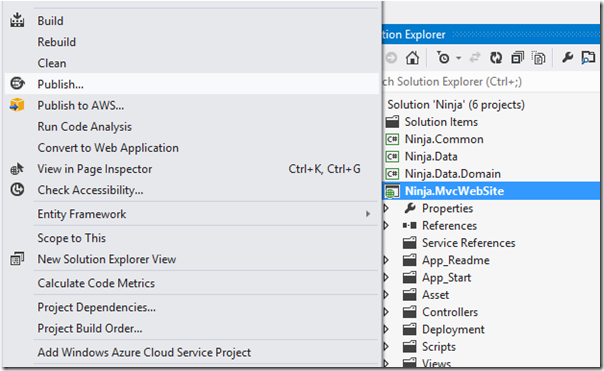
Now open your website in Visual Studio. Right click your website, and click "Publish".
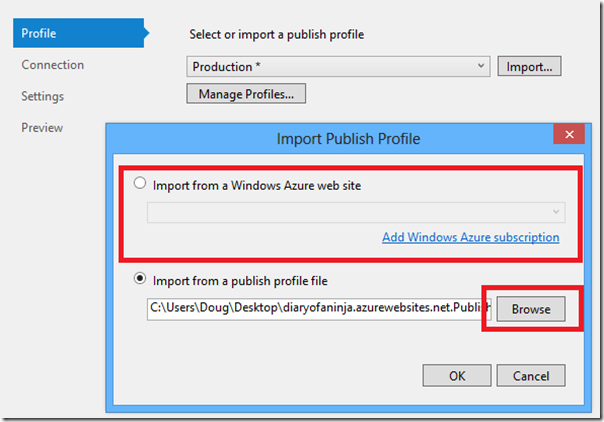
Now click the "import" button and browse and select the file you just downloaded. Alternatively you can actually skip this and actually directly download it from the azure websites option.
Now close this, and right click on your web.config file and click the option "Add config transform". This should add a new config transform for your azure website.
Add any configuration transforms required for your site to run in Azure. Mine included my SMTP setting, my SQL Azure connection string.
<?xml version="1.0" encoding="utf-8"?>
<configuration xmlns:xdt="http://schemas.microsoft.com/XML-Document-Transform">
  <connectionStrings>
    <add name="NinjaDB" xdt:Locator="Match(name)" xdt:Transform="Replace"
         providerName="System.Data.SqlClient"
         connectionString="[Azure connection string]" />
  </connectionStrings>
  <system.net>
    <mailSettings>
      <smtp from="website[at]diaryofaninja.com" deliveryMethod="Network" xdt:Transform="Replace" >
        <network host="smtp.sendgrid.net" userName="[sendgrid username]" password="[send grid password]" port="25"/>
      </smtp>
    </mailSettings>
  </system.net>
</configuration>
Now open your publish dialog again (right click your website, and click "Publish").
Now actually press the "publish" button to start the publishing process.
This can then be processed by your build server later using the familiar publishing profile MSBuild syntax.
Ninja.SLN /p:Configuration=Release;DeployOnBuild=true;PublishProfile=Azure;Password=[my azure publishing password]
The only other thing I needed to do was upload my blog images. I did this by creating new credentials from the azure portal and then connecting using an FTP client.
You can also access the default credentials inside the publish settings file you downloaded from the portal.
DNS
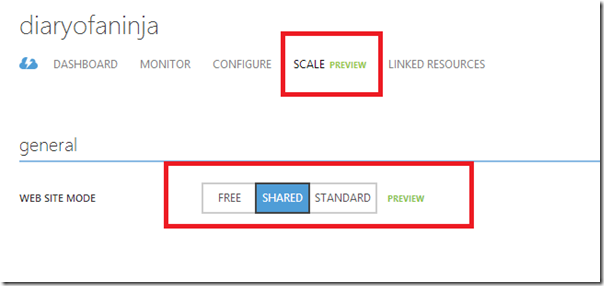
Free websites in Azure don't allow dedicated domain names. For this functionality you need to have your website running in "shared" mode, which obviously comes at a cost after the first 5gb of bandwidth you use (ie. still basically free for small sites).
You change this from within the "scale" page of your website control panel in Azure.
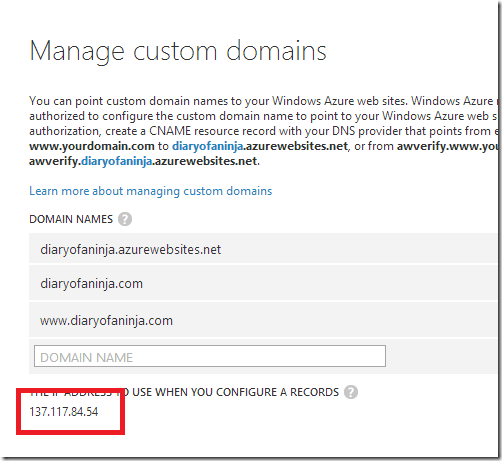
Once this is done, you can then add additional domain names to your site by going to the "configure" page and pressing the "manage domains" button.
This will give you an IP address to add to your DNS.
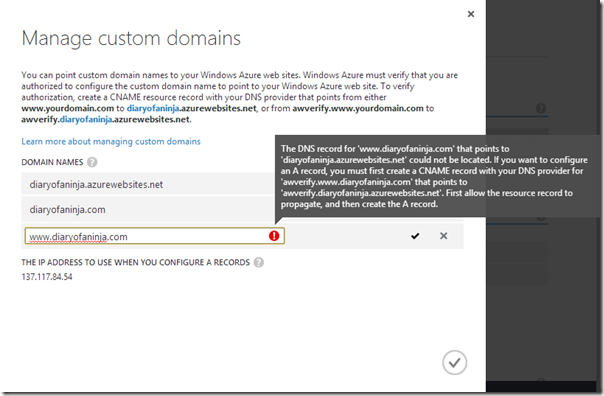
Before you can setup you can setup your domain for Azure you have to prove that you control the domain you're about to point at. Azure does this by looking for validation CNAME records in your DNS in the following format:
awverify.[yourdomain name.com] CNAME awverify.[yourazurewebsite].azurewebsites.net
an example of this is that for my domain i wanted to host both www. and the naked domain for my site, so i needed to create the following records:
awverify.diaryofaninja.com CNAME awverify.diaryofaninja.azurewebsites.net
awverify.www.diaryofaninja.com CNAME awverify.diaryofaninja.azurewebsites.net
Now that you've added your domain bindings to Azure, simply log into your domain registrar or wherever you host your DNS (I host mine on Amazon Route 53 for now) and replace the A records for your domain name with the IP address provided by Azure.
Wait a few hours for the DNS zones to propagate and you're done – your website should be live!
That's it!
I actually found the migration pretty straight forward. The only thing that was a little frustrating was the SQL upload as the Azure SDK tooling didn't work so well for non-new databases (i.e. I had to script the schema and data).
Go get yourself a [insert tasty beverage] and enjoy no longer having to worry about hosting scalability for your site – let Microsoft and Scott Gu's team worry about it for you.
Comments