I first started playing around with my Kinect at home just to get a feel for what was involved in working with the SDK – I must say that I, like many of you, was amazed, and still am, at how awesomely simple and beautifully designed the API’s in the Kinect NUI framework are. A lot of people have written little Kinect demo’s showing how to create buttons and detect hand location, but I thought I’d try something different. So I set out to mimic some of the Xbox Live's interface elements in WPF.
I must admit this post might be a little late in it’s timing – most people where blogging about the Kinect SDK at the very start of this year, and while I was part of that throng of developers excitedly crawling all over the SDK like a pack of red-cordial infected pre-school children who’ve just discovered a secret stash of unattended Space Hoppers, I simply haven't had the time I'd like to write about it. I cannot contain that silence any longer.
Game Plan
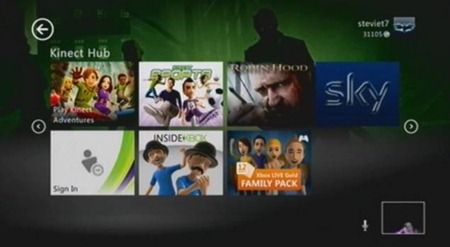
Before you set off on any little learning adventure you usually want to have a set goal in mind to make your learning experience more driven – for me this was accomplishing something different to a lot of the tutorials out there and that was to create a unified interface that closely matched the Xbox Kinect Hub that you use to navigate around your Xbox with.
You can find a walkthrough of the interface I’m talking about below.
But basically, I want something similar to the Kinect Hub (screen shots below).
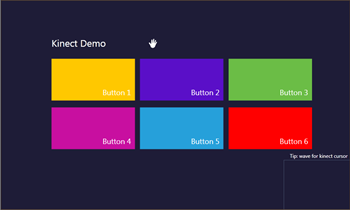
Primarily I want to create an interface that has a tile based layout and allows you to “press” the buttons with your hand. This would then allow me to create applications that allow you to “navigate” around a series of pages and view “assets” – whether they be videos or images. The navigation sections won’t be covered in this post, but i plan on doing a number of other posts covering these functionalities.
I also want a “hand” cursor that has a timer based “ring” that is used to “press” the buttons similar to the screen below:

Getting started
Before we start out on our building adventure, you’ll need to grab the necessary tools for the job.
You’ll need the following:
- a Kinect for Xbox 360 Sensor
- Visual Studio Express of higher
- .Net Framework 4.0
- Kinect SDK - http://research.microsoft.com/en-us/um/redmond/projects/kinectsdk/
Once you've got all this installed and setup i recommend you do a quick restart (I've found on both my work and home pc, that there are usually issues using the SDK before you first restart).
WARNING, DON’T DO THIS AT HOME KIDS
I am a web developer by trade. I do not have much experience with WPF/Windows Forms. Therefore, any code you see in this post that you want to sip sherry and scoff at while going about your day job bringing a new accounting package to the world (I kid, I kid…) will probably be perfectly warranted and I’d love to hear from you on ways you’d do things differently or where I’ve gone wrong. Additionally, my code has been simplified to make it shorter to fit with the format of this post. This is my journey into the world of the Kinect SDK, be gentle :-)
API Design - A Work Of Art
Before we make a start on the project i have to give a quick shout out to the Kinect SDK team. They have done a stunning job on the design of the SDK and the API’s that come with it. You just have to take a look at the skeleton tracking section of the API to see how elegant the API allows your code to become:
void SkeletonFrameReady(object sender, SkeletonFrameReadyEventArgs e)
{
    SkeletonFrame skeletonSet = e.SkeletonFrame;

    SkeletonData firstPerson = (from s in skeletonSet.Skeletons
                                where s.TrackingState == SkeletonTrackingState.Tracked
                                orderby s.UserIndex descending
                                select s).FirstOrDefault();
}
Is that just beautiful or what? In my example above you get handed a list of IEnumerable<SkeltonData> and you’re off.
Follow this up with amazing little gems such as the access provided to all the major body joints of a skeleton and you start to get this sudden rush that you only get when first start hacking around with something awesome early in your career – remember the time you grok’d your first programming language and wanted to take over the world with LOGO controlled green turtles? This will bring back those glory days.
Joint rightHand = jointsCollection[JointID.HandRight];
Joint leftHand = jointsCollection[JointID.HandLeft];
On with the show
The first part of my project involved just basically setting up a new WPF project.
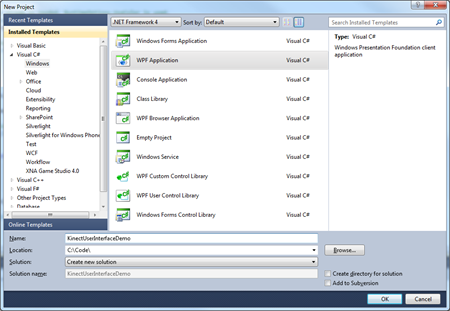
We are ready to get going, and the first thing i want to do is implement the Xbox Kinect Hub “hand”.
This is an interesting part of the project, as to solve it I’m going to hack a few different things together. The hand needs to have a circle complete a rotation around it when it hovers over an object. Clint Rutkas has already completed similar functionality in the Coding4Fun Kinect project with the addition of Hover Buttons that have a relatively standard eventing model, although he doesn’t use a hand as his button, and instead uses simply circular buttons. Michael Crump has a done a nice tutorial on using them here.
I want to use them slightly differently though. In both the original use in the Coding4Fun toolkit and Michael’s post they place the button’s statically in the Window and have a cursor move over the top of them to Click them. I am going to reverse this event flow and make the Button itself the cursor and fire the Hovering event inside the control whenever the button is sitting over the top of one of my buttons.
To achieve this i am going to download the Coding4Fun Kinect Toolkit, add a reference to the library Coding4Fun.Kinect.Wpf and add a hover button to my MainWindow.xaml.
At the same time I’m going to setup my MainWindow.xaml with some new properties such as a background color, bigger screen size (1680x1045 – if your screen size is smaller you may have to change this to suit), and remove the navigation bars to make it run in full screen mode.
My new MainWindow.xaml header looks like this (with the added reference to the Coding4Fun WPF and a :
<Window x:Class="KinectUserInterfaceDemo.MainWindow"
        WindowState="Maximized"
        WindowStyle="SingleBorderWindow"
        xmlns="http://schemas.microsoft.com/winfx/2006/xaml/presentation"
        xmlns:x="http://schemas.microsoft.com/winfx/2006/xaml"
        Background="#1E1C37"
        xmlns:Controls="clr-namespace:Coding4Fun.Kinect.Wpf.Controls;assembly=Coding4Fun.Kinect.Wpf"
        Title="Kinect Demo" Height="1045" Width="1680">
Now that we’ve added the right references, I’m going to add my hand PNG to my project, and set it as a Resource inside my project.
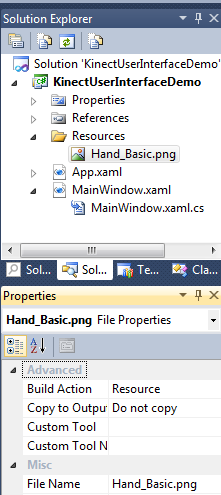
With this done, i can add a Hover Button to my xaml page and set its background as my hand PNG resource above;
<Grid x:Name="theGrid">
    <Canvas Background="Transparent">
        <Controls:HoverButton Margin="0" Padding="0" x:Name="kinectButton" ImageSize="64"
                                ImageSource="/Resources/Hand_Basic.png"
                                ActiveImageSource="/Resources/Hand_Basic.png"
                                TimeInterval="2000"  Panel.ZIndex="1000" />
    </Canvas>
</Grid>
I also want to create a bunch of “buttons” to press. So I’m going to go ahead and add the following;
<Button Canvas.Left="246" Canvas.Top="282" Height="200" Name="button1" Width="400" Background="#FFC800"
        HorizontalContentAlignment="Right" VerticalContentAlignment="Bottom" Click="button1_Click">
    <TextBlock FontSize="36" Foreground="White" Height="64" Text="Button 1" Width="155" />
</Button>
<Button Canvas.Left="670" Canvas.Top="282" Height="200" Name="button2" Width="400" Background="#FF5A0FC8"
        HorizontalContentAlignment="Right" VerticalContentAlignment="Bottom" Click="button2_Click">
    <TextBlock FontSize="36" Foreground="White" Height="64" Text="Button 2" Width="155" />
</Button>
<Button Canvas.Left="1095" Canvas.Top="282" Background="#6BBD46" Height="200" Name="button3" Width="400"
        HorizontalContentAlignment="Right" VerticalContentAlignment="Bottom" Click="button3_Click">
    <TextBlock FontSize="36" Foreground="White" Height="64" Text="Button 5" Width="155" />
</Button>
<Button Canvas.Left="246" Canvas.Top="515" Background="#C80FA0" Height="200" Name="button4" Width="400"
        HorizontalContentAlignment="Right" VerticalContentAlignment="Bottom" Click="button4_Click">
    <TextBlock FontSize="36" Foreground="White" Height="64" Text="Button 4" Width="155" />
</Button>
<Button Canvas.Left="670" Canvas.Top="515" Background="#26A0DA" Height="200" Name="button5" Width="400"
        HorizontalContentAlignment="Right" VerticalContentAlignment="Bottom" Click="button5_Click">
    <TextBlock FontSize="36" Foreground="White" Height="64" Text="Button 5" Width="155" />
</Button>
<Button Canvas.Left="1095" Canvas.Top="515" Background="#FF0000" Height="200" Name="button6" Width="400"
        HorizontalContentAlignment="Right" VerticalContentAlignment="Bottom" Click="button6_Click">
    <TextBlock FontSize="36" Foreground="White" Height="64" Text="Button 6" Width="155" />
</Button>
Given that the Xbox Kinect user interface usually includes a window that shows the user, I’ll also add an Image control that I’ll fill later with a single video frame that the Kinect sends us through.
<Image Name="videoImage" Height="240" Width="320" HorizontalAlignment="Right" VerticalAlignment="Bottom"></Image>
These two additions should bring it all together for us to have a nice base use interface look that I’m going for;
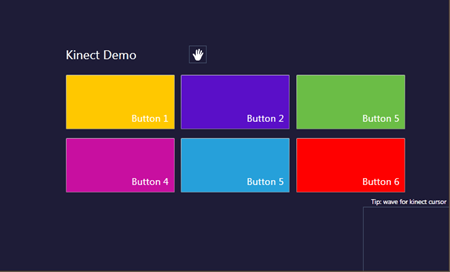
Now for the fun stuff. Shift to the code behind for MainWindow.xaml and follow the bouncing ball.
Inside the constructor for my xaml page, I add a new click handler to my hover button, add a new class level Runtime object and set up some handlers for it to tap into the window’s Loaded and Unloaded events.
Loaded += new RoutedEventHandler(MainWindow_Loaded);
Unloaded += new RoutedEventHandler(MainWindow_Unloaded);
kinectButton.Click += new RoutedEventHandler(kinectButton_Clicked);
_runtime.VideoFrameReady += runtime_VideoFrameReady;
_runtime.SkeletonFrameReady += SkeletonFrameReady;
As you can see from my code above, the Kinect SDK simply sets up a bunch of events that get fired for every Kinect frame that is received and processed. This means that we receive a call to my SkeletonFrameReady and runtime_VideoFrameReady methods around 20-30 times a second.
Next add some logic for the Loaded and Unloaded events defined in our constructor above. This will setup our Kinect SDK Runtime object, configure smoothing so that the joint movements we receive are slightly smoothed from the sensor (you don’t want our “hand” cursor jumping all around the screen when you wave you hand), and finally we need to setup a list of all our rectangular “buttons”;
void MainWindow_Loaded(object sender, RoutedEventArgs e)
{
    InitializeButtons();
    //Since only a color video stream is needed, RuntimeOptions.UseColor is used.
    _runtime.Initialize(RuntimeOptions.UseDepthAndPlayerIndex | Microsoft.Research.Kinect.Nui.RuntimeOptions.UseColor | RuntimeOptions.UseSkeletalTracking);
    _runtime.SkeletonEngine.TransformSmooth = true;

    //Use to transform and reduce jitter
    _runtime.SkeletonEngine.SmoothParameters = new TransformSmoothParameters
    {
        Smoothing = 0.75f,
        Correction = 0.0f,
        Prediction = 0.0f,
        JitterRadius = 0.05f,
        MaxDeviationRadius = 0.04f
    };

    //You can adjust the resolution here.
    _runtime.VideoStream.Open(ImageStreamType.Video, 2, ImageResolution.Resolution640x480, ImageType.Color);
}
void MainWindow_Unloaded(object sender, RoutedEventArgs e)
{
    _isClosing = true;
    _runtime.Uninitialize();
}
private void InitializeButtons()
{
    buttons = new List<Button>
                {
                    button1,
                    button2,
                    button3,
                    button4,
                    button5,
                    button6
                };
}
Next, lets go ahead and add some logic into my SkeletonFrameReady method so that i can hook up the HoverButton I created above as a cursor. I’m going to be controlling its location on the screen relative to where a user’s hand is in the video frame. Then we’ll check if the hand is over any of my buttons, and if so begin the Hovering event for the Kinect button that we’ve hijacked for our cursor.
Below is the code I have for detecting my first person, finding out what laterality they are (right handed or left handed depending on which hand is higher), and then allowing them to control the HoverButton with that hand to “click” any buttons it is hovering over;
void SkeletonFrameReady(object sender, SkeletonFrameReadyEventArgs e)
{
    if (e.SkeletonFrame.Skeletons.Count() == 0) return;

    SkeletonFrame skeletonSet = e.SkeletonFrame;

    SkeletonData firstPerson = (from s in skeletonSet.Skeletons
                                where s.TrackingState == SkeletonTrackingState.Tracked
                                orderby s.UserIndex descending
                                select s).FirstOrDefault();

    if (firstPerson==null) return;

    JointsCollection joints =  firstPerson.Joints;

    Joint rightHand = joints[JointID.HandRight];
    Joint leftHand = joints[JointID.HandLeft];

    //find which hand is being used for cursor - is the user right handed or left handed?
    var joinCursorHand = (rightHand.Position.Y > leftHand.Position.Y)
                    ? rightHand
                    : leftHand;

    float posX = joinCursorHand.ScaleTo((int)SystemParameters.PrimaryScreenWidth, (int)SystemParameters.PrimaryScreenHeight).Position.X;
    float posY = joinCursorHand.ScaleTo((int)SystemParameters.PrimaryScreenWidth, (int)SystemParameters.PrimaryScreenHeight).Position.Y;

    Joint scaledCursorJoint = new Joint
                            {
                                TrackingState = JointTrackingState.Tracked,
                                Position = new Microsoft.Research.Kinect.Nui.Vector
                                             {
                                                 X = posX,
                                                 Y = posY,
                                                 Z = joinCursorHand.Position.Z
                                             }
                            };
    OnButtonLocationChanged(kinectButton, buttons, (int)scaledCursorJoint.Position.X, (int)scaledCursorJoint.Position.Y);
}
private static void OnButtonLocationChanged(HoverButton hand, List<Button> buttons, int X, int Y)
{
    if (IsButtonOverObject(hand, buttons)) hand.Hovering(); else hand.Release();

    Canvas.SetLeft(hand, X - (hand.ActualWidth / 2));
    Canvas.SetTop(hand, Y - (hand.ActualHeight / 2));
}
void kinectButton_Clicked(object sender, RoutedEventArgs e)
{
    //call the click event of the selected button
    _selectedButton.RaiseEvent(new RoutedEventArgs(ButtonBase.ClickEvent, _selectedButton));
}
public static bool IsButtonOverObject(FrameworkElement hand, List<Button> buttons)
{
    if (_isClosing || !Window.GetWindow(hand).IsActive) return false;

    // get the location of the top left of the hand and then use it to find the middle of the hand
    var handTopLeft = new Point(Canvas.GetTop(hand), Canvas.GetLeft(hand));
    _handLeft = handTopLeft.X + (hand.ActualWidth / 2);
    _handTop = handTopLeft.Y + (hand.ActualHeight / 2);

    foreach (Button target in buttons)
    {
        Point targetTopLeft = target.PointToScreen(new Point());
        if (_handTop > targetTopLeft.X
            && _handTop < targetTopLeft.X + target.ActualWidth
            && _handLeft > targetTopLeft.Y
            && _handLeft < targetTopLeft.Y + target.ActualHeight)
        {
            _selectedButton = target;
            return true;
        }
    }
    return false;
}
And for good measure, I'll add my runtime_VideoFrameReady method to fill our image with the current video frame;
void runtime_VideoFrameReady(object sender, ImageFrameReadyEventArgs e)
{
    //pull out the video frame from the eventargs and load it into our image object
    PlanarImage image = e.ImageFrame.Image;
    BitmapSource source = BitmapSource.Create(image.Width, image.Height, 96, 96,
        PixelFormats.Bgr32, null, image.Bits, image.Width * image.BytesPerPixel);
    videoImage.Source = source;
}
Last but not least, we’ll go ahead and add all the event handlers for our Buttons. My aim is just to notify you when they’ve been clicked – but you get the point so feel free to take it from here;
private void button1_Click(object sender, RoutedEventArgs e)
{
    MessageBox.Show("Button 1 Clicked");
}

private void button2_Click(object sender, RoutedEventArgs e)
{
    MessageBox.Show("Button 2 Clicked");
}

private void button3_Click(object sender, RoutedEventArgs e)
{
    MessageBox.Show("Button 3 Clicked");
}

private void button4_Click(object sender, RoutedEventArgs e)
{
    MessageBox.Show("Button 4 Clicked");
}

private void button5_Click(object sender, RoutedEventArgs e)
{
    MessageBox.Show("Button 5 Clicked");
}

private void button6_Click(object sender, RoutedEventArgs e)
{
    MessageBox.Show("Button 6 Clicked");
}
You have to agree, that was simple huh? Amazingly simple.
So there you have it – if you haven’t already, go out and have a play with the Kinect SDK. Your inner-youthful-programmer will thank you.
Here’s one I prepared earlier
I’ve taken the liberty of packaging up this project for your perusal. Feel free to download it and give it a bash!