Over the years I have had the luck to work alongside many really smart, switched on people in the development community. I’ve learnt from them many intermediate and experienced programming skills. Generally when it comes understanding the very basis of how the internet functions using DNS, most of these very same experienced developers haven’t got a clue. I wrote this post to hopefully help pay back some of the awesome karma they have earned helping me over the years, by teaching them something in return. Lets learn about DNS.
 DNS is a huge part of the inner workings of the internet. Web Developers spend a considerable amount of man hours a year ensuring the sites they build are fast and respond well to user interaction by setting up expensive CDN’s, recompressing images, minifying script files and much more – but what a lot of us don’t understand is that DNS server configuration can make a big difference to the speed of your site – hopefully at the end of this post you’ll feel empowered to get the most out of this part of your website’s configuration.
What I will cover in this post:
- How the internet works from a Domain/DNS standpoint.
- Tools that you should use when investigating DNS problems or testing configuration.
- A basic overview of the main types of DNS records.
- Setting up a site from scratch.
- Investigating some common problems.
Why does DNS matter to you?
Well it’s simple – if you are a developer it matters to you because:
- You are a passionate developer, and therefore knowing this stuff is your job.
- You own a website, and up until now your webhost has taken care of your DNS for you – but you need to know what's going on in case something bad happens…
- Maybe the webhost you have allows you to manage your own DNS using a web interface, but you haven’t a clue what you are doing.
- The DNS that your webhost or ISP offers you is probably not the fastest – if your website grows over time, you probably want to setup your own DNS or manage it through a dedicated service such as DNSMadeEasy, ZoneEdit or DynDNS.
First up: How the internet works (DNS)
If you already know how this works feel free to step ahead.
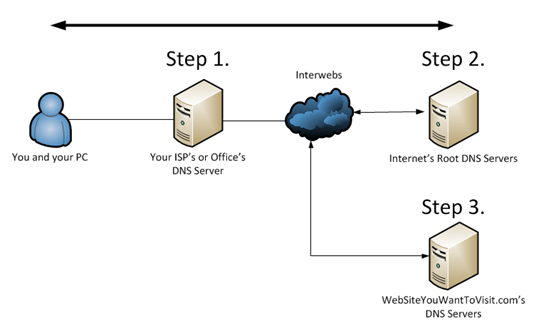
In really simple terms, when you enter a URL and hit enter, apart from magical unicorns rendering the requested page in your browser window, the interwebs works kinda like this:
- You want to visit to a domain name, so your PC first checks its internal DNS cache to see if it’s looked it up recently – if so it uses this record
- Your PC then asks your DNS server (probably configured by your router or ISP when you first started your PC) for the IP address of the server hosting the domain name you want to visit.
- Your ISP’s DNS server looks up the root DNS servers for the world to find out who takes care of the DNS configuration for the domain you want to visit.
- Your ISP’s DNS server then asks this authorative DNS server for the domain name you want’s IP information, fetches it, caches it, and then returns it to your PC.
- Your browser connects to this IP address and asks for a web page.
There are a number of different scenarios that play a role in special circumstances with the above but I'm not really going to cover everything in this post.
What DNS does do:
- Converts hostnames to IP addresses.
- Stores mail delivery information for a domain.
- Stores miscellaneous information against a domain name (TXT records).
What DNS doesn’t/cannot do
- Redirects users to a different server/site.
- Configure which port the client is connecting to (not entirely true; SRV records are used for protocol/port mappings for services).
Tools for the Job
One of the coolest things about the tools you’ll need for this blog post, is where I tell you that independent of which operating system you are using, you almost certainly have everything you need to query and test the DNS configuration of your website installed right now without you even knowing
The Swiss Army Knife of DNS inspection is the command line tool NSLOOKUP. This is installed by default in nearly every OS you’ll ever need it on.
NSLOOKUP on Unix/Linux/Mac OSX
Another cool thing the usage is the same on most platforms as well.
To run NSLOOKUP simply open a terminal/command prompt and type
nslookup
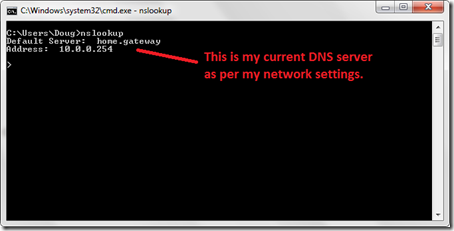
The first thing you’ll notice about the pic above is that the first thing NSLOOKUP tells me upon launch is the current DNS server that it will use for its lookups.
By default NSLOOKUP will use your current machine’s DNS settings for its DNS lookups. This can sometimes give you different results from the rest of the world as your internal DNS at your place of work/ISP may be returning different results so they can route, say your office mail, to the internal mail server IP rather than the external internet/DMZ IP address.
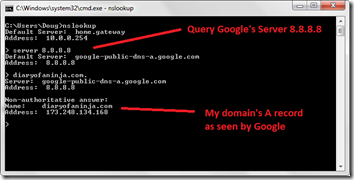
Lets change this to use Google’s global DNS server to get a better global view (what others see when they surf the web outside my network) on our DNS queries, by typing;
server 8.8.8.8
Now if I query this blog’s domain name “diaryofaninja.com.” (ensure you place the additional period on the end of this query to avoid any internal DNS suffixes to be added) I should get back the A record for my domain; (A records are the default query type used by NSLOOKUP – I discuss DNS record types further in this post below).

An overview of common DNS record types
Below is a simple overview of all the common types of DNS records and some example scenarios.
All records usually share the following common properties:
Value – this is usually the contents of the records. If it is an A record this is the IP address for that A record
TTL – this is the “Time To Live” in seconds for a DNS record and basically means that DNS Clients of Servers accessing the requested record should not cache the record any longer than this value. If this value is set to 3600 this means to cache the returned record’s value for an hour (these values are usually the reason that IT people talk about DNS changes taking “24-48 hours” as these values are usually set quite high on hostnames that are quite static so that they offer the best performance by being kept in cache.
SOA (Start of Authority) records
SOA records (start of authority records) are the root of your domain’s registration. SOA records are created by your domain name registrar in the parent domain’s DNS servers (in the case of a .com domain the SOA record is created in the DNS servers for the .com root domain. In an SOA record the hostnames or IP addresses of your domain’s DNS servers are stored. These tell the internet’s root DNS servers (mother ship DNS servers) where to ask for the rest of your domain’s DNS configuration (such as A, MX and TXT records). When a client (a web browser, a mail server, an FTP client etc.) wants to connect to part of your website, it asks the locally configured DNS server for the record – the server in turn looks for the SOA records for your domain so it knows which DNS server to ask about it.
Consider these records as the source of “which DNS server stores all the information about the website I want to look up”.
Hostname (A and CNAME) records
A records store information about a hostname record for your domain name. These list the IP address that a client should talk to when using a certain hostname.
If you had an address of http://mywebsite.examplecompany.com into your web browser this would refer to the A record “mywebsite” on the domain “examplecompany.com”.
If you have multiple A records with the same hostname, clients will receive a list of all the records. The order of this list will change with iterate each time you query the DNS server – this is called round-robin DNS and it a simple way to spread load across multiple servers .
AAAA records are the same as A records, only they stores the 128bit IPv6 address of a server instead of the IPv4 IP address – as the world shifts to using IPv6 these records will gain more relevance, but if your webhost supports IPv6 its worth setting these records up now, so that any visitors using IPv6 can access your website.
A CNAME record (Canonical name) is basically an alias for an A record. This tells whoever is asking, that the DNS information for the requested hostname is stored in another record somewhere else on the internet. This other record might not even be on the same domain name or on the same DNS server. CNAME’s are very powerful as they allow you simplify your domains DNS records by centralising the information somewhere else. ISPs and webhosts commonly use CNAMEs to centralise the DNS configuration storage for things like mail or web server’s by allowing you to keep all the configuration details on a parent domain name.
It is important to note that root records for a domain name (I.e the empty A record for mydomain.com) cannot be a CNAME. The simple hard and fast reason why, is that CNAME’s cannot live on the same node in a DNS forest as any other type of record – because the very nature of a CNAME record defines that all configuration for that node is stored somewhere else, and given you store other information at the root of your domain other than your A record (MX records for mail etc.) this would break every other record’s functionality. This is mentioned specifically in the RFC for DNS, section 3.6.2.
An example of CNAME usage, is when most webhosting company web servers have a hostname such as web0234.mywebhost.com
When setting up your website, your webhost might for instance make the “www.yourwebsite.com” record for your website a CNAME that has the value “web0234.mywebhost.com” so that when trying to access “www.yourwebsite.com” DNS clients look up the IP address for “web0234.mywebhost.com”. This makes their life easier if the IP address for this web server changes, as they only have to update a single DNS record, instead of updating all their clients DNS records.
To reiterate this to make it crystal clear:
CNAME’s are not a redirection. They are a reference pointer for a hostname. All they tell DNS clients, is that the configuration information for the hostname being queried is the same as can be found by querying the other hostname.
Illustration – Visiting a website
In the case that you want to visit www.google.com your computer does the following:
- Using the local machine’s DNS client your operating system talks to the locally configured DNS server for your local network/ISP’s network.
- This DNS server inturn looks up the DNS server for google.com by first looking up the SOA record for google.com and then connecting to the DNS server listed.
- Your local DNS server then asks the DNS server for google.com for the A record listed for www – the google.com DNS server will return an IP address for www.google.com. Your ISP or local network’s DNS server, along with returning it to you, will then cache this record for as long as the TTL (time to live) property of the record says.
- Your browser then connects to this returned IP address listed on port 80 and asks for the web page.
All of the above happens in milliseconds – but you can understand that if the google.com DNS server is slow in responding this negatively affects your browsing experience.
A records and CNAME records have a TTL (Time To Live) property to indicate how long they can be cached for.
Mail (MX)
MX records are the internets way of telling mail where to be delivered. They list the hostname or IP address of the mail server that handles mail for a given domain name. If a mail server is looking to deliver mail to “examplecompany.com” it will look up the MX record for this domain.
MX records have both a TTL (Time To Live) and a Priority (a weighting to give the order in which they should be looked up).
Illustration – Sending an e-mail to a friend
In the case that you send an email to your friend at myfriend@otherexamplecompany.com your local SMTP mail server (usually at your ISP) does the following:
- Your mail server connects to its local network/ISP’s DNS server and asks for the MX record for otherexamplecompany.com.
- Your local DNS server or ISP’s DNS server looks up the SOA record for otherexamplecompany.com and then connects to the DNS server listed.
- It asks for the MX records for this domain and is returned a list of hostnames.
- it grabs the first hostname from the list (order in ascending order by Priority), runs a second query for the IP address of this mail server and returns this IP address to your mail server.
- your mail server then connects to this IP address on the SMTP TCP port 25 and delivers your mail.
Text Records (TXT)
TXT records are a powerful addition to the DNS standard that allow the storage of miscellaneous information for a hostname. Many web developers, system admins and the like use TXT records for the storage of information such as SPF records and DKIM public keys.
TXT records have a TTL (Time To Live) property to indicate how long they can be cached for.
Name Server Records (NS)
Name Server Records are placed in your domain’s DNS when you wish to store the configuration of part of your domain’s DNS on a separate DNS server. This can be very handy if you want to give control of a subdomain to another person/entity.
i.e. my site is www.widgetsareus.com and I manage all of the DNS for this domain, but I would like support.widgetsareus.com and any child sub domains of this domain to be managed by the company we outsource all of our customer support to – therefore I have setup an NS record for support.widgetsareus.com to point at our support partner’s DNS servers.
Setting up a domain from scratch
If you are setting up a domain you’ve just purchased from scratch you’ll need to do the following:
Setup your website (A records)
- Setup a DNS server to store the configuration for yourdomain.com
This might be at your webhost, or might be a third party service such as DNSMadeEasy, ZoneEdit or DynDNS. - Set the Nameserver SOA records for your domain name to the above DNS server’s IP address or hostname (at your domain registrar)
- Create a new root record to point at your webserver’s IP address (this is simply an A record with an empty hostname) in your domain name’s DNS forest.
- Create a new www A record that points at your webserver’s IP address in your domain’s DNS server
- Setup your webserver’s website to listen for the host-header of your domain name (IIS calls this a “binding”).
- Test your DNS as below.
- Try and access your site in a web browser.
Testing your website’s A record
In a command prompt/terminal type NSLOOKUP
Enter “yourdomainname.com.” (including the extra period on the end) and hit enter
Check that the returned record value/IP address is that of your web server.

Remember to do the same for “www.youdomainname.com.” if you also use www. in your domain name.
Setup your website’s mail (MX record)
- Setup a DNS server to store the configuration for yourdomain.com (Follow steps 1 and 2 above from your website if you haven’t already).
- Create a new MX record that points at your mail servers IP address or hostname.
- Setup your mail server to listen to receive mail for yourdomain.com
- Test that all the above is setup correctly using nslookup as per below.
- Try and send and receive email to and from your domain name.
- Setup SPF records, to verify your mail server’s ability to send mail on behalf of your domain name
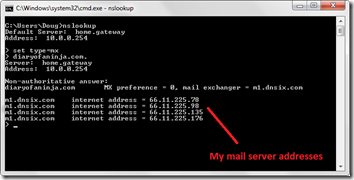
Testing your website’s MX record
In a command prompt/terminal type NSLOOKUP
Enter “set type=mx” and hit enter. This set the query type to MX records.
Enter “yourdomainname.com.” (including the extra period on the end) and hit enter
Check that the returned record value/IP address(es) is that of your mail server.
Investigating Common Problems
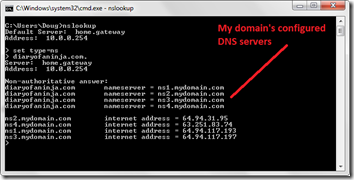
How do I check what DNS server is authorative for my domain name?
You’ve set up your websites DNS, everything is fine; then one day, everyone visiting your site is directed to a site that isn’t yours!
To check which DNS server is authorative for your domain name, first open a command prompt or terminal.
Type “NSLOOKUP” and hit enter
Type ”set type=ns” and hit enter. This sets the query type to NS (NameServer) records.
Type “yourdomainname.com.” and hit enter (make sure you put the extra dot on the end.)
Confirm that the nameserver’s returned are yours.
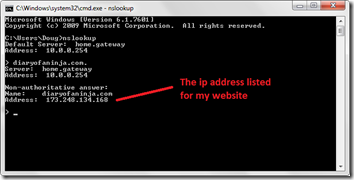
How do I check what IP address my site is currently pointing at?
In a command prompt/terminal launch NSLOOKUP
Enter “yourdomainname.com.” (including the extra period on the end) and hit enter
Check that the returned record value/IP address is that of your web server.
Remember to do the same for “www.youdomainname.com.” if you also use www. in your domain name.
What is split DNS?
Split DNS is when you run a separate DNS forest for a domain name both on your external DNS servers (for everyone else to see) and also internally for staff or local users to see.
This allows you to do things like:
- Ensure local users talk to your mail server (or any other internal server) using the internal IP address, and internet users talk to your mail server’s external DMZ IP address.
- Block access to certain sites by giving incorrect or different DNS results for these site’s domain names. This if often how many net nanny etc softwares work.
For some users my sites seems to be served from a different address – how do I check “what the world sees” vs. “what I see”?
Many things can occur that result in some people seeing different DNS results to others:
- Your ISP/company’s DNS server may have an older cached record to the current live record
- Your local computer may be caching the DNS record you are requesting
- Your local DNS server may be fetching the records for your domain from a different authorative DNS server than the rest of the world.
How do you investigate these things?
The easiest way to investigate these things is to query an external DNS server that you know is good for the records you want, to get a better idea of how the rest of the world sees things.
A really good server that is easy to remember are the ones owned by Google. The primary and secondary DNS server for Google’s Public DNS system are “8.8.8.8” and “8.8.4.4” respectively.
You can use whatever DNS servers you think are more likely to see the correct values.
To do this, open a command prompt/console.
Type “NSLOOKUP” and hit enter
Type “server 8.8.8.8” and hit enter. This sets the DNS server we will query to the Google Public DNS server’s address.
Type “yourdomainname.com.” and check the resulting record values.
