These days we’re lucky. SSL is becoming pretty pervasive. Facebook uses it. Twitter uses it. Most modern start ups now use it. Sadly there are still other sites or services that you may be accessing on the internet that are still insecure allowing others to listen in on your internet usage, and for these your want an encrypted VPN link to route your traffic through. VPN’s can be expensive though if all you have is a home PC and a laptop on the road – lucky for us this can be a magic combination that is all you need and saves the day.
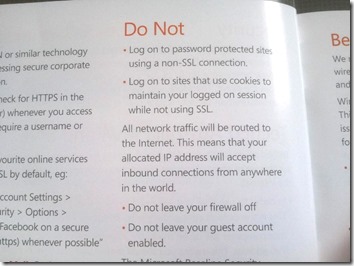
This week I’m in TechEd Australia. Microsoft make the fact that using the shared Wi-Fi could be fraught with peril:
The Australian TechEd program guide on Wi-fi usage.
The above statement didn’t worry me though. Why? Because I have a VPN to connect to when using third party internetzes while I'm on the road.
A few people I spoke to on the day seemed to think this was a lot harder than it is to setup. You don’t need to be a network engineer, and you don’t need Windows Server or a remote Amazon instance, or really much of a clue. All you need is a Windows 7 or Windows 8 PC to host your VPN (i.e. at PC at home), a Windows PC to dial in from (from XP right through to Win 8) and port forwarding support in your router.
How is this possible?
From Windows 7 onwards there is native support for hosting an incoming PPTP VPN service.
This allows you to setup a remote Windows 7 or Windows 8 machine as a VPN server for you dial in to while you are on the road, so that you can route your internet traffic through this remote machine’s internet connection in an encrypted fashion.
This allows you to cut the complicated setup of a whole bunch of services such as DHCP, VPN, and routing into a simple step by step walk through that can take you 5 minutes.
What you’ll need
- Windows 7 or Windows 8 remote machine for hosting the VPN connection.
- The ability to route internet ports directly to this machine (i.e. port forwarding support in your router or a PC connected directly to the internet).
On with it then…
At home I have a Windows 7 PC used as a media pc that is on all the time for media sharing and TV watching duties. This is perfect for me as it gives me a remote PC that is on all the time and is connected to an internet connection I trust. If you have such a PC and control the port forwarding to said machine, this is all you need.
Step 1: setup the VPN server (on your host machine).
The following works on both a Windows 8 and a Windows 7 machine (I've tested both successfully and the interface is exactly the same with just different “chrome” on the windows).
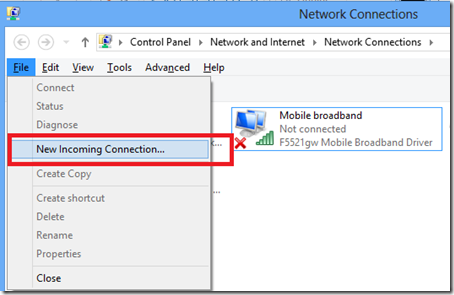
Open Network Connections
Hit the ALT Key to show the file menu, and then select New Incoming Connection.
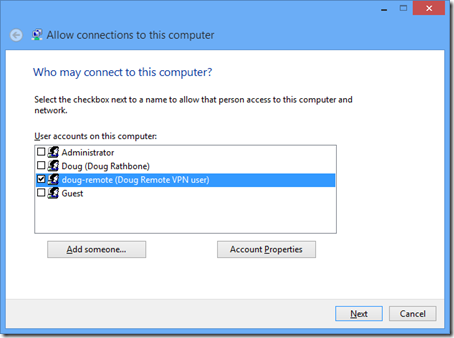
At this point you can either select one of the current local machine users and grant them access to your new VPN link, or take my suggestion and create a new user just for VPN access and give it a really strong password. This will ensure that even if an evil doer gets into your VPN link, they don't necessarily have any of your other account files with the same account. Don’t make it any easier for them.
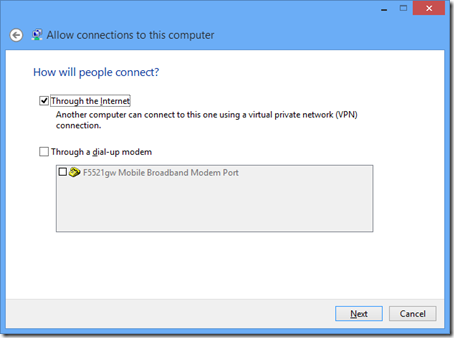
Then on the next page, tick the box that mentions that users will be connecting “through the internet”.
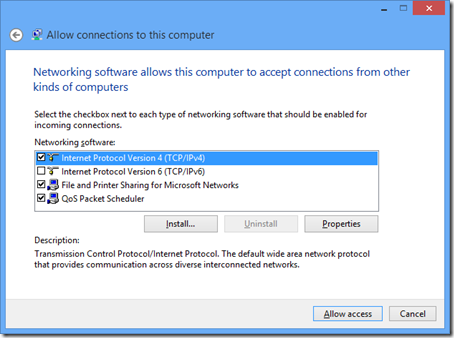
On the next page tick the network protocols you would like them to have access to. I’ve left mine “as is” as I only need IPv4.
Then click “Allow access”.
This has finished the setup of your server.
Step 2: Setup port forwarding.
Next you need to allow “the internet” to talk to your host PC on TCP port 1723.
First setup a static IP address for your host PC on your local network.
Take a look at Port Forward to find your router and instructions for how to forward TCP port 1723 to your machine’s IP address from the internet.
This will allow your host PC to be contactable from the internet, but unless you are lucky enough to have a static internet IP address from your ISP, or you don’t mind having to remember IP addresses, you’ll want to give your host machine a nicer address.
To help with making your host PC easier to connect to, take a look at setting up DynDNS.
Step 3: Your client PC.
Now that you have your home host PC all setup, you simply need to setup your client PC to connect.
This is just as simple.
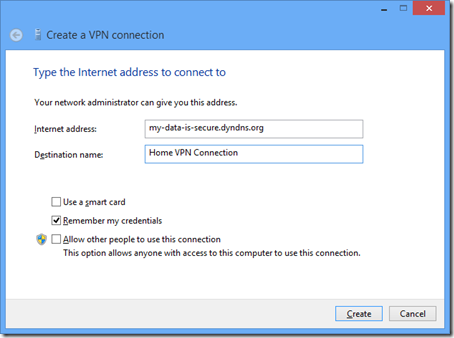
Open the network control panel item Setup a VPN Connection.
Enter the remote hostname for your PC. If you’ve setup DynDNS this is your DynDNS host address (ie [yourhostname].dyndns.org.
Click Create.
Now when you attempt to connection, simply enter the username and password you created earlier (the one with the really strong password) and connect.
Now enjoy the security of having a remote VPN setup without all the server management hassle.
You have been warned
Using 3rd party Wi-Fi at your local cafe or in my case conference centre is a bad idea. Any website you visit while connected to these Wi-Fi access points risks anyone else on the network sniffing your traffic and stealing your session using something like Firesheep.
However there is another risk in setting up a VPN by following the above:
By following the above you are directly placing your PC “on the internet”. This means the evil doers can have just as much access as you. Be sure to place a really strong password on any accounts you setup, and change it regularly. You can also look at using a different TCP port for your VPN so that there is a bit more obscurity for anyone just trying to brute force port 1723.

Comments