Now that we've successfully setup your Amazon AWS account start new machines and serve any WebDeploy packages we'll be using during automation, its now time to get our website project in a state that will work with our Amazon AWS account and this includes some PowerShell Automation to bring it all together.
This post is part 2 in a 3 part series.
- Part1: Amazon AWS configuration
- Part 2: Site Configuration and scripts
- Part 3: Automating it all with TeamCity
Website and PowerShell configuration
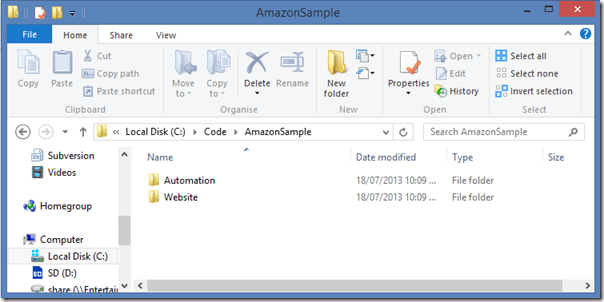
Create a top level folder for your solution – mine’s C:\Code\AmazonSample\
Inside this create two folders:
- /Automation
- /Website
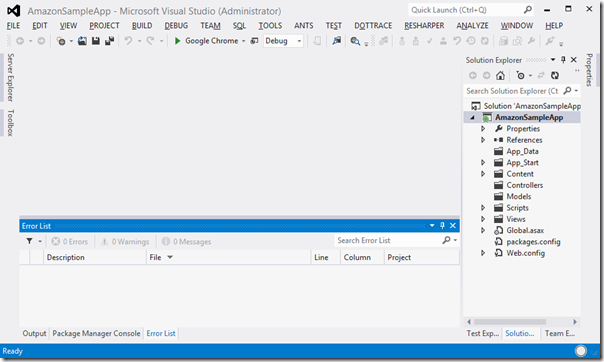
Inside the Website folder create a website (I'll assume you already have one, but for the sake of this post I’ll be using a blank ASP.net MVC project).
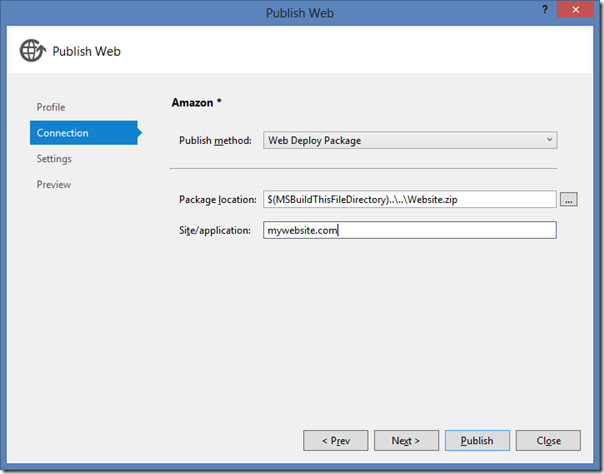
Now add a new Publishing profile, we’ll call it “Amazon”.
Then select “Web Deploy Package” as the publish method. Then enter the publish path as “$(MSBuildThisFileDirectory)\..\..\..\..\DeploymentPackage.zip”
Follow this with the website name as “mywebsite.com” (you can change this but you’ll have to update our scripts later).
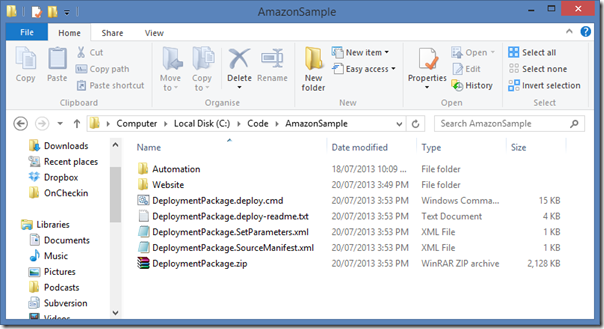
Now test that this works by doing a test deploy. Your package should be placed in the top folder.
Amazon Package Automation
Now open up the "/Automation" folder and create a new PowerShell file, we're going to call it "PackageAndPublish.ps1".
Open this file and paste in the following PowerShell code.
You'll need to:
- Replace the key and secret parameters with your Amazon credentials.
- Replace the region with the region that you've created your S3 bucket. You can find a list here.
Set-ExecutionPolicy Unrestricted -Force
import-module "C:\Program Files (x86)\AWS Tools\PowerShell\AWSPowerShell\AWSPowerShell.psd1"

$key =  "[INSERT YOUR AMAZON AWS KEY]"
$keySecret = "[INSER YOUR AMAZON AWS SECRET]"

# S3 Bucket name where the file will be stored
$S3BucketName = "[INSERT YOUR S3 BUCKET NAME]"

# S3 Bucket folder name within your S3 bucket where the package will reside.
$S3FolderName = "packages"

# The name of the package filename we'll be uploading
$S3PackageName = "websitedeployment"

# Amazon region that your S3 Bucket and your EC2 instances will reside.
$AmazonRegion = [Amazon.RegionEndpoint]::USEast1

#########################################################################################
cls
$path = split-path -parent $MyInvocation.MyCommand.Definition
$parentPath = split-path -Parent $path
Set-Location $path

function Add-Zip
{
    param([string]$zipfilename)
    if(-not (test-path($zipfilename)))
    {
        set-content $zipfilename ("PK" + [char]5 + [char]6 + ("$([char]0)" * 18))
        (dir $zipfilename).IsReadOnly = $false
    }
    $shellApplication = new-object -com shell.application
    $zipPackage = $shellApplication.NameSpace($zipfilename)
    foreach($file in $input)
    {
        $zipPackage.CopyHere($file.FullName)
        while($zipPackage.Items().Item($file.Name) -Eq $null)
        {
            start-sleep -seconds 1
            write-host "." -nonewline
        }
    }
    write-host ""
}
###############################################
# PACKAGE DEPLOYMENT FILES
###############################################
New-Item -ItemType directory -Path $parentPath\DeployTemp -Force
Move-Item $parentPath\Deployment* ..\DeployTemp\

# zip, zip file (and anything else needed).
$packageFullPath = "$parentPath\DeployTemp\${S3PackageName}.zip"
If (Test-Path $packageFullPath){
    Remove-Item $packageFullPath -Force
}

echo "Creating deployment package at $packageFullPath"
dir $parentPath\DeployTemp\*.* -Recurse | Add-Zip $packageFullPath
Remove-Item $parentPath\DeployTemp\Deployment* -Force

###############################################
# UPLOAD DEPLOYMENT PACKAGE TO S3
###############################################

function Hash-MD5 ($file) {
    $cryMD5 = [System.Security.Cryptography.MD5]::Create()
    $fStream = New-Object System.IO.StreamReader ($file)
    $bytHash = $cryMD5.ComputeHash($fStream.BaseStream)
    $fStream.Close()
    return [Convert]::ToBase64String($bytHash)
}

$S3FilePath = "${S3FolderName}/$S3PackageName"
$S3ClientConfig = new-object Amazon.S3.AmazonS3Config
$S3ClientConfig.RegionEndpoint = $AmazonRegion

$AmazonS3 = [Amazon.AWSClientFactory]::CreateAmazonS3Client($key, $keySecret, $S3ClientConfig)
$S3PutRequest = New-Object Amazon.S3.Model.PutObjectRequest
$S3PutRequest.BucketName = $S3BucketName

$S3FilePathSuffix = "${S3FilePath}-latest.zip".ToLower()
$S3PutRequest.Key = $S3FilePathSuffix
$S3PutRequest.FilePath = $packageFullPath
$strMD5 = Hash-MD5($packageFullPath)
$S3PutRequest.MD5Digest = $strMD5
echo "Uploading package $S3FilePathSuffix to S3..."
$S3Response = $AmazonS3.PutObject($S3PutRequest)

$dateString = Get-Date -format "yyyyMMddmmss"
$S3FilePathSuffix = "${S3FilePath}-${dateString}.zip".ToLower()
echo "Uploading package $S3FilePathSuffix to S3..."
$S3PutRequest = New-Object Amazon.S3.Model.PutObjectRequest
$S3PutRequest.BucketName = $S3BucketName
$S3PutRequest.Key = $S3FilePathSuffix
$S3PutRequest.FilePath = $packageFullPath
$strMD5 = Hash-MD5($packageFullPath)
$S3PutRequest.MD5Digest = $strMD5
$S3Response = $AmazonS3.PutObject($S3PutRequest)

#If upload fails it will throw an exception and $S3Response will be $null
if($S3Response -eq $null){
    Write-Error "ERROR: Amazon S3 put request failed. Script halted."
    exit 1
}
Now we're going to create the script that our webserver runs when its first starting up.
Inside your "/Automation" folder create a new file called "UserData.ps1" and paste the following into it.
You'll need to:
- Replace the key and secret parameters with your Amazon credentials.
- Replace the S3 bucket name with that of the one we created in step 1. You can find a list here.
<powershell>
  Set-ExecutionPolicy Unrestricted -Force

  #############################################
  # Settings
  ############################################
  $urlForPackage = "http://[INSERT YOUR S3 BUCKET NAME].s3.amazonaws.com/packages/websitedeployment-latest.zip"
  $packageFileName = "DeploymentPackage"
  $iisWebsiteName = "mywebsite.com"

  ############################################
  $deployTempLocation = "c:\Data\DeployTemp"

  mkdir "c:\Data"
  mkdir $deployTempLocation

  #turn on logging to another file
  $ErrorActionPreference="SilentlyContinue"
  Stop-Transcript | out-null
  $ErrorActionPreference = "Continue"
  Start-Transcript -path C:\Data\AutomationLog.txt -append

  mkdir "c:\Data\Downloads"
  Set-Location "c:\Data\Downloads"

  $wc = New-Object System.Net.WebClient
  echo "downloading webdeploy"
  $webDeployInstallerUrl = "http://download.microsoft.com/download/1/B/3/1B3F8377-CFE1-4B40-8402-AE1FC6A0A8C3/WebDeploy_amd64_en-US.msi"
  $webDeployDownloadPath = "c:\Data\Downloads\webdeploy.msi"
  $wc.DownloadFile("$webDeployInstallerUrl",$webDeployDownloadPath)

  ############################
  # download deployment package from S3
  ############################
  Remove-Item "${deployTempLocation}\*" -Recurse -Force

  Set-Location $deployTempLocation
  $downloadFileName = "deploypackagetemp.zip"
  $packageDownloadFilePath = "$deployTempLocation\$downloadFileName"

  echo "downloading iis webdeploy package"
  $wc = New-Object System.Net.WebClient
  $wc.Headers.Add("user-agent", "diaryofaninjadeploy-4d8ae3a6-6efc-40dc-9a7c-bb55284b10cc");
  $wc.DownloadFile($urlForPackage,$packageDownloadFilePath)

  echo "unzipping iis webdeploy package"
  Set-Location $deployTempLocation
  $shell_app=new-object -com shell.application
  $zip_file = $shell_app.namespace($packageDownloadFilePath);
  $destination = $shell_app.namespace((Get-Location).Path)
  $destination.Copyhere($zip_file.items(),0x14)

  ############################
  # Install/setup IIS
  ############################

  Import-Module ServerManager
  echo "installing windows features"
  Add-WindowsFeature -Name Application-Server,Web-Common-Http,Web-Asp-Net,Web-Net-Ext,Web-ISAPI-Ext,Web-ISAPI-Filter,Web-Http-Logging,Web-Request-Monitor,Web-Basic-Auth,Web-Windows-Auth,Web-Filtering,Web-Performance,Web-Mgmt-Console,Web-Mgmt-Compat,WAS -IncludeAllSubFeature

  Import-Module WebAdministration
  # --------------------------------------------------------------------
  # Setting directory access
  # --------------------------------------------------------------------
  $InetPubWWWRoot = "C:\inetpub\wwwroot\"
  echo "setting security permissions on iis folders"
  $Command = "icacls $InetPubWWWRoot /grant BUILTIN\IIS_IUSRS:(OI)(CI)(RX) BUILTIN\Users:(OI)(CI)(RX)"
  cmd.exe /c $Command
  $Command = "icacls $InetPubWWWRoot /grant `"IIS AppPool\DefaultAppPool`":(OI)(CI)(M)"
  cmd.exe /c $Command

  echo "renaming default website"
  Rename-Item 'IIS:\Sites\Default Web Site' $iisWebsiteName

  echo "running iis reset"
  $Command = "IISRESET"
  Invoke-Expression -Command $Command

  echo "installing web deploy"
  Start-Process -FilePath "msiexec.exe" -ArgumentList "/i $webDeployDownloadPath /passive /log C:\Data\WebDeployInstallLog.txt" -Wait -Passthru

  echo "starting web deploy"
  net start msdepsvc

  Set-Location ${deployTempLocation}
  echo "Adding WebDeploy snapin"
  Add-PSSnapin WDeploySnapin3.0

  echo "invoking the webdeploy package (installing to iis)"
  Restore-WDPackage "${packageFileName}.zip"

  Stop-Transcript
</powershell>
Now the last but most important PowerShellScript – the one that tells Amazon to create a new server instance.
Create another PowerShell script named "LaunchNewInstance.ps1".
Paste and update the below into the file, and modify with your key/secret.
Set-ExecutionPolicy Unrestricted -Force
import-module "C:\Program Files (x86)\AWS Tools\PowerShell\AWSPowerShell\AWSPowerShell.psd1"

$key =  "[INSERT YOUR AMAZON AWS KEY]"
$keySecret = "[INSER YOUR AMAZON AWS SECRET]"

$serverKey = "[INSERT THE NAME OF YOUR SERKEY KEYPAIR NAME WITHOU THE .PEM]"

$securityGroup = "[INSER YOUR SECURITY GROUP]"

$region = [Amazon.RegionEndpoint]::USEast1
$instanceSize="t1.micro"
$amiId = "ami-2bafd842"
$userDataFileName = ".\userData.ps1"

#########################################################
$path = split-path -parent $MyInvocation.MyCommand.Definition
$parentPath = split-path -Parent $path
Set-Location $path
cls

# get script to run on start up. Encode it with Base64
$userDataContent = Get-Content $userDataFileName -Raw
$bytes = [System.Text.Encoding]::Utf8.GetBytes($userDataContent)
$userDataContent = [Convert]::ToBase64String($bytes)

$ec2Config = new-object Amazon.EC2.AmazonEC2Config
$ec2Config.RegionEndpoint = $region
$client = [Amazon.AWSClientFactory]::CreateAmazonEC2Client($key,$keySecret,$ec2Config)

echo 'Launching Web Server'
$runRequest = new-object Amazon.EC2.Model.RunInstancesRequest
$runRequest.ImageId = $amiId
$runRequest.KeyName = $serverKey
$runRequest.MaxCount = "1"
$runRequest.MinCount = "1"
$runRequest.InstanceType = $instanceSize
$runRequest.SecurityGroupId = $securityGroup
$runRequest.UserData = $userDataContent

try{
    $runResp = $client.RunInstances($runRequest)
}
catch {
    echo $_.Exception.ToString()
    echo "Error occured while running instances. Exitting"
    Exit
}
Start-Sleep -s 1

$runResult = $runResp.RunInstancesResult.Reservation.RunningInstance[0].InstanceId
$tmp = 1
$hostname = ""

echo "Instance created: $runResult"
echo "Waiting for IP Address"
while ($tmp -eq 1)
{
    try
    {
        sleep(5)
        $ipReq = New-Object Amazon.EC2.Model.DescribeInstancesRequest
        $ipReq.InstanceId.Add($runResult)
        $ipResp = $client.DescribeInstances($ipReq)

        $hostname = $ipResp.DescribeInstancesResult.Reservation[0].RunningInstance[0].PublicDnsName

        if($hostname.Length -gt 0)
        {
            $tmp = 0
        }
     }
     catch{
        echo "Error occured: echo $_.Exception.ToString()"
        Exit
     }
}

echo "New Amazon instance available at: http://$hostname"
Now push all of this to your source control provider of choice – I'm going to be using git.
Now move onto to setting up your Build configuration in Part 3.


Comments