I’ve been lucky enough to have access to a brand new Surface 2.0 (Samsung SUR40) recently, and wanted to try my hand at developing for the platform. As with most things, the easiest way to learn something is to set yourself up with a little project – I’m going to build a very simple Image “Attractor” to start. This will allow you to move, resize and rotate images and videos on the screen of the device. The Surface development community appears to be a little cloak and dagger, with very little information being shared; something hopefully I can positively contribute towards changing by documenting my journey.
Background on Surface 2.0
Microsoft has teamed up with Samsung to create the second version of the Surface and as usual Samsung has really stepped up to the plate to create an amazing piece of hardware.
The original Surface contained infrared cameras pointing up at the screen to see what was going on. This meant that you were left with a device that was literally as deep as an entire coffee table. The new device is only 4 inches deep and uses a new type of sensing called Pixel Sense that takes away the need for the depth – again showing how much Samsung knows about making ridiculously thin screens.

Device Specs:
- AMD Athlon™ II X2 Dual-Core Processor 2.9GHz
- 40-in multi-touch LCD display
- 16:9 aspect ratio
- 1920x1080 resolution
- 50 point multi-touch
What I want to build
What I am setting out to build is an app that displays my images and videos for display in a reception area.
This is a pretty common use for a Microsoft surface – reception porn for your visitors.
I am going to call this application OpenAttractor as its going to be an open source app to get my visitors attention and allow them to view some of our work.
This app will allow users to view, push around, and resize my images and videos.
Things you’ll need
- Download and install the Surface 2.0 SDK from here.
- Windows 7 machine (The Surface 2.0 runs on Windows 7).
- Visual Studio 2010 Express or above.
WARNING, DON’T DO THIS AT HOME KIDS
As I mentioned for my Kinect SDK post, I am a web developer by trade. I do not have much experience with WPF/Windows Forms. Therefore, any code you see in this post that you think is hilariously “the wrong way to do things” you will probably be perfectly well placed to make such commentary - I’d love to hear from you on ways you’d do things differently or where I’ve gone wrong in the comments below.This is my journey into the world of the Surface SDK, be gentle :-)
Create a new Surface application in Visual Studio.

The first thing I'm going to need is a background image for my app.
I’ve found a nice Wood Grain 1920x1080 image that will suit this purpose well.
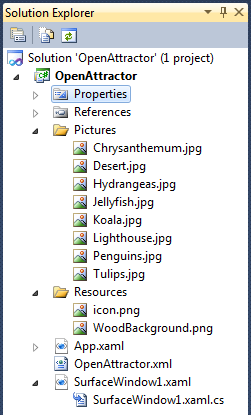
So put this in the Resources folder of your newly created project and include it in your project.
Now we’ll need some photos to view, so I'm going to copy the Sample Pictures out of the default Windows Installation path and put them in a folder called Pictures in my project.

The Amazing Beauty of the Surface SDK
I’ve blogged before about how elegant the Kinect SDK is before, and the Surface SDK is no different.
In a very few lines of code you can build amazingly powerful multi-touch apps.
Open the file SurfaceWindow1.xaml and paste the following into the page:
<s:SurfaceWindow x:Class="OpenAttractor.SurfaceWindow1"
    xmlns="http://schemas.microsoft.com/winfx/2006/xaml/presentation"
    xmlns:x="http://schemas.microsoft.com/winfx/2006/xaml"
    xmlns:s="http://schemas.microsoft.com/surface/2008" xmlns:Properties="clr-namespace:OpenAttractor.Properties"
                 xmlns:OpenAttractor="clr-namespace:OpenAttractor" Title="OpenAttractor">
    <s:SurfaceWindow.Background>
        <ImageBrush ImageSource="/OpenAttractor;component/Resources/WoodBackground.png"/>
    </s:SurfaceWindow.Background>
        <s:ScatterView x:Name="ScatterContainer">
            <s:ScatterViewItem>
                <Image Source="/OpenAttractor;component/Pictures/Desert.jpg"/>
            </s:ScatterViewItem>
            <s:ScatterViewItem>
                <Image Source="/OpenAttractor;component/Pictures/Hydrangeas.jpg"/>
            </s:ScatterViewItem>
            <s:ScatterViewItem>
                <Image Source="/OpenAttractor;component/Pictures/Jellyfish.jpg"/>
            </s:ScatterViewItem>
            <s:ScatterViewItem>
                <Image Source="/OpenAttractor;component/Pictures/Koala.jpg"/>
            </s:ScatterViewItem>
            <s:ScatterViewItem>
                <Image Source="/OpenAttractor;component/Pictures/Lighthouse.jpg"/>
            </s:ScatterViewItem>
            <s:ScatterViewItem>
                <Image Source="/OpenAttractor;component/Pictures/Penguins.jpg"/>
            </s:ScatterViewItem>
            <s:ScatterViewItem>
                <Image Source="/OpenAttractor;component/Pictures/Tulips.jpg"/>
            </s:ScatterViewItem>
        </s:ScatterView>
</s:SurfaceWindow>
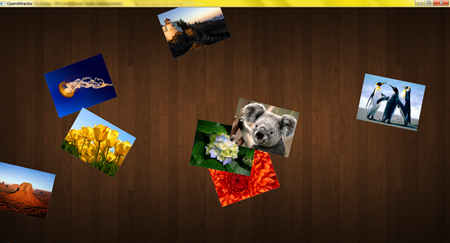
This uses one of the Surface SDK controls, the ScatterView control, to enable objects to be resizable and contain basic physics properties so that you can flick them around the screen.
If we run this application, we are already half way there!

A Word on Testing
The Surface is a Multi-touch device, designed to take up to 50 points of contact at a time.
I am developing my application on my laptop. I don’t have multi-touch support. This means I can’t test my “pitch/stretch to zoom” without using something special.
Lucky for me the Surface 2.0 SDK includes a tool called the Microsoft Surface Input Simulator and this supports placing multiple fingers on the screen at once.
To test this open the Input Simulator. Then launch our app.
Select the Finger tool and left click on one corner of an image. While holding the left mouse button down, press your right mouse button. This will place and hold a virtual finger on the screen.
Now use the left mouse button the click the opposite corner of one of your picture, and resize it as if you were using two fingers to stretch the image.

Amazingly simple, and awesome; We haven’t even written any code yet!
Now for videos.
Adding a video player
Now that I had image sorted with my scatter views, I needed the ability to play videos as well. I need to add a simple video player, so that people playing with the app could view sample videos.
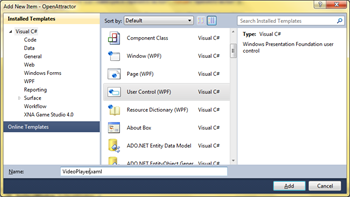
So let’s sort this out. I want a video player that will include a fair bit of modular functionality. To avoid any problems with storing lots of variables in a single class, I’m going to create a WPF user control so that I can encapsulate all the functionality into a single object.

Then I created a number of images for use in my control and added them to my Resources folder.

![]()
![]()
![]()
Now with that done, I added the following code to my WPF user control’s XAML file to give me all my video controls:
<UserControl x:Class="OpenAttractor.VideoPlayer"
             xmlns="http://schemas.microsoft.com/winfx/2006/xaml/presentation"
             xmlns:x="http://schemas.microsoft.com/winfx/2006/xaml"
             xmlns:mc="http://schemas.openxmlformats.org/markup-compatibility/2006"
             xmlns:d="http://schemas.microsoft.com/expression/blend/2008"
             xmlns:s="clr-namespace:Microsoft.Surface.Presentation.Controls;assembly=Microsoft.Surface.Presentation"
             DataContext="{Binding RelativeSource={RelativeSource Self}}"
             mc:Ignorable="d">
    <Grid>
         <Grid VerticalAlignment="Stretch" HorizontalAlignment="Stretch" Panel.ZIndex="10">
            <MediaElement x:Name="videoPlayer" ScrubbingEnabled="True" Source="{Binding Path=Source}" Loaded="videoPlayer_Loaded" LoadedBehavior="Manual" UnloadedBehavior="Stop" Stretch="UniformToFill" />
            <Image Source="/OpenAttractor;component/Resources/video_overlay.png" x:Name="Overlay">
                <Image.Style>
                    <Style TargetType="{x:Type Image}">
                        <Style.Triggers>
                            <DataTrigger Binding="{Binding VideoIsPlaying}" Value="True">
                                <Setter Property="Visibility" Value="Collapsed"/>
                            </DataTrigger>
                            <DataTrigger Binding="{Binding VideoIsPlaying}" Value="False">
                                <Setter Property="Visibility" Value="Visible"/>
                            </DataTrigger>
                        </Style.Triggers>
                    </Style>
                </Image.Style>
            </Image>
            <s:SurfaceButton Background="Transparent" x:Name="PlayButton" Click="PlayButton_Click" HorizontalContentAlignment="Center" VerticalContentAlignment="Center">
                <s:SurfaceButton.Content>
                    <Image Source="/OpenAttractor;component/Resources/video_playbutton_large.png" />
                </s:SurfaceButton.Content>
                <s:SurfaceButton.Style>
                    <Style TargetType="{x:Type s:SurfaceButton}">
                        <Style.Triggers>
                            <DataTrigger Binding="{Binding VideoIsPlaying}" Value="True">
                                <Setter Property="Visibility" Value="Collapsed"/>
                            </DataTrigger>
                            <DataTrigger Binding="{Binding VideoIsPlaying}" Value="False">
                                <Setter Property="Visibility" Value="Visible"/>
                            </DataTrigger>
                        </Style.Triggers>
                    </Style>
                </s:SurfaceButton.Style>
            </s:SurfaceButton>
        </Grid>
        <Grid Height="40" Name="PlayerControls" VerticalAlignment="Bottom" Margin="5,0,5,0">
            <Grid.ColumnDefinitions>
                <ColumnDefinition ColumnDefinition.Width="40" />
                <ColumnDefinition ColumnDefinition.Width="40" />
                <ColumnDefinition ColumnDefinition.Width="*" />
            </Grid.ColumnDefinitions>
            <s:SurfaceButton x:Name="RewindButton" Click="RewindButton_Click"  VerticalAlignment="Top">
                <s:SurfaceButton.Background>
                    <ImageBrush ImageSource="/OpenAttractor;component/Resources/video_rewindbutton.png" />
                </s:SurfaceButton.Background>
            </s:SurfaceButton>
            <s:SurfaceButton x:Name="PauseButton" Click="PauseButton_Click"  Grid.Column="1">
                <s:SurfaceButton.Background>
                    <ImageBrush ImageSource="/OpenAttractor;component/Resources/video_pausebutton.png" />
                </s:SurfaceButton.Background>
                <s:SurfaceButton.Style>
                    <Style TargetType="{x:Type s:SurfaceButton}">
                        <Style.Triggers>
                            <DataTrigger Binding="{Binding VideoIsPlaying}" Value="True">
                                <Setter Property="Visibility" Value="Visible"/>
                            </DataTrigger>
                            <DataTrigger Binding="{Binding VideoIsPlaying}" Value="False">
                                <Setter Property="Visibility" Value="Collapsed"/>
                            </DataTrigger>
                        </Style.Triggers>
                    </Style>
                </s:SurfaceButton.Style>
            </s:SurfaceButton>
            <s:SurfaceButton x:Name="PlayButtonSmall" Grid.Column="1" Click="PlayButtonSmall_Click">
                <s:SurfaceButton.Background>
                    <ImageBrush ImageSource="/OpenAttractor;component/Resources/video_playbutton_small.png" />
                </s:SurfaceButton.Background>
                <s:SurfaceButton.Style>
                    <Style TargetType="{x:Type s:SurfaceButton}">
                        <Style.Triggers>
                            <DataTrigger Binding="{Binding VideoIsPlaying}" Value="True">
                                <Setter Property="Visibility" Value="Collapsed"/>
                            </DataTrigger>
                            <DataTrigger Binding="{Binding VideoIsPlaying}" Value="False">
                                <Setter Property="Visibility" Value="Visible"/>
                            </DataTrigger>
                        </Style.Triggers>
                    </Style>
                </s:SurfaceButton.Style>
            </s:SurfaceButton>
            <Border Border.Background="#881E1E1E" FrameworkElement.Margin="10,15,0,15" FrameworkElement.Height="4" Grid.Column="2" />
            <Border Border.Background="#7FC9FA" FrameworkElement.Margin="10,15,0,15" FrameworkElement.Height="4" Grid.Column="2">
                <UIElement.RenderTransform>
                    <ScaleTransform ScaleTransform.ScaleX="{Binding Path=CurrentVideoProgress}" />
                </UIElement.RenderTransform>
            </Border>
            <Grid.Style>
                <Style TargetType="{x:Type Grid}">
                    <Style.Triggers>
                        <DataTrigger Binding="{Binding VideoIsPlaying}" Value="True">
                            <DataTrigger.EnterActions>
                                <BeginStoryboard>
                                    <Storyboard>
                                        <ThicknessAnimation Storyboard.TargetProperty="Margin" Timeline.Duration="0:0:0.300" ThicknessAnimation.From="5,0,5,0" ThicknessAnimation.To="5,0,5,-40" />
                                    </Storyboard>
                                </BeginStoryboard>
                            </DataTrigger.EnterActions>
                            <DataTrigger.ExitActions>
                                <BeginStoryboard>
                                    <Storyboard>
                                        <ThicknessAnimation Storyboard.TargetProperty="Margin" Timeline.Duration="0:0:0.300" ThicknessAnimation.From="5,0,5,-40" ThicknessAnimation.To="5,0,5,0" />
                                    </Storyboard>
                                </BeginStoryboard>
                            </DataTrigger.ExitActions>
                        </DataTrigger>
                    </Style.Triggers>
                </Style>
            </Grid.Style>
        </Grid>
    </Grid>
</UserControl>
I then added the following code to the code behind of my control’s XAML file:
namespace OpenAttractor
{
    public partial class VideoPlayer : UserControl
    {
        public string Source { get { return (string)GetValue(_sourceProperty); } set { SetValue(_sourceProperty, value); } }
        public static readonly DependencyProperty _sourceProperty = DependencyProperty.Register("Source", typeof(string), typeof(VideoPlayer), new FrameworkPropertyMetadata(String.Empty));

        public double CurrentVideoProgress { get { return (double)GetValue(_currentVideoProgress); } set { SetValue(_currentVideoProgress, value); } }
        public static readonly DependencyProperty _currentVideoProgress = DependencyProperty.Register("CurrentVideoProgress", typeof(double), typeof(VideoPlayer), new FrameworkPropertyMetadata((double)0));

        public bool VideoIsPlaying { get { return (bool)GetValue(_videoIsPlaying); } set { SetValue(_videoIsPlaying, value); } }
        public static readonly DependencyProperty _videoIsPlaying = DependencyProperty.Register("VideoIsPlaying", typeof(bool), typeof(VideoPlayer), new FrameworkPropertyMetadata(false));

        private Timer _playTimer;

        public VideoPlayer()
        {
            InitializeComponent();
            Loaded += new RoutedEventHandler(VideoPlayerLoaded);
        }

        void VideoPlayerLoaded(object sender, RoutedEventArgs e)
        {
            videoPlayer.MediaEnded += delegate(object o, RoutedEventArgs args)
            {
                videoPlayer.Position = new TimeSpan(0, 0, 0, 0);
                videoPlayer.Play();
            };

            _playTimer = new Timer {Interval = 300};
            _playTimer.Elapsed += delegate(object o, ElapsedEventArgs args)
                                      {
                                          Application.Current.Dispatcher.BeginInvoke(
                                              DispatcherPriority.Background,
                                              new Action(() => CurrentVideoProgress =
                                                               videoPlayer.Position.TotalMilliseconds/
                                                               videoPlayer.NaturalDuration.TimeSpan.TotalMilliseconds));
                                      };
        }

        private void PlayButton_Click(object sender, RoutedEventArgs e)
        {
            videoPlayer.Play();
            _playTimer.Start();
            VideoIsPlaying = true;
        }

        private void RewindButton_Click(object sender, RoutedEventArgs e)
        {
            videoPlayer.Position = new TimeSpan(0, 0, 0, 0);
        }

        private void PauseButton_Click(object sender, RoutedEventArgs e)
        {
            videoPlayer.Pause();
            _playTimer.Stop();
            VideoIsPlaying = false;
        }

        private void videoPlayer_Loaded(object sender, RoutedEventArgs e)
        {
            ((MediaElement)sender).Play();
            ((MediaElement)sender).Position = new TimeSpan(0, 0, 0, 1);
            ((MediaElement)sender).Pause();
        }

        private void PlayButtonSmall_Click(object sender, RoutedEventArgs e)
        {
            videoPlayer.Play();
            _playTimer.Start();
            VideoIsPlaying = true;
        }
    }
}
You’ll note a slightly weird approach in that I play, and then pause the video as soon as it is loaded. This is because the MediaElement control doesn’t load the first video frame until it is first played. As I want the first frame to show for my video as a teaser, I play and pause the video straight up to ensure that you can see what the first frame of the video looks like.
private void videoPlayer_Loaded(object sender, RoutedEventArgs e)
{
    ((MediaElement)sender).Play();
    ((MediaElement)sender).Position = new TimeSpan(0, 0, 0, 1);
    ((MediaElement)sender).Pause();
}
I also use a Background control to show my progress for the video. When search for a colour to use, I opened the video in Windows Media Player and
With that out of the way, I need to add my WPF user control to my main Surface App’s page, so I added the following to my main page’s XAML:
<s:ScatterViewItem>
    <OpenAttractor:VideoPlayer Source="Videos/Wildlife.wmv" />
</s:ScatterViewItem>
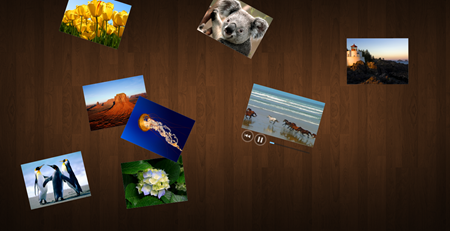
After all that, I have a very usable app with very little code:

Making it all Dynamic
So far I’ve used manually created XAML objects for each of my images and videos. This is far from flexible. What I want to do is have a setting that contains a path for videos and images and on application loading, it will create my ScatterView controls for me dynamically.
So I removed all the Main XAML page’s content, and replaced it with the manual scatterview items removed
<s:SurfaceWindow x:Class="OpenAttractor.SurfaceWindow1"
    xmlns="http://schemas.microsoft.com/winfx/2006/xaml/presentation"
    xmlns:x="http://schemas.microsoft.com/winfx/2006/xaml"
    xmlns:s="http://schemas.microsoft.com/surface/2008"
    Title="OpenAttractor">
    <s:SurfaceWindow.Background>
        <ImageBrush ImageSource="/OpenAttractor;component/Resources/WoodBackground.png"/>
    </s:SurfaceWindow.Background>
    <s:ScatterView x:Name="ScatterContainer"/>
</s:SurfaceWindow>
And then added an app.config setting for my path:
<?xml version="1.0" encoding="utf-8" ?>
<configuration>
  <appSettings>
    <add key="VideoAssetsPath" value="C:\Users\Public\Videos\Sample Videos"/>
    <add key="PhotoAssetsPath" value="C:\Users\Public\Pictures\Sample Pictures"/>
  </appSettings>
</configuration>
And then add the following to the code behind of the main page’s XAML:
public SurfaceWindow1()
{
    InitializeComponent();

    // Add handlers for window availability events
    AddWindowAvailabilityHandlers();
    Loaded += new RoutedEventHandler(SurfaceWindow1_Loaded);
}

void SurfaceWindow1_Loaded(object sender, RoutedEventArgs e)
{
    var images = Directory.GetFiles(ConfigurationManager.AppSettings["PhotoAssetsPath"], "*.jpg");
    var videos = Directory.GetFiles(ConfigurationManager.AppSettings["VideoAssetsPath"], "*.wmv");

    foreach (var imagePath in images)
    {
        var imageControl = new Image();
        var myBitmapImage = new BitmapImage();
        myBitmapImage.BeginInit();
        myBitmapImage.UriSource = new Uri(imagePath);
        myBitmapImage.EndInit();
        imageControl.Source = myBitmapImage;
        var scatterView = new ScatterViewItem { Content = imageControl };
        ScatterContainer.Items.Add(scatterView);
    }

    foreach (var videoPath in videos)
    {
        var videoControl = new VideoPlayer { Source = videoPath };
        var scatterView = new ScatterViewItem { Content = videoControl };
        ScatterContainer.Items.Add(scatterView);
    }
}
All done! Now I have a flexible way to present my photos and videos for viewing on the Surface 2.0 – All in very little time and with very little code.
This highlights just how amazing, elegant the work the Surface SDK team have created to enable you to get going on the platform. They’ve abstracted all the heavy lifting out of the way to make building surface apps easy as 1-2-3.
Summary
While the price tag of a Surface 2.0 might be out of reach for a lot of businesses, Microsoft as usual have delivered in spades when it comes to the development side of the story. They have taken what appears to be a part of development that someone such as me, a lowly web developer, would normally think was a considerable task: multi-multi-touch app building; and made it an awesome development experience with a an easy to learn SDK.
Recently everything I've touched that has been from Microsoft (My Windows Phone, My Xbox Kinect, My Netduino plus, ASP.Net MVC) has had an SDK that has been nothing short of a developer wet-dream. When you are first getting into development, there is always a moment you when stop and realise you can take over the world with things that you can build – this is usually the moment you get hooked as a developer. As your career progresses this feeling can sometimes be hard to replicate as you become accustomed with whatever you do as part of your day job.
The Microsoft Surface SDK for the Samsung Surface 2.0 brings this feeling back in spades.
If you have access to one of these amazing devices, download the SDK and have a play!
As for my OpenAttractor app, as I mentioned; during my travels looking into Surface 2.0 development I noticed that a lot of developers on the Surface platform seem to be keeping things to themselves when it comes to sharing code.
So I’ve put my app up on GitHub HERE and will continued developing it over time – I welcome you to fork it and have a play yourself.

Comments