New Relic's Deployment notes features have definitely been around for a while, but like a lot of things experienced by developers outside Microsoft's ecosystem, this is another service where we're a bit late to the party. The ability to track application performance against a certain release of your application is a great way to track the progress of any work your team has put in to improve your application's performance and visitor's overall experience. Implementing it is surprisingly simple which begs the question, if you're not doing it, why not?
Unlike our other language peers, only in the last 2 years or so have .Net developers begun to treat New Relic as a household name for production performance profiling, in the same way that other must-have tools like Nuget, WebDeploy and MVC have risen to prominence. The ability to track users, visitors, application performance, server performance, database performance and more all in one easily cross referenced form is an amazing piece of kit when channelled towards your codebase.
New Relic's "Deployment notes" Rest API end point is a pretty easy way to record your application's deployments as part of this tracking. As it's a REST webservice, this makes it super easy to use for basically anyone in any language.
The only downside is that this only is available to New Relic accounts on the Pro account (not standard or free).
New Relic's documentation refers to simply making a curl command line call to use it – although like most most things in the Windows universe the awesomeness of curl doesn't come "out of the box" for us making it a little more complicated to execute.
curl -H "x-api-key:REPLACE_WITH_YOUR_APP_ID" -d "deployment[app_name]=REPLACE_WITH_YOUR_APP_NAME" https://api.newrelic.com/deployments.xml
Because we don't get curl out of the box, what I've done is replace the above command with a bit of PowerShell script.
Param (
    [string]$deployedby = $(throw "-deployedby is required."),
    [string]$appid = $(throw "-appid is required."),
    [string]$revision = "",
    [string]$apikey = $(throw "-apikey is required."),
    [string]$description = $(throw "-description is required.")
 )

$description = [Uri]::EscapeDataString($description)
$URL = "http://api.newrelic.com/deployments.xml"
$data = "deployment[user]=${user}&deployment[user]=${deployedby}&deployment[app_id]=${appid}&deployment[revision]=${revision}&deployment[description]=${description}"
$URI = New-Object System.Uri($URL, $true)

$request = [System.Net.HttpWebRequest]::Create($URI)
$request.Method = "POST"
$request.Headers.Add("x-api-key", $apikey);
$request.ContentType = "application/x-www-form-urlencoded"
$request.Accept = "text/xml"

try {
    $stream = New-Object IO.StreamWriter $request.GetRequestStream()
    $stream.AutoFlush = $True
    $postData = [System.Text.Encoding]::UTF8.GetBytes($data)
    $stream.Write($postData, 0, $postData.length)
    $stream.Close()

    $response = $request.GetResponse()
    $response.Close()

    if ([int]$response.StatusCode -eq 201) {
        Write-Host "Deployment note pushed to NewRelic."
    } else {
        Write-Host "Deployment note failed to push to NewRelic."
    }
} catch [System.Net.WebException] {
    $excep = $_.Exception.Response
    Write-Host "NewRelic Deploy API call failed. Exception: $excep"
}
Getting this working in TeamCity
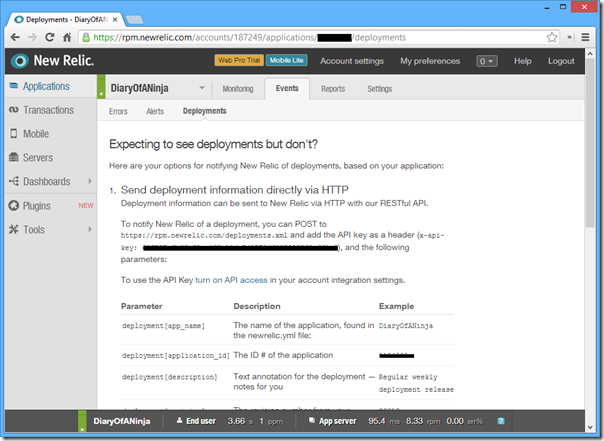
The first thing you'll need to do is grab some information from New Relic for use with your API calls. This information can all be found on the "deployments" page for your application in the New Relic RPM.
To get there, simply follow the menus
Applications –> [Application you want to deploy] –> Events –> Deployments
You should see a page that looks like this (this is the deployments page for this very blog) and has all of the details you'll need to call the API:
Write down the following for later;
- New Relic API Key
- Application Id
Save the script I wrote above into a file. I've named mine AddNewReliceDeploymentNote.ps1 and I've placed it inside a /Automation directory in my solution folder.
Check this into your source control.
Now open your website's build configuration in TeamCity.
This should be the build configuration that you are deploying from.
Add a new build task after your MSBUILD deployment task – for ASP.Net developers using Publishing profiles or simply calling WebDeploy directly, this new build task should execute after you call your solution file with DeployOnBuild=true to build and deploy it.
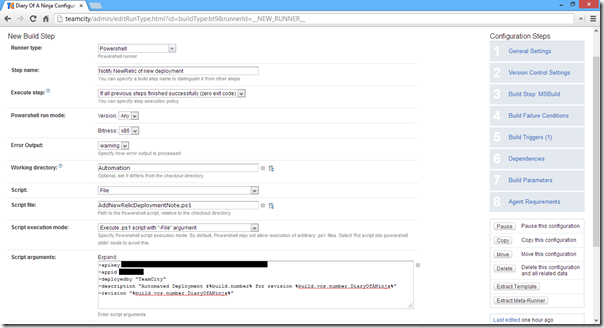
Then setup the execution of the script pasted above using a PowerShell task. Include parameters to note your control changes and a revision note.
Properties for the build step:
- Step name: "Notify NewRelic of new deployment"
- Working Directory: "Automation"
- Script file: "AddNewRelicDeploymentNote.ps1"
- Script execution mode: "Execute .ps1 script with –File argument"
- ScriptArguments:
"…
-apikey [insert your api key]
-appid [insert your appid]
-deployedby "TeamCity"
-description "Automated Deployment #%build.number% for revision %build.vcs.number.[Your TeamCity SourceControl source]%"
-revision "%build.vcs.number.[Your TeamCity SourceControl source]%"
…"
Now run your deployment and watch the telemetry show your deployment in NewRelic. This will mark your deployment with a green bar in all of the graphs, allowing you to track any performance changes and correlate them with your deployment.
Now go grab yourself a [insert tasty beverage] and revel in your latest performance tweak's awesomeness.


Comments