Jetbrains’ build server software TeamCity is an awesome product to get up and running with continuous integration and deployment, however with its ease of operation it leaves a few nice to have business features aside. One of these is Scheduled backup – and if there is anything that your career has probably taught you to date, it’s that when things break, having a backup is priceless.
The default database storage that comes with an installation of TeamCity is HSQL and while I currently have a single build server instance presiding over more than 100 build configurations flawlessly while running HSQL for data storage there is always the fear that when something goes wrong, it'll really go wrong.
To allay this fear there are a few things that you should do:
- Use a storage device other than the pre-packaged HSQL such as SQL Express (i will cover this in a later post).
- Run a scheduled backup of your build server configuration regularly so that in the case of failure you can come back where you left off.
The first task ill cover in a later blog post, but the second one we’ll go through today.
TeamCity comes packaged with a number of command line tools for running maintenance tasks against your build server. The main one we’ll look at in this post is called "maintainDB" – Documented here.
maintainDB backup -C -D -L -P
The above makes it really easy flexible for use in a batch file and Windows Scheduled Task scenario – what this post will cover.
Getting stuck in
The first this we need to do is add a few environment variable paths to your Windows TeamCity server so that the TeamCity maintenance tool can find everything:
- TEAMCITY_APP_DIR
- TEAMCITY_DATA_PATH
To do this, login to your TeamCity Server and click on Start.
Right click on My Computer and select Properties.
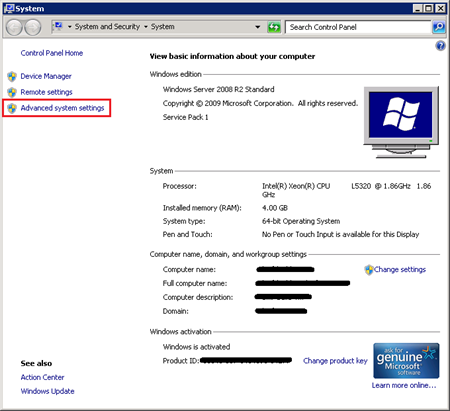
Click the link on the left marked Advanced System Settings
Now click on Environmental Variables
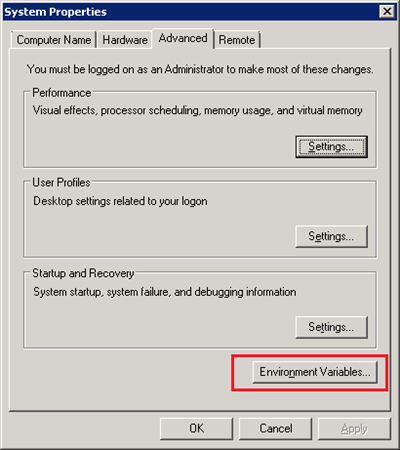
Now click on New and enter the following paths (your configuration may be different, so please investigate these locations):
“TEAMCITY_APP_DIR” – the location of your TeamCity web application directory (on my server this is set to the default of C:\TeamCity\webapps\ROOT)
“TEAMCITY_DATA_PATH” – the location of your TeamCity data directory. This is inside the windows user profile of the user who installed it. You find this out by access the Server Configuration page in the TeamCity site/admin console (on my server this is C:\Users\dougr\.BuildServer).

Now that we’ve set the environment variables needed to make this all work, open notepad and copy the following script into a new file. You will need to change the fifth line to the reflect your TeamCity backup path.
This is a folder inside the Windows User Profile of the user who installed the server – again for me this is C:\Users\dougr\.BuildServer\backup.
@ECHO off
::
:: REPLACE THE FOLLOWING PATH WITH YOUR TEAMCITY BACKUP DIRECTORY
::
SET TeamcityDataFolder=C:\Users\dougr\.BuildServer\backup

IF "%1"=="" GOTO NoParams

SET CopyToPath=%1
ECHO.
ECHO Currently path: %~dp0
ECHO TeamCity Data Folder: %TeamcityDataFolder%

net stop "TeamCity Web Server"

CD C:\TeamCity\bin
CALL maintainDB backup -C -D -L -P -F backup-temp

net start "TeamCity Web Server"

:: GET THE LOCAL DATE IN ANY REGION
:: Taken from http://stackoverflow.com/a/3202796/115749

SETLOCAL ENABLEEXTENSIONS
if "%date%A" LSS "A" (set toks=1-3) else (set toks=2-4)
for /f "tokens=2-4 delims=(-)" %%a in ('echo:^|date') do (
for /f "tokens=%toks% delims=.-/ " %%i in ('date/t') do (
set '%%a'=%%i
set '%%b'=%%j
set '%%c'=%%k))
if %'yy'% LSS 100 set 'yy'=20%'yy'%
set Today=%'yy'%-%'mm'%-%'dd'%
ENDLOCAL & SET v_year=%'yy'%& SET v_month=%'mm'%& SET v_day=%'dd'%


SET BackupFileName=TeamCityBackup-%V_Year%-%V_Month%-%V_Day%.zip

SET CopyToPath=%CopyToPath%\%BackupFileName%
ECHO Copying Backup to: %CopyToPath%
move %TeamcityDataFolder%\backup-temp.zip %CopyToPath%

GOTO Finished

:NoParams

ECHO.
ECHO ERROR:
ECHO You haven't defined an output path for your backup. call this script again
ECHO followed by the Path you'd like to save your backup to.
ECHO.
ECHO i.e. backup-teamcity.bat C:\mybackupfolder
GOTO:EOF

:Finished
cd %~dp0
ECHO Backup finished
Save this file somewhere you put the rest of your server maintenance scripts if you have any – I saved mine as C:\MaintenanceScripts\backup-teamcity.bat.
You can run this script by entering the batch file name into an elevated command prompt window and adding a parameter to indicate where you want your backup saved.
C:\MaintenanceScripts\backup-teamcity.bat C:\SaveMyBackupsInThisFolder
WARNING:
The above batch file has been tested successfully on a few of my TeamCity installations successfully. You shouldn’t have anything to fear, however if you don’t fully understand the above batch script buyer beware – do you research before using it.
What is this going to do to my server?
The batch file i have written above does the following:
- Takes an incoming parameter as the destination to copy the backup to.
- Stops the TeamCity Web Server service.
- Runs the TeamCity maintenance tool to create a backup.
- Saves the backup as TeamCityBackup-yyyy-mm-dd.zip
- Copies the backup to your folder of choice.
- Starts the TeamCity Web Server service.
Schedule that bad buoy…
Now we have everything in place we need to create a scheduled task to run our backup.
Open Task Scheduler and click on Create Basic Task

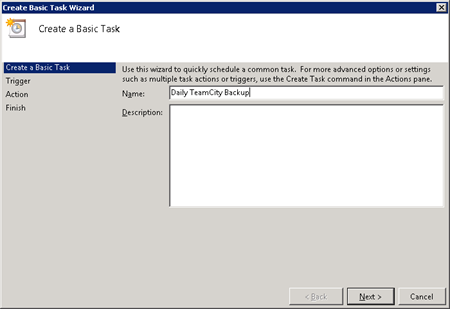
In the next Window give your task a name and click Next – I’ve named mine “Daily TeamCity Backup”
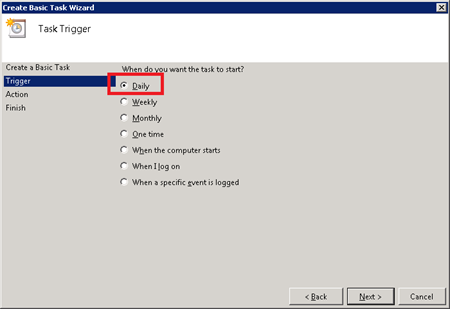
Now select how often you want your backup to run and click Next – I’ve set Daily as I want a regular backup.
Now set the time you want your backup to run and click Next – I’ve set mine to 12:00am so that i runs when nothing else is happening on the build server.

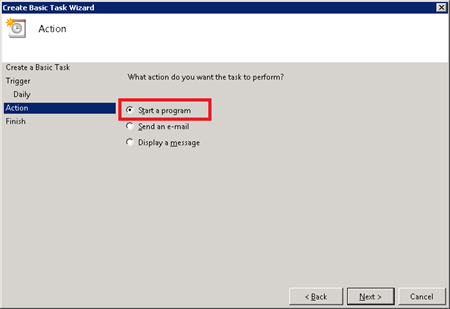
Now select that you want your task to Start a program and click Next
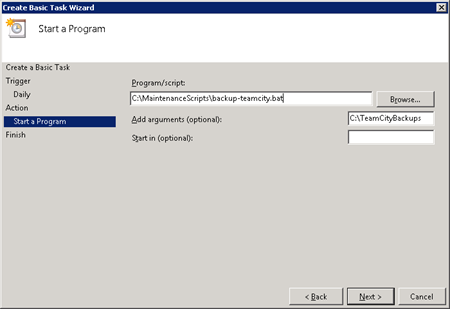
Enter the path to the batch file you saved above and enter the path you want the backup to be copied to as the only argument.
Click Next.
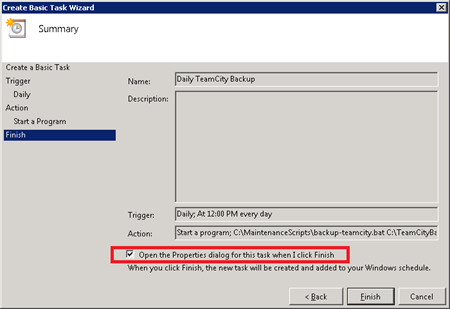
Tick the box marked “Open the Properties dialog for this task when I click Finish” and click Finish.
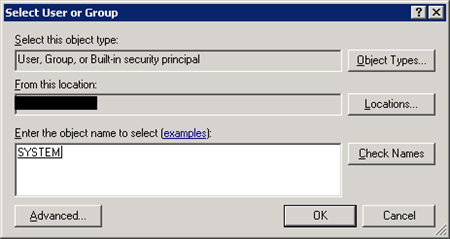
Select the radio button marked “Run whether user is logged on or not” and then click the button marked “Change User of Group” – This allows us to set what user the task runs as. As we are doing a number of things in our batch file that require Windows to be running as an elevated user we want ours to run as SYSTEM.
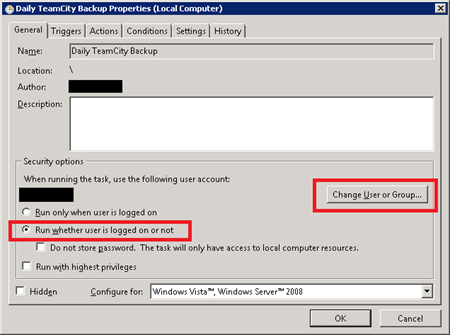
Enter the user SYSTEM and click ok and then OK again.
You’re done!
It’s worth testing the task once to make sure everything happens as it should by running it manually in the task scheduler settings page.
One more thing to note is that this will fill your server’s hard drive with backups every night. If you only want to keep a certain number you can use the this post in conjunction with the scripts in my post Set up scheduled log file cleaning for Windows Servers running IIS.
Comments